How to Make a Blog on WordPress in 2022
Posted on
March 23, 2019
by

in
Web Development
Do you want to create a blog but are confused about where to start?
Are you worried that it needs technical expertise and days of work?
What if we say otherwise?
What if we say you can make a blog in less than 20 minutes?
You know what, we’ll just show you the easiest way to make a blog, in only 4 steps,
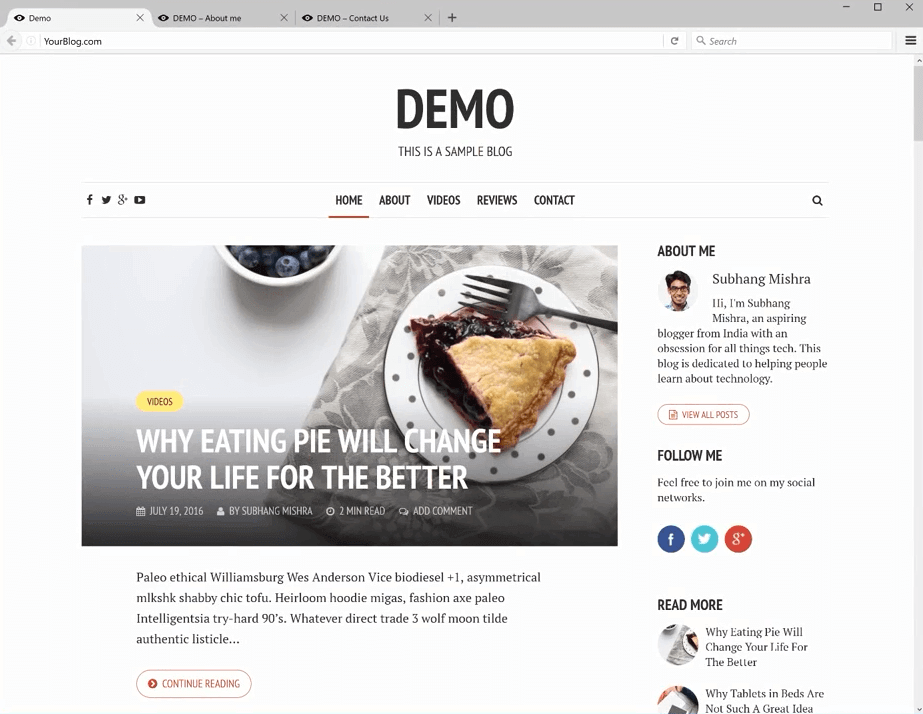
But before starting with the steps, let’s first take a look at everything we are going to create.
Yeah, a blog! Ultimately we are going to create a blog that’s going to look like this.
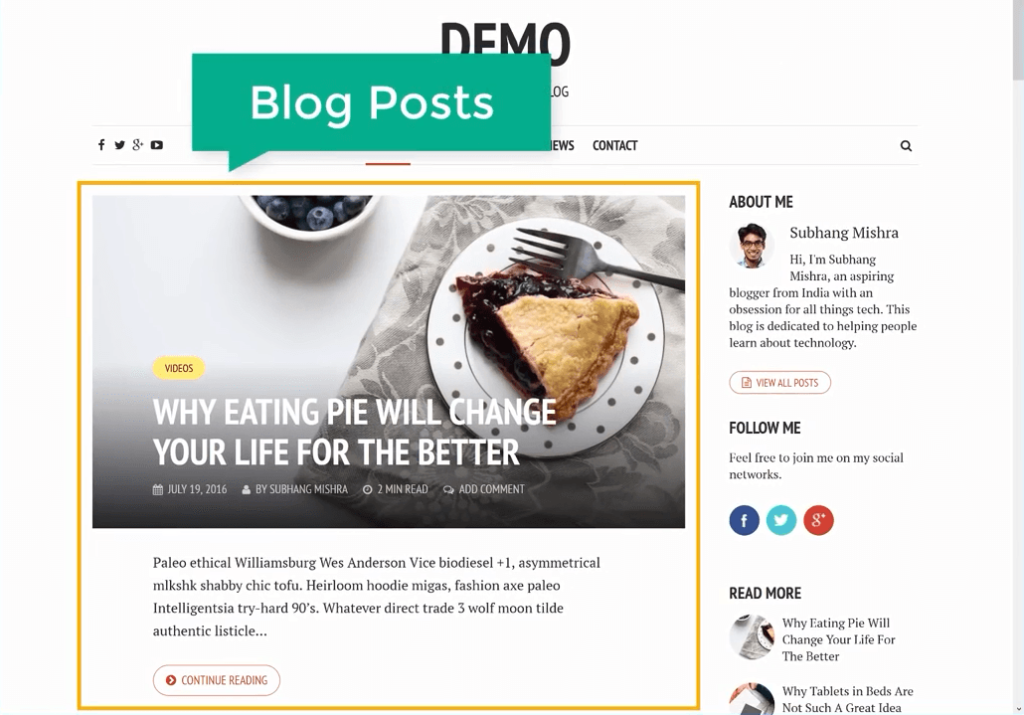
But first, we will create a website for our blog, with its own URL like ‘YourBlog.com’, with any domain name of your choice.

And after creating a website, we will begin to create different blog posts for the readers.
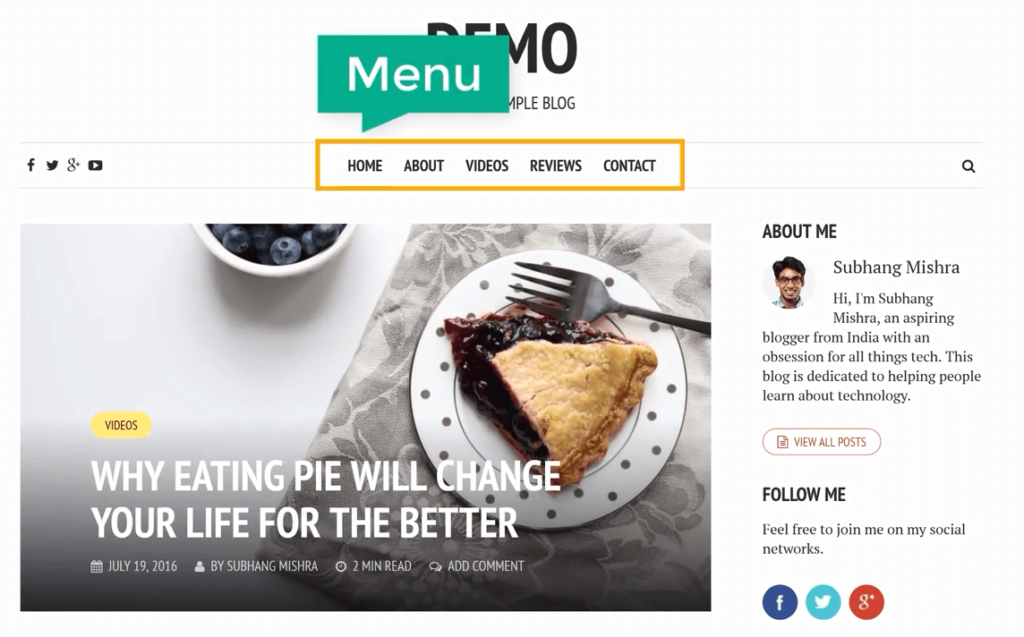
This comes with a set of menus that will help your readers easily navigate your blog.
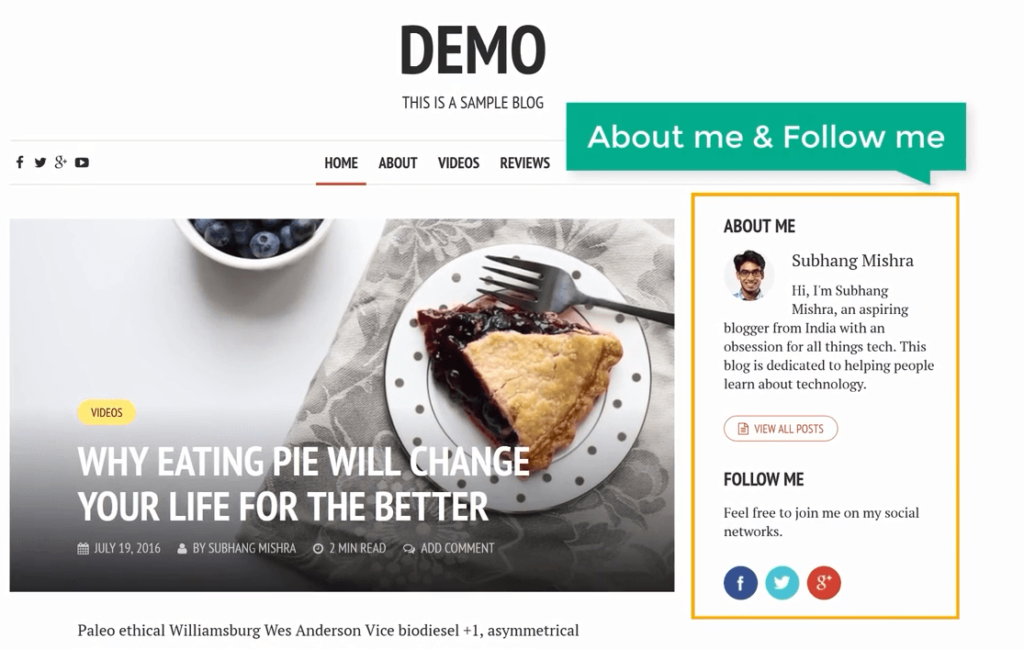
Then we will create an ‘About Me’ and a ‘Follow Me’ section, so your blog users can get to know you and follow your social media profiles.
We will also create a separate About Me page, that will help your readers know the person behind the blogs with detailed information about you.
Finally, we will create a Contact page so your blog readers can give you feedback and contact you with suggestions or questions.
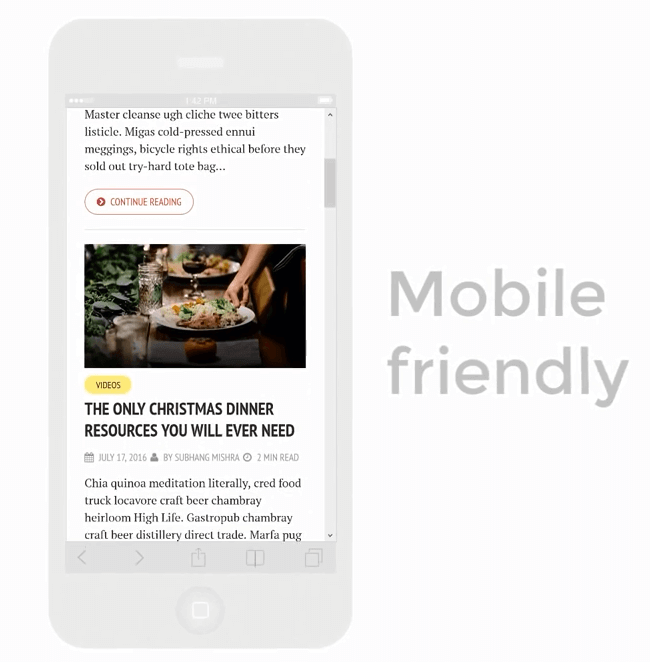
Considering how important it is for a website to be responsive, everything on the blog, every single blog post will be mobile-friendly and look perfect on any device you use.
Ok, let’s cut to the chase and start to create a blog with WordPress.
As promised, we are going to make a blog in only 4 steps,
This will be a pretty easy process, even for beginners. So join us and get yourself a well-tailored blog in the blink of an eye!
To make this process even more convenient for you, we have created a How to Make a Blog page that will guide you through the process.
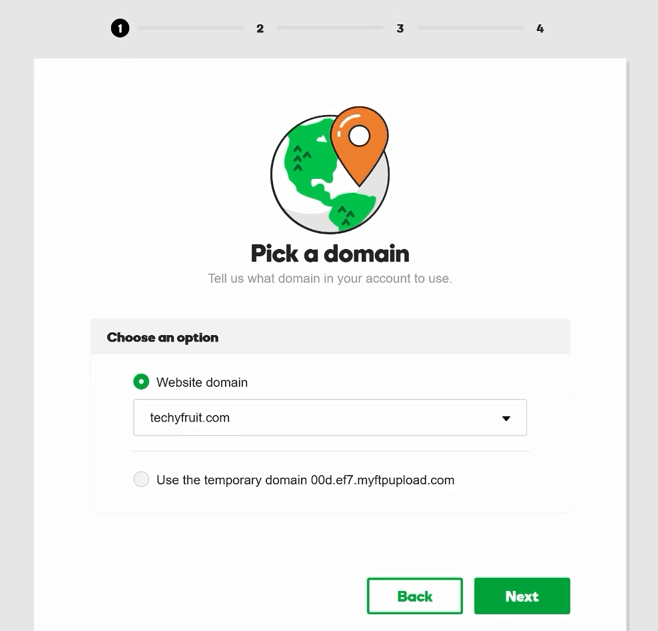
First things first, we need to choose a domain name for our blog. With domain names, think long-term and come up with a catchy and unique one.
Here, we have decided to go with ‘techyfruit.com’.
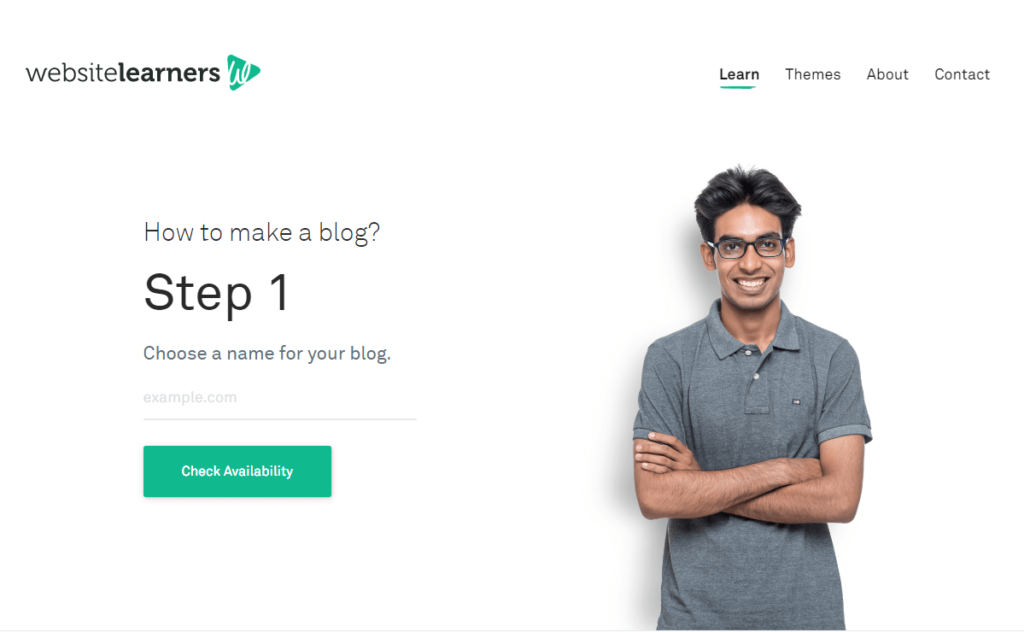
Once you decide on a website name, enter the name and click on Check Availability. Our system will check whether the name you have chosen is available and inform you about the availability status immediately.
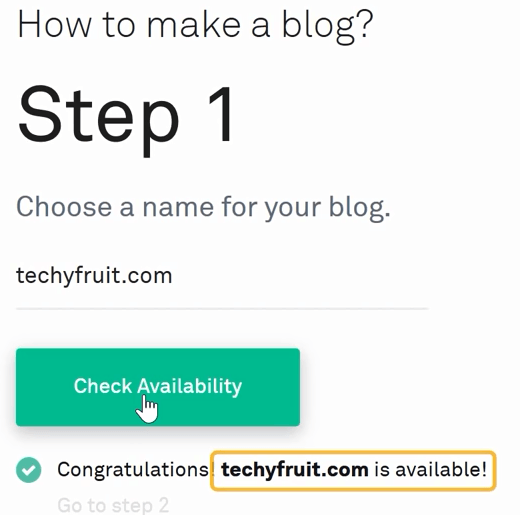
Luckily, ‘techyfruit.com’ is available, so we can go to the next step!
The next step is to get Domain name and Hosting for our website.
A domain is the name of the website (‘techyfruit’) while hosting is where your website’s files are stored. With the different types of web hosting available in the market, it may get quite confusing for beginners.
But don’t you worry, because we got your back! On our How to Make a Blog page, scroll down to Step 2.
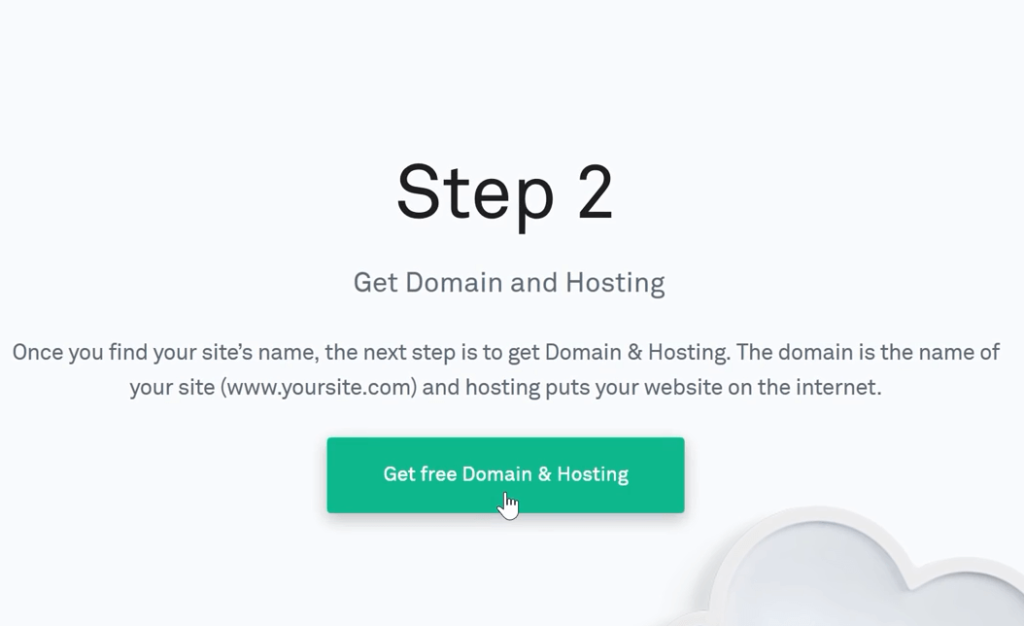
Here, click Get free Domain & Hosting. This will take you to GoDaddy.com.
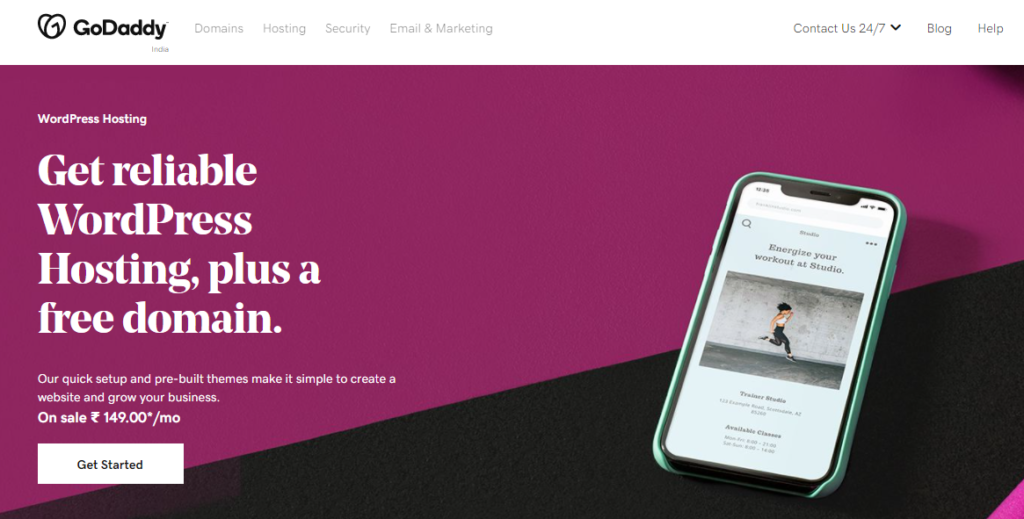
After carefully considering all the hosting factors, we have decided to go with GoDaddy. With a variety of plans that are suitable for everyone, and a free domain, there is no wonder why GoDaddy is the biggest name in the hosting scene.
Now that you are in GoDaddy’s site, click Get Started to get the Hosting and domain for our website.
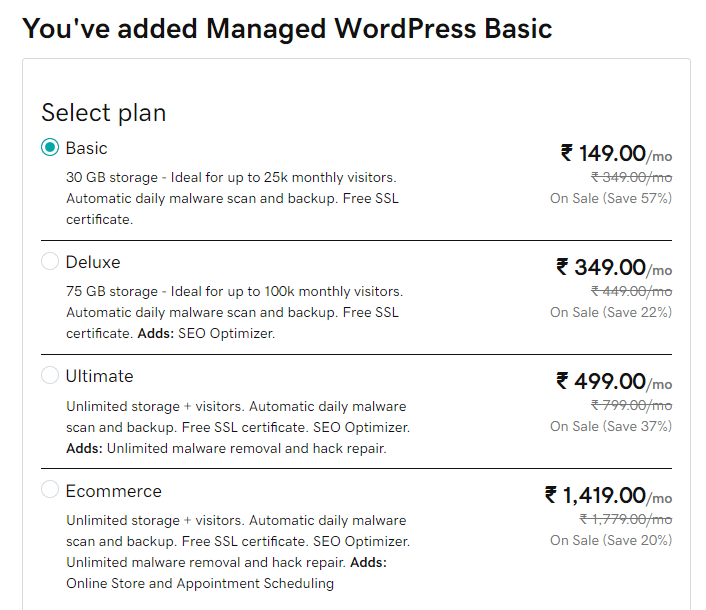
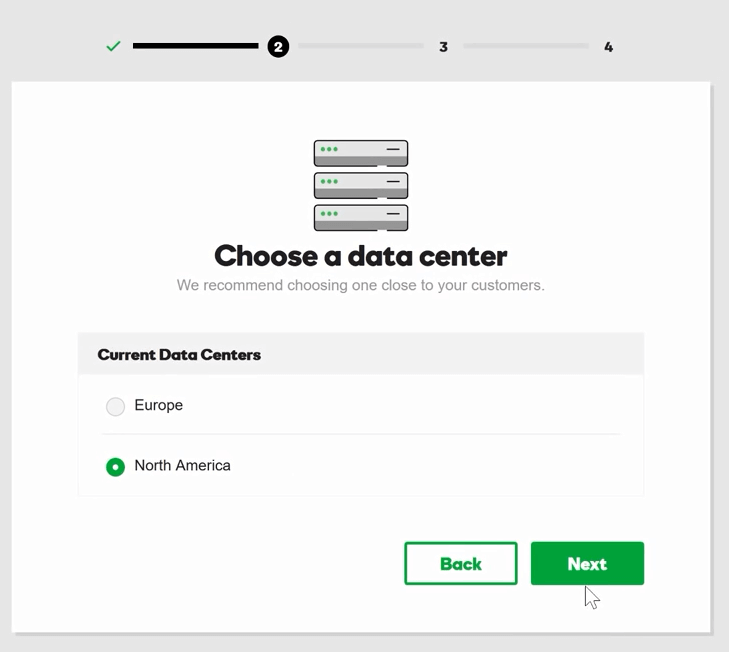
Now you will see the various hosting plans provided by GoDaddy. You can choose the plan that well suits your needs.
As we are just starting out to create a blog, we recommend using the ‘Basic’ plan because it will be apt for all types of blogs.
Once you have chosen the Hosting plan, scroll down to find the Billing cycle. You can select the term length of your choice and proceed to scroll down.

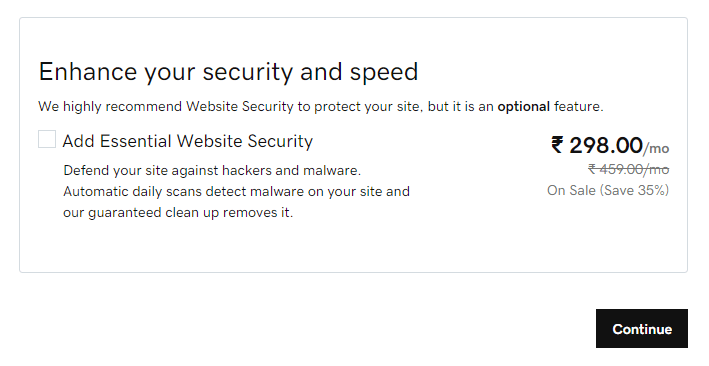
Once you have chosen the Billing cycle, you can scroll down to find Essential Website Security, an optional add-on provided by GoDaddy. You can choose to include if you need that extra security for your website.
Then, click Continue.
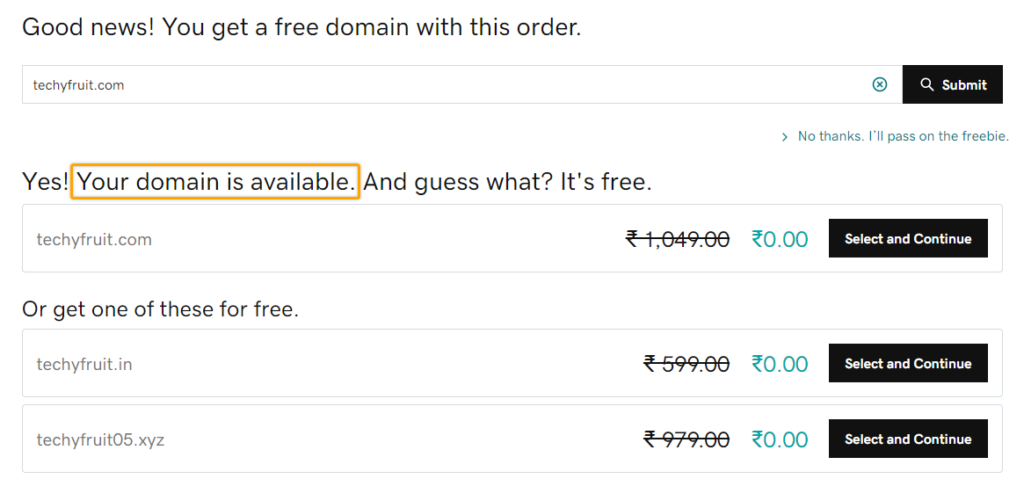
Enter your blog’s domain name here and click Submit. In this example, we are entering ‘techyfruit.com’, the name we’ve chosen for our blog.

Looks like our domain is up for grabs! So, click Select and Continue to proceed.
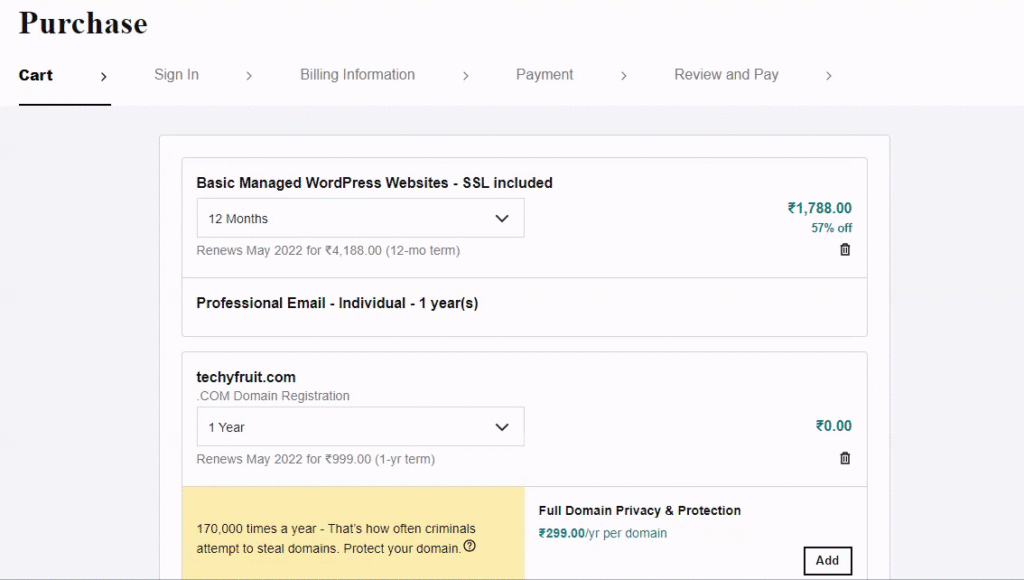
Here, you can review the hosting plan and domain. Once it’s done, click Checkout.
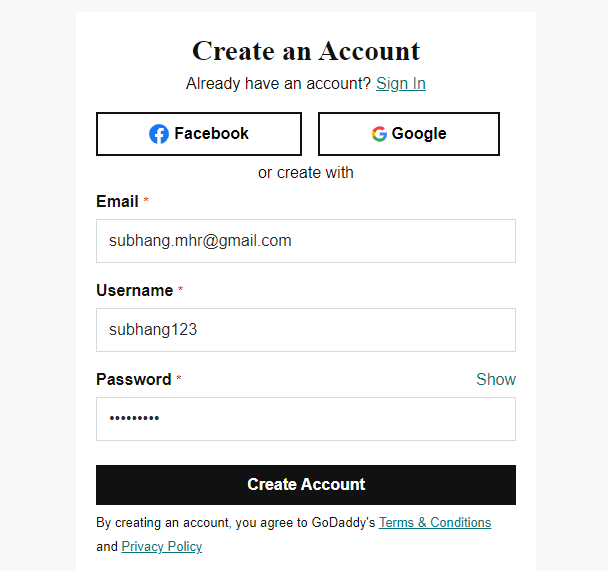
Now all we need to do is create an account on GoDaddy. Let’s do this!
Enter your Email, Username, and password. And click Create Account.
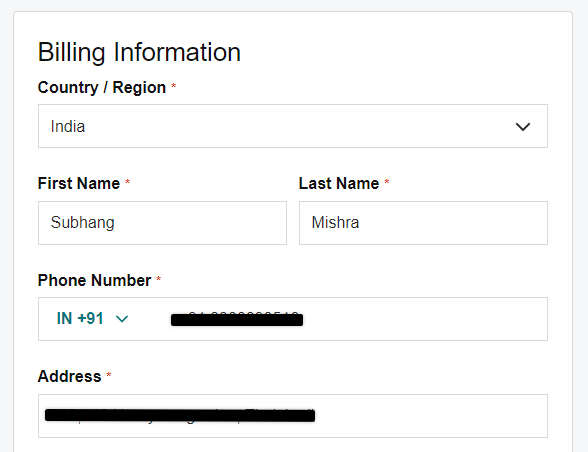
In the Billing Information section, enter all your details like Name, Phone Number, Address, and even Postal code. Once all the details are entered, click Save.
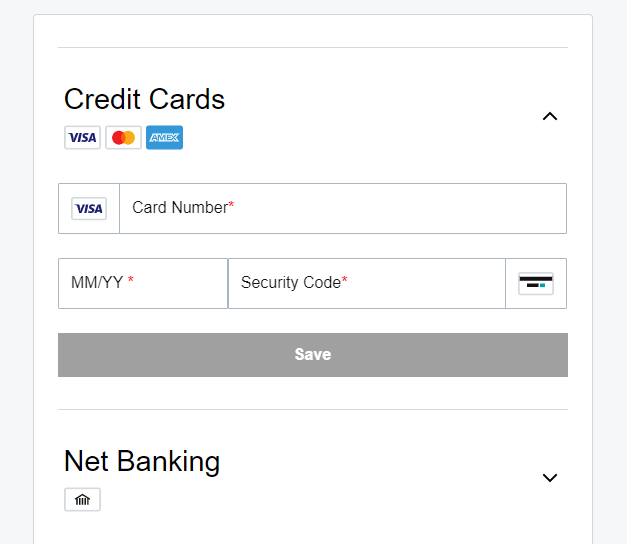
Then, in the Payment section, you can include the Credit card details to complete the payment. Or you can choose to use Net banking and other options for the payment. Click Save.
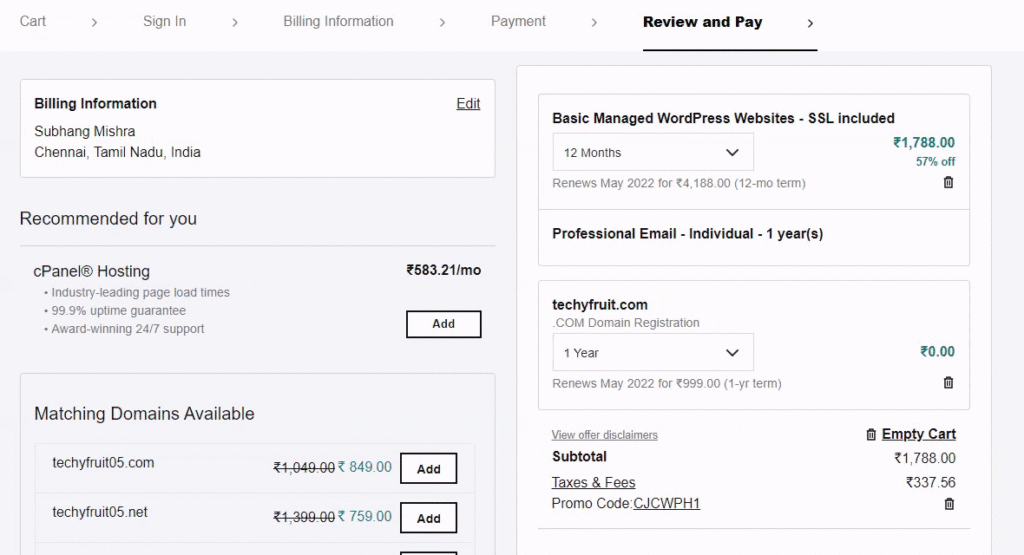
Now to the final section, Review and Pay. Here, you can review the hosting, domain, payment, and billing information as well.
Once verified, click Complete Purchase to complete the domain and hosting purchase.
Congratulations!! We have now purchased the domain and hosting for our website! We’re only a few steps away from having our very own blog!
We have successfully purchased Domain and Hosting for our website, we just need to Install WordPress and launch our website.
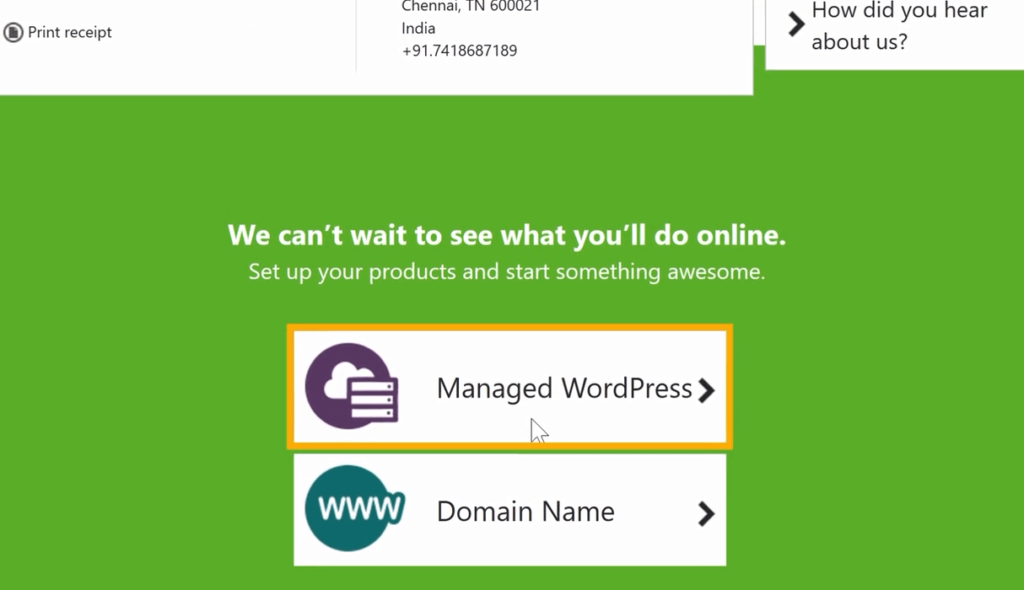
Now to Install WordPress on our website, let’s continue by clicking Managed WordPress and then Next.
Click Next again. Here, we can create a username and password for WordPress.
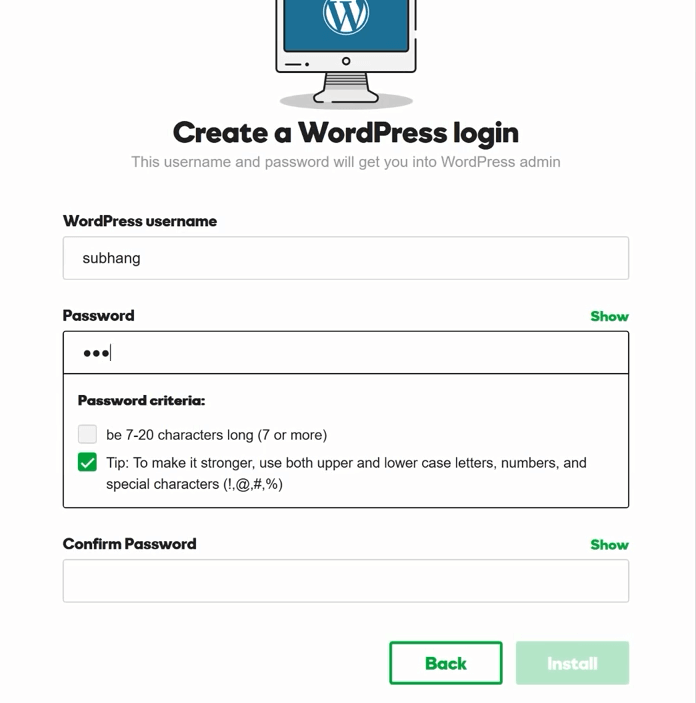
This will be your login for your blog. Click Install and let the system do its job while you have a cup of tea.
Just kidding, it gets done in no time that you won’t even notice!
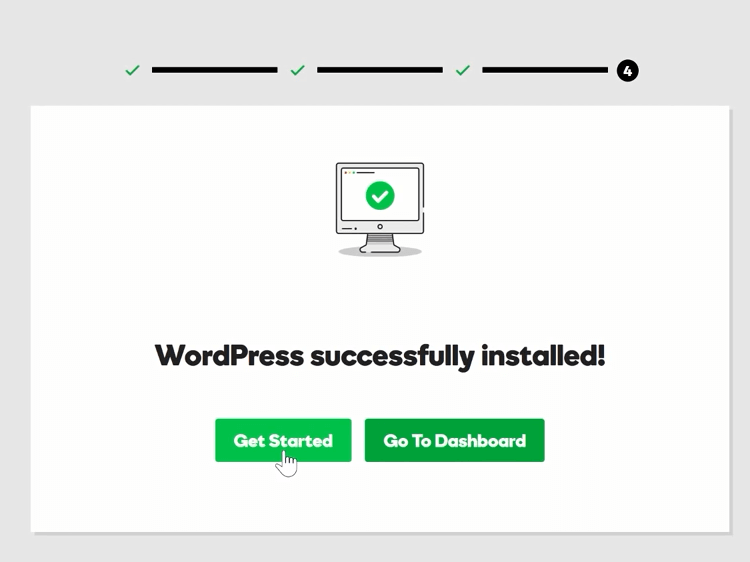
So we have installed WordPress on our website and are a step closer to creating our blog! Click Get Started.
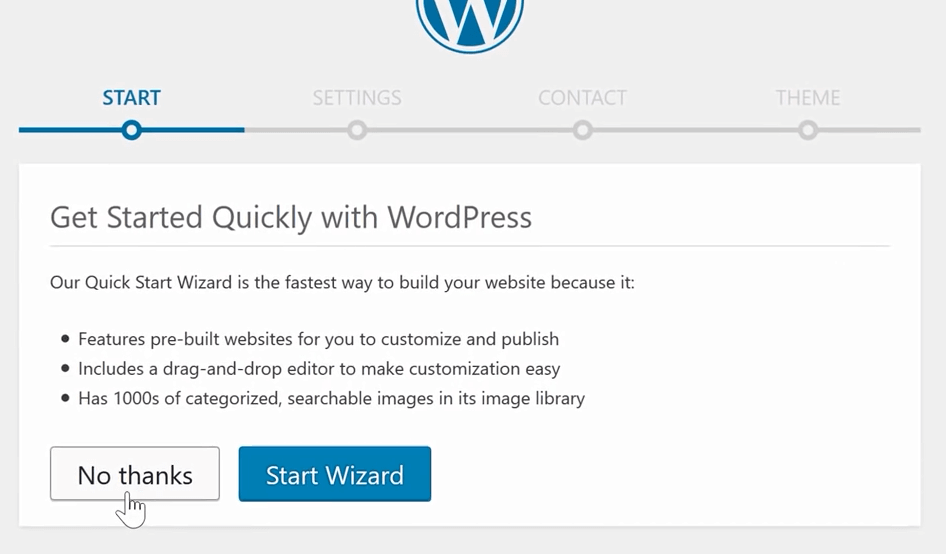
Click No thanks, then Ok. This will take you to the next step of the WordPress configuration.
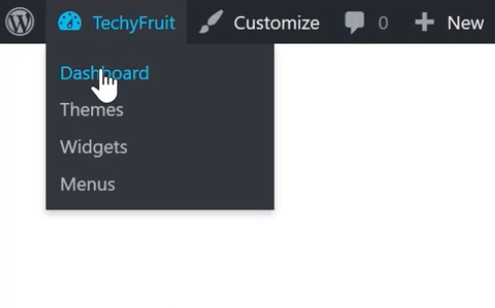
This is the WordPress dashboard. It will serve as your control center, where you can tune in to your blog and customize it according to your needs.
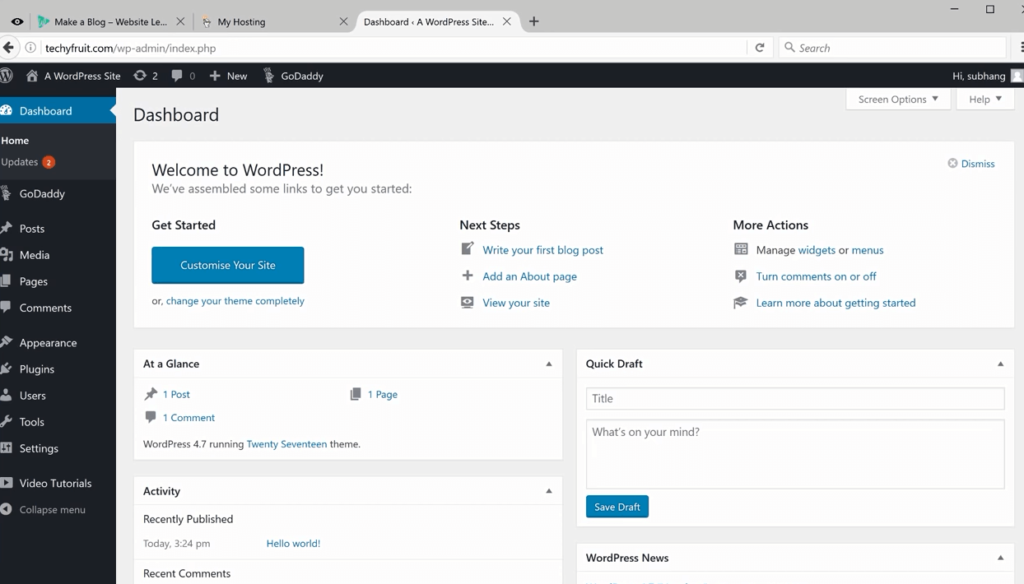
If you can see this dashboard, it means your blog is live now!
Anyway, let’s go check for ourselves by entering the name in your browser’s address field. So, we are going to enter ‘techyfruit.com’ and make sure everything looks good.
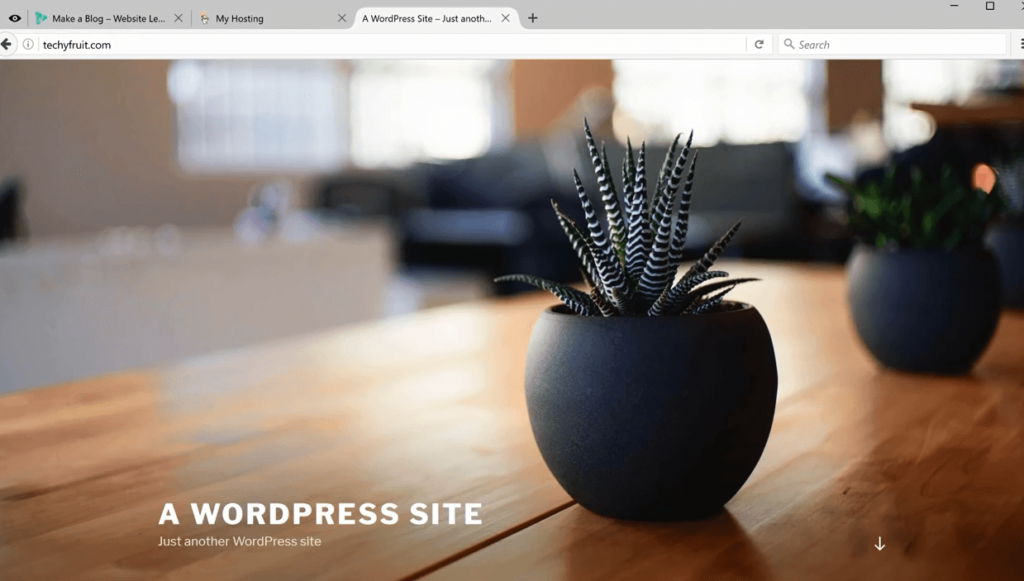
Well, that’s pretty decent for a beginner. But right now our website has the default WordPress look, which is kind of boring, to be honest. So, let’s spice things up, shall we?
Let’s install a WordPress theme that entirely changes and dictates the look and feel of our website.
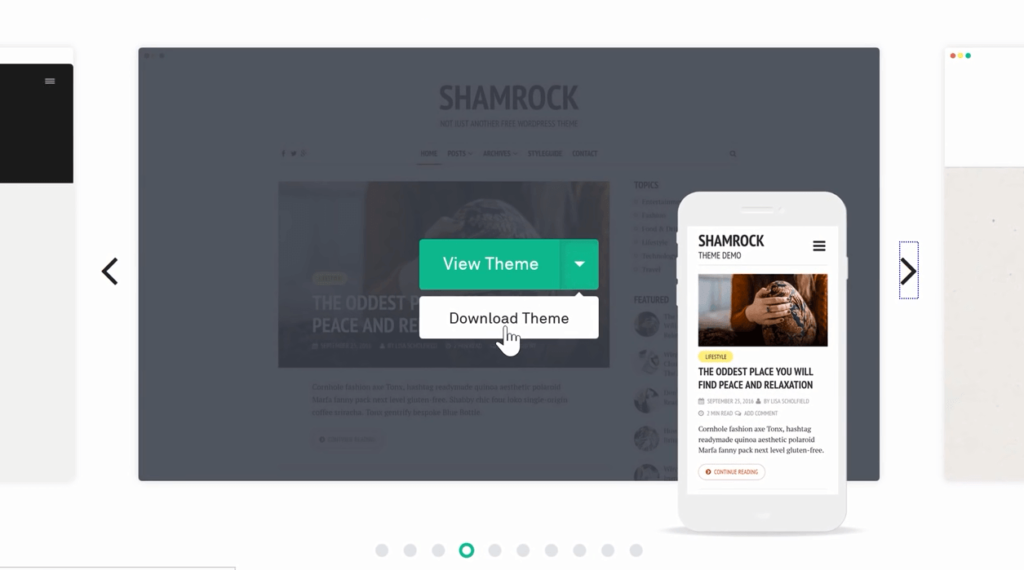
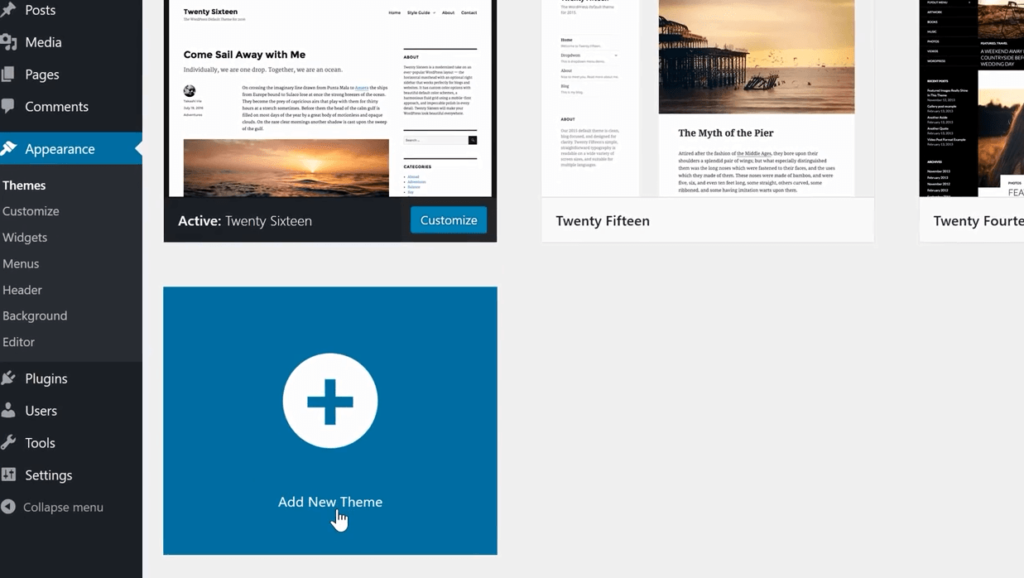
It is pretty simple to choose and Install a Theme on our website. To begin with, let’s go back to our How to Make a Blog page and scroll down to ‘Step 3’.
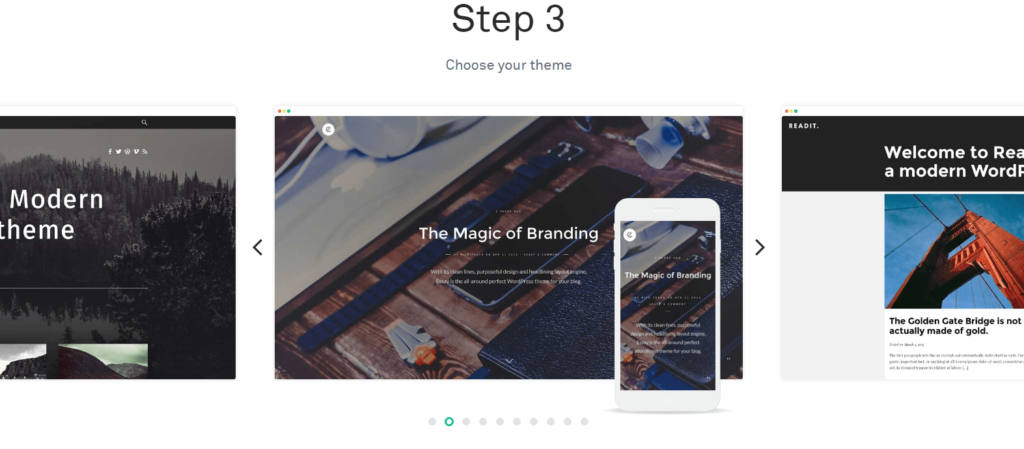
In the list of various themes, choose the theme you like and download it by clicking on the arrow.
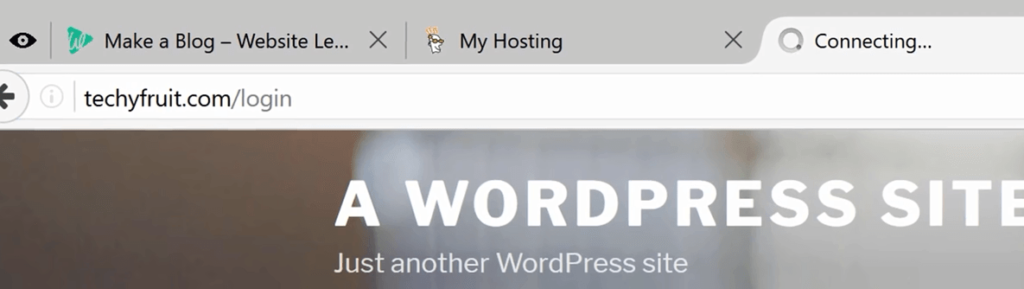
Now, to add the downloaded theme to our website, we’ll have to log in to our blog.
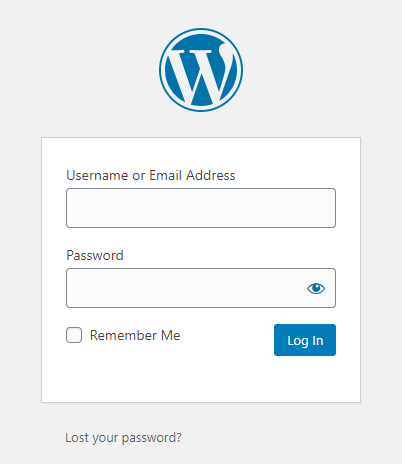
So, add ‘/login’ to the end of the blog address. This will take you to the dashboard login page.
Enter your username and password, and then click Log In.
This will take you right to the WordPress dashboard. In the dashboard, choose Appearance and Themes. This is where you can add new themes and customize the ones you already have.
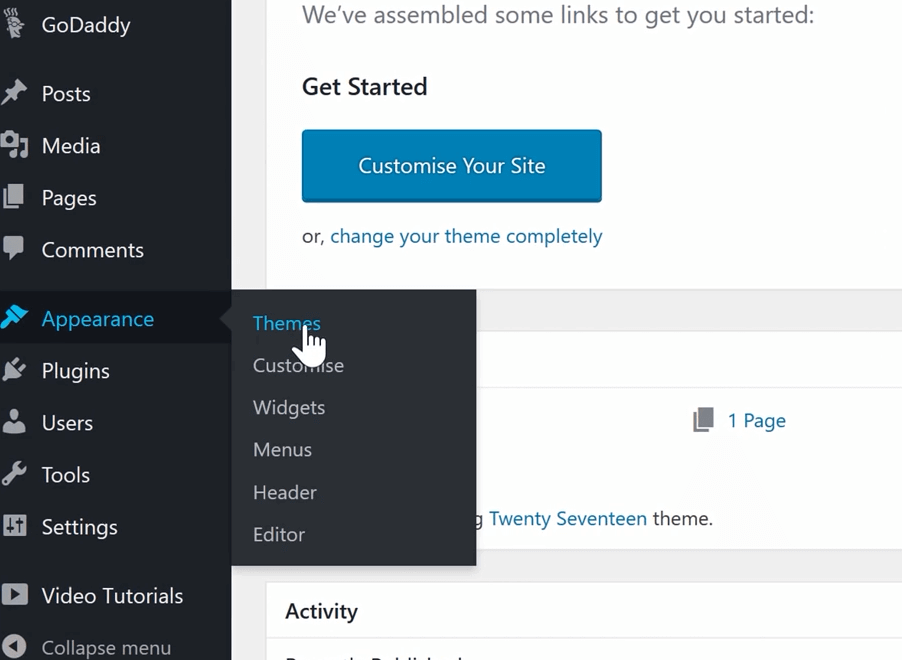
As we already have our Theme downloaded, click Add New Theme, then Upload Theme.
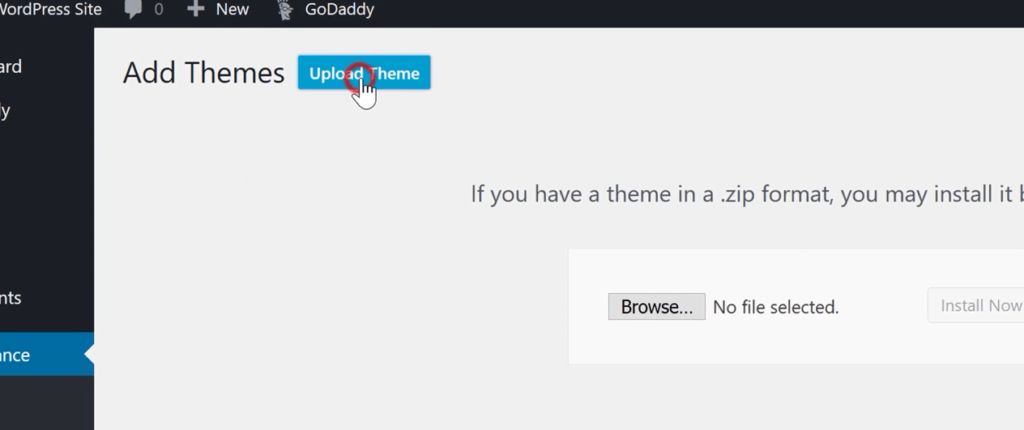
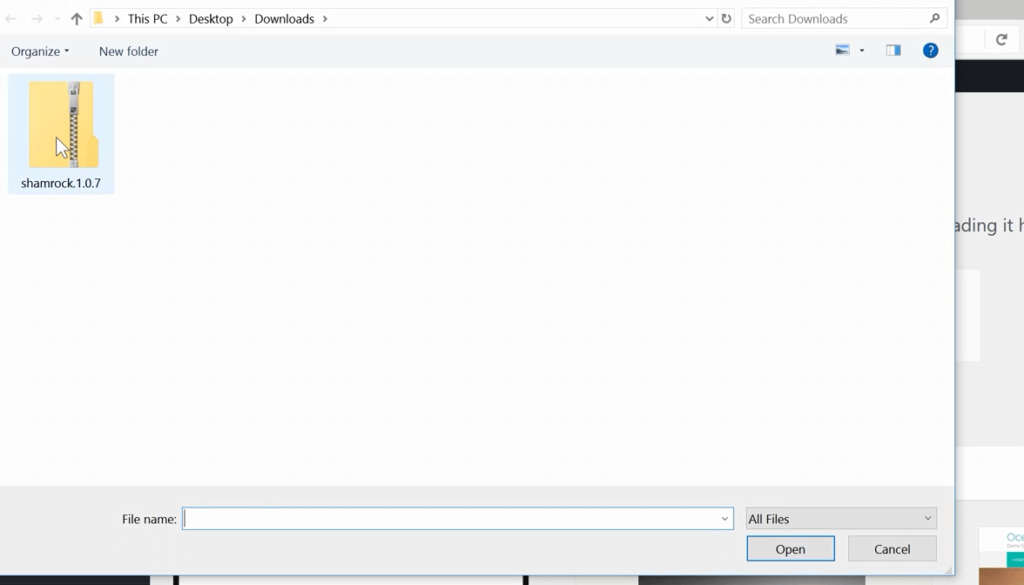
Browse through your computer and select the theme we just downloaded.
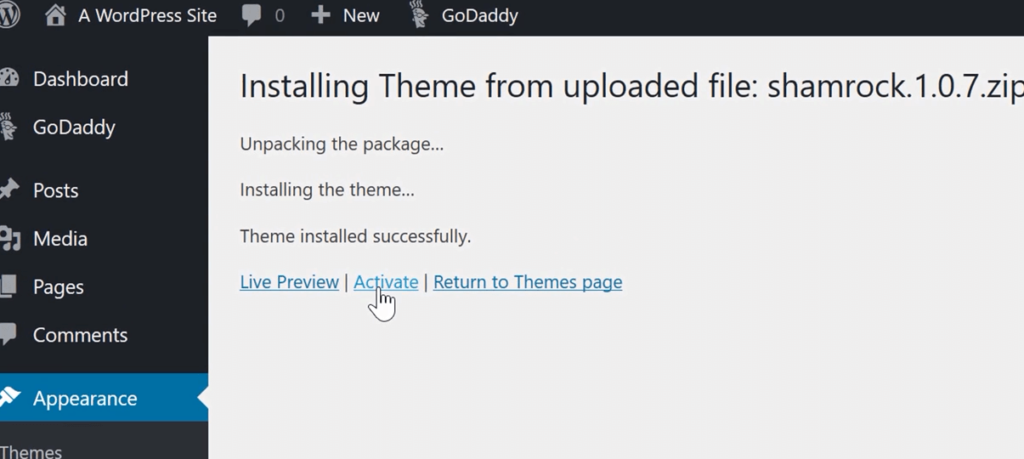
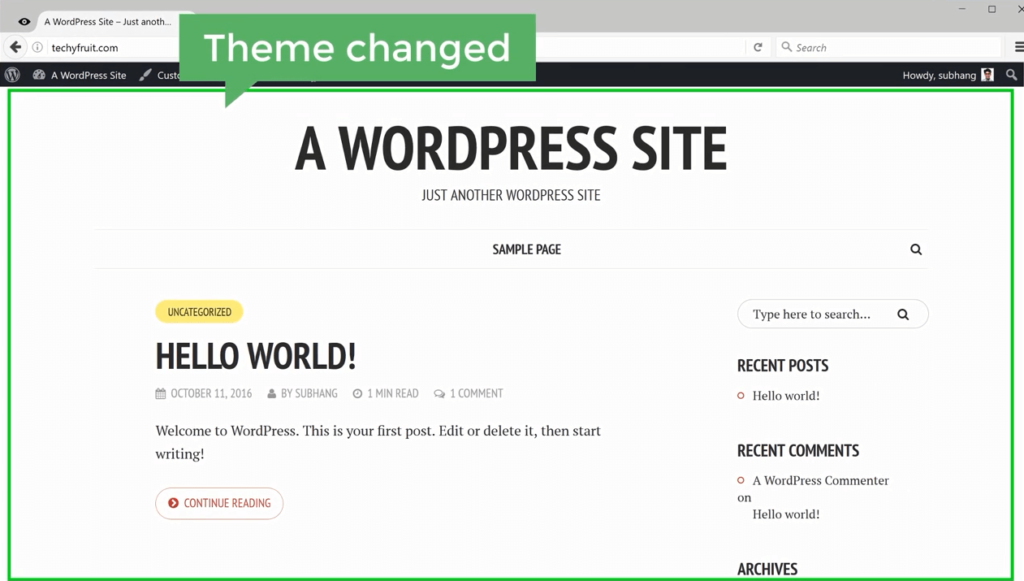
Install the Theme and click Activate to use it on your blog.
Now, open your website and you’ll see the theme has been changed successfully. Our website has a new look now, different from the default one, something we can work with.
Now, you can proceed to the next step and add content to your blog.
We have launched and customized our website. So, it’s time to add our first blog post. Blog posts are basically articles that you post on your website.
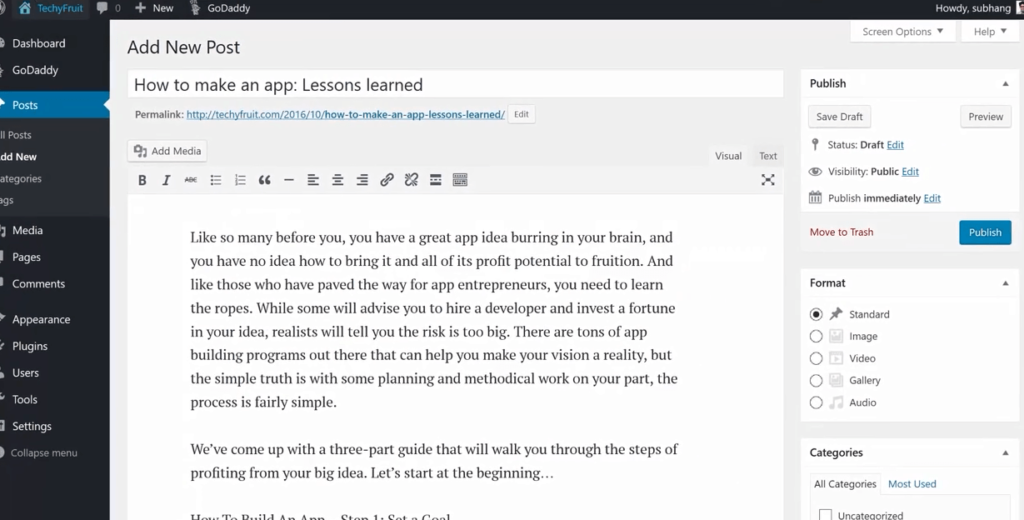
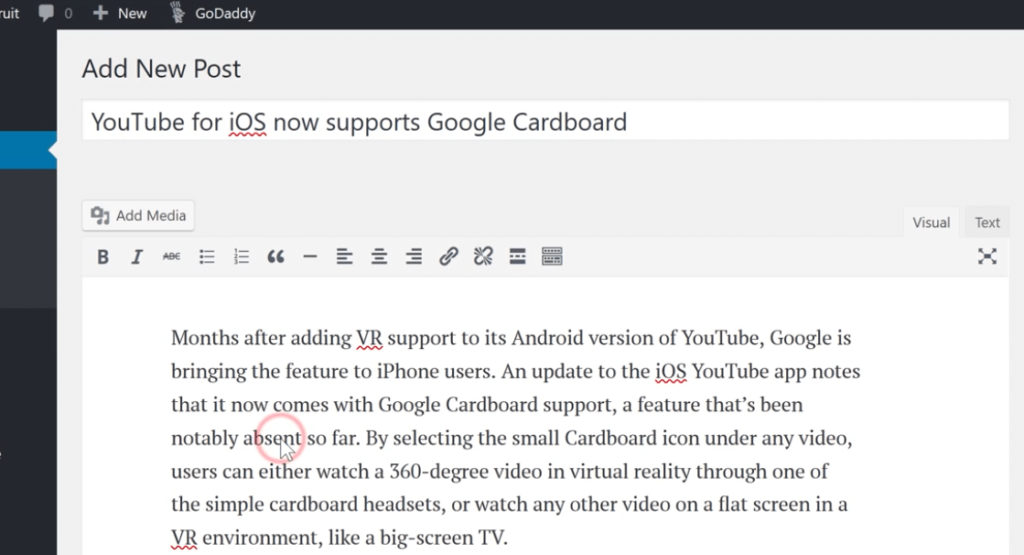
You can add your first post by clicking +New and Post in the admin bar of your newly created website.

In this page, you can Enter the title and content of your first blog post.
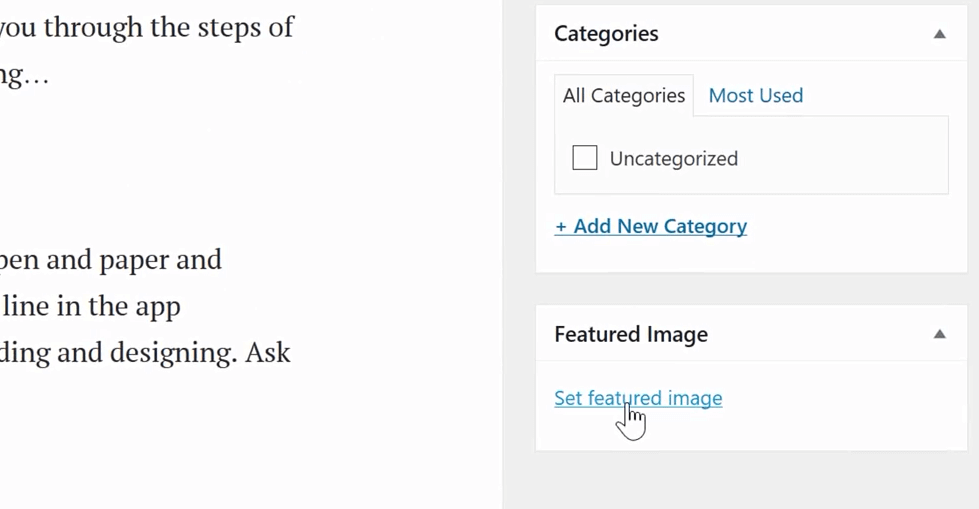
Now let’s add a featured image to the post. This is the image your visitors will see along with the post title and content when they read the article or see it on the home page.
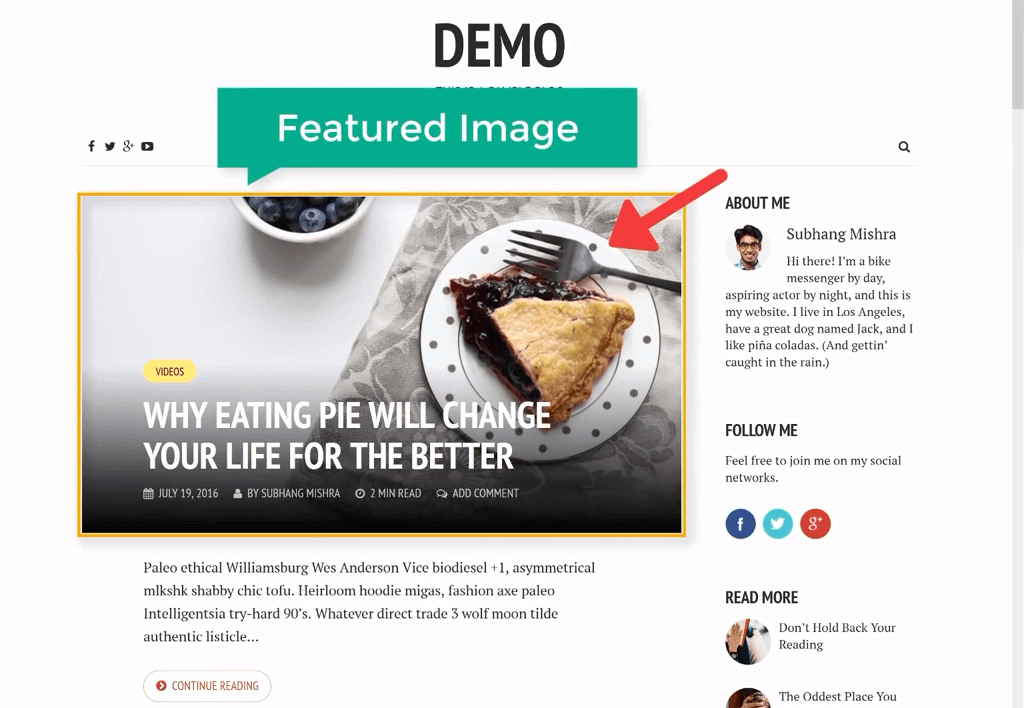
Adding a featured image is pretty straightforward in the WordPress dashboard.
Just click Set Featured Image in the right sidebar under the Featured Image section, and select the image you want to use in the post.
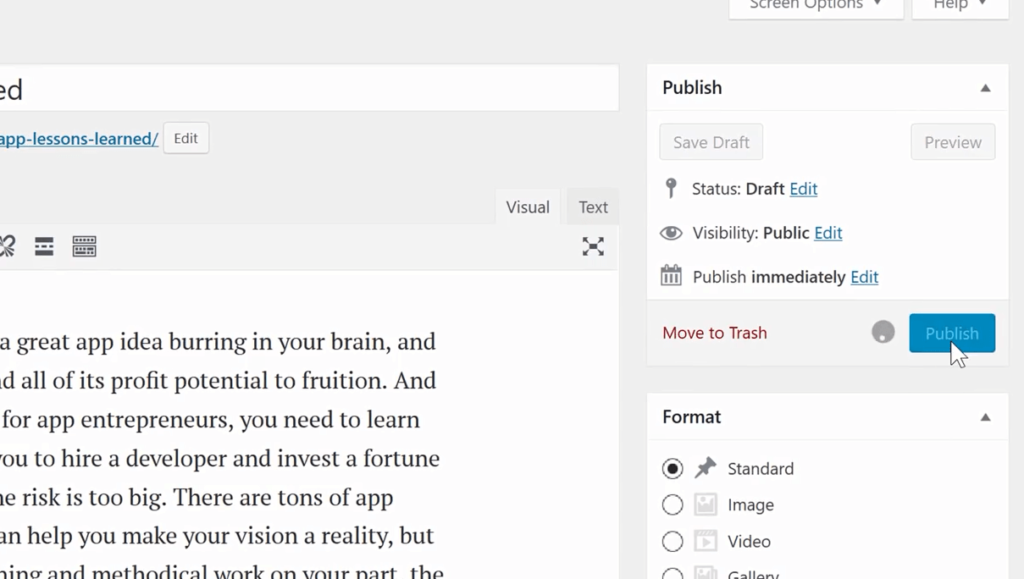
Publish the post, then click ‘View Post’ to see how it looks now.
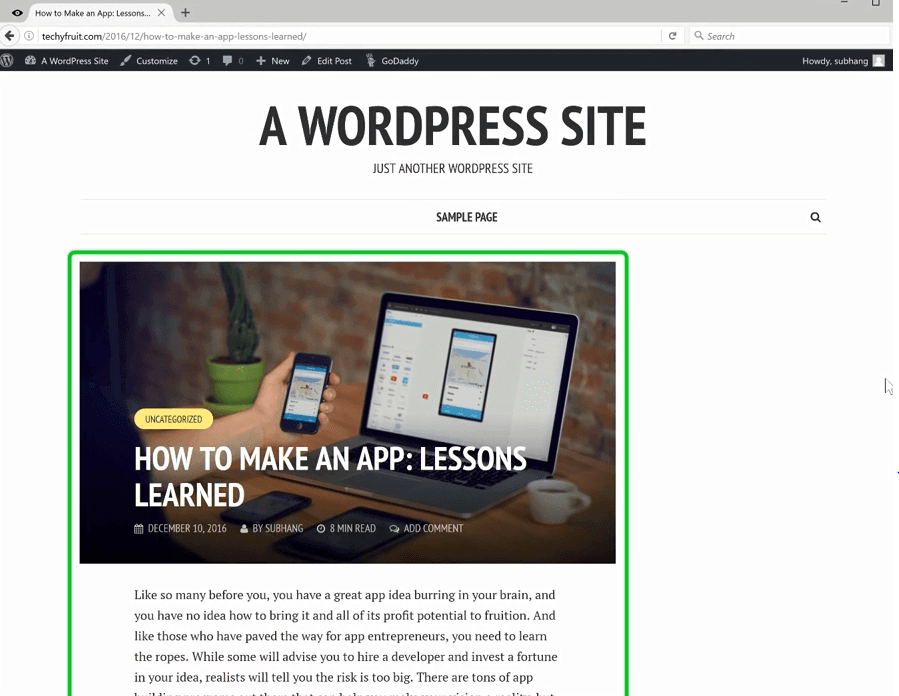
And this is how you’ll post articles to your blog. In just a few clicks, your content will go live! Isn’t that too simple to be true?
Though we have added a blog post on our website, we still have got some work to do. Don’t you think we need to stand out from the blogs you usually find on the Internet?
That is why we are going to add and customize 11 more blog elements that will set you apart from your competitors. These elements include Blog title, Menu, and even Social media links.
As you can see, the title of your blog is a default WordPress website name. Let’s change it!
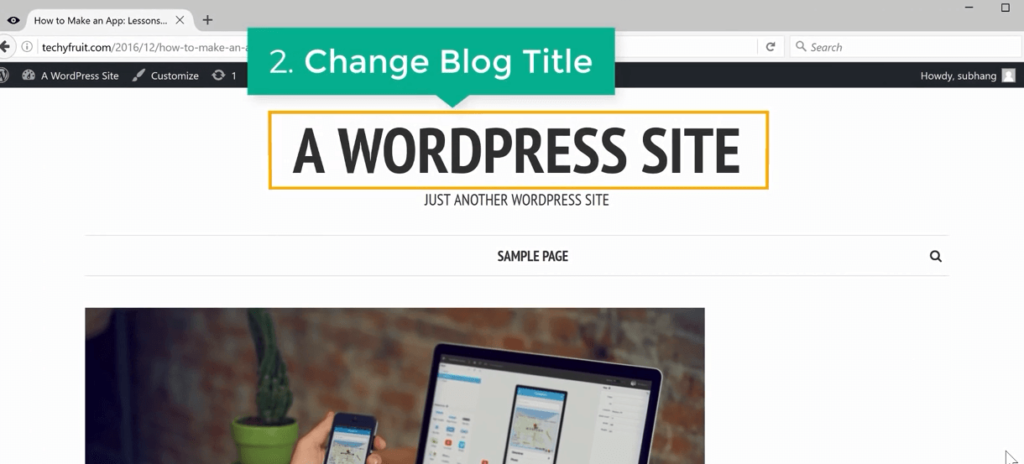
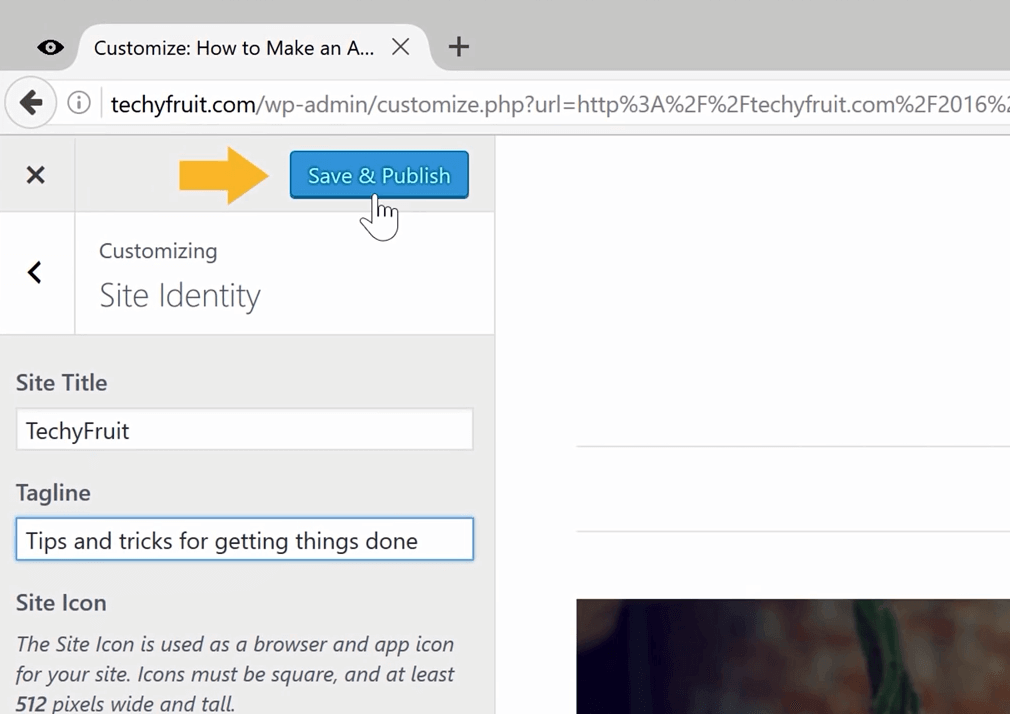
Change it easily by clicking Customize in the admin bar at the top of the page, then clicking Site Identity.

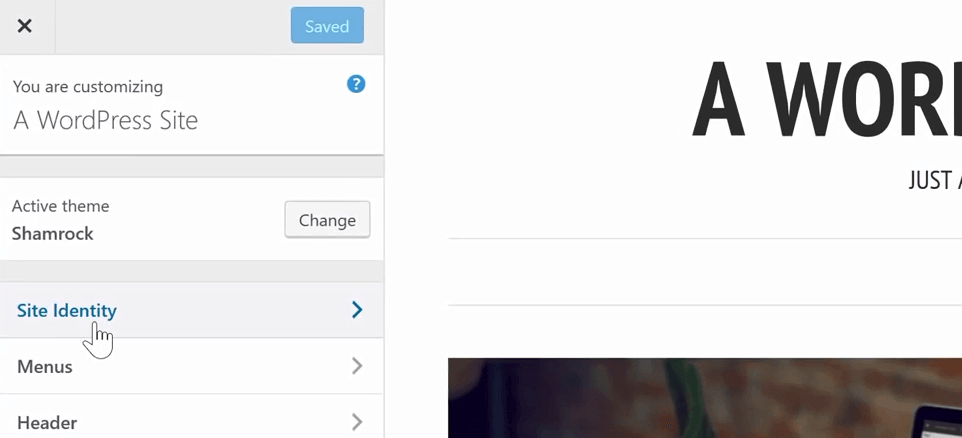
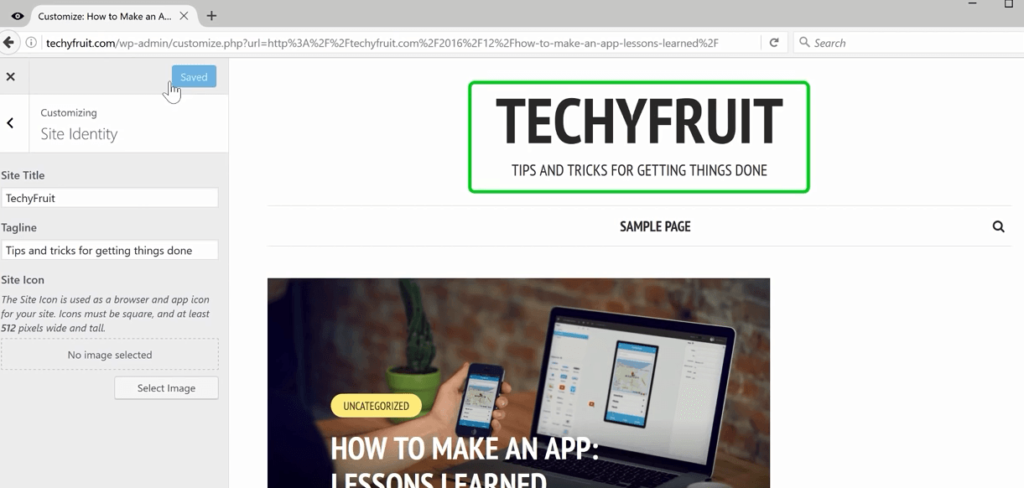
Insert the name of your blog along with a tagline, then click Save & Publish to apply the changes.
Well, our title looks way more attractive now!
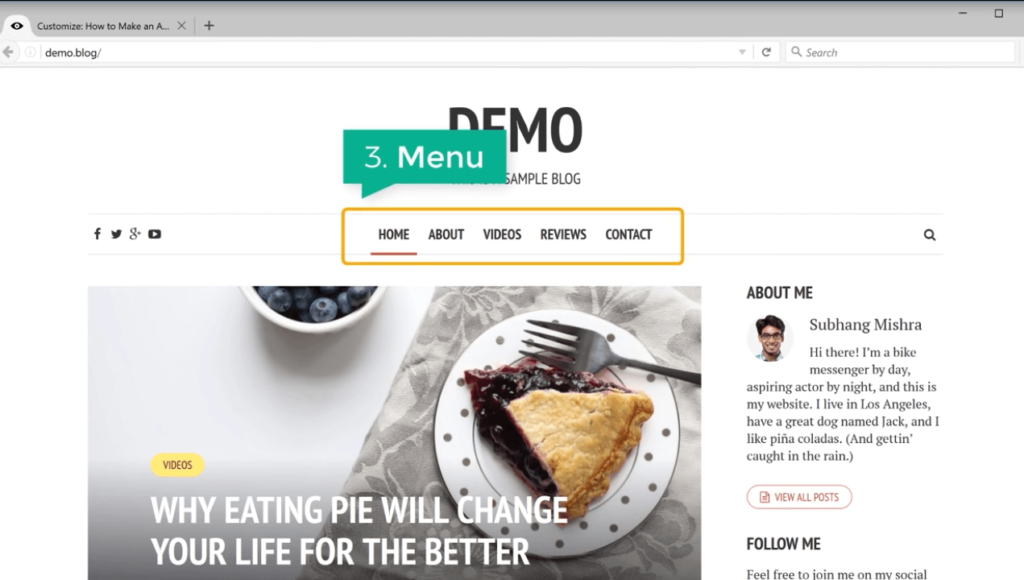
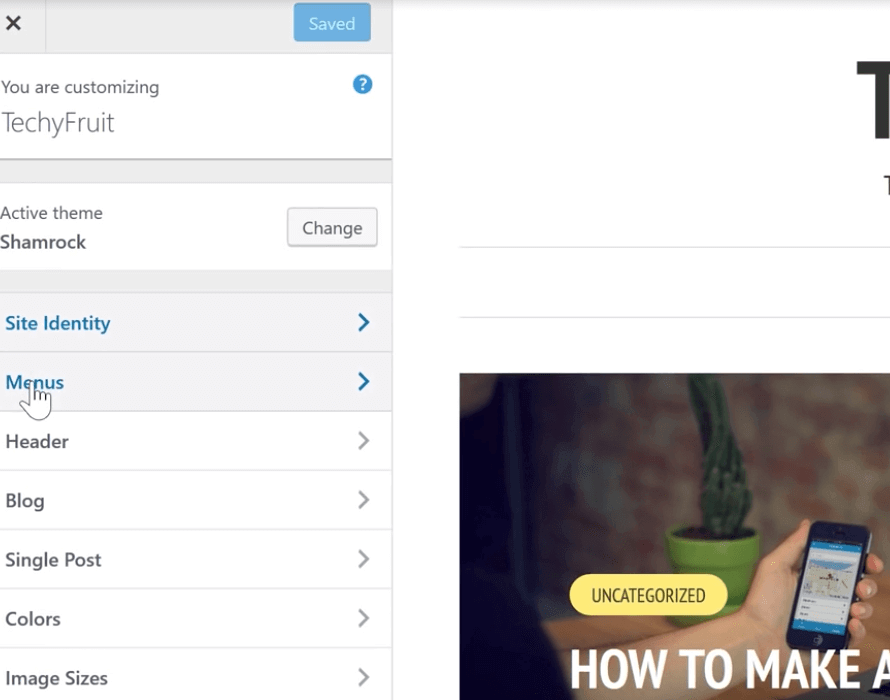
Now that our blog title is set, let’s create a top menu.
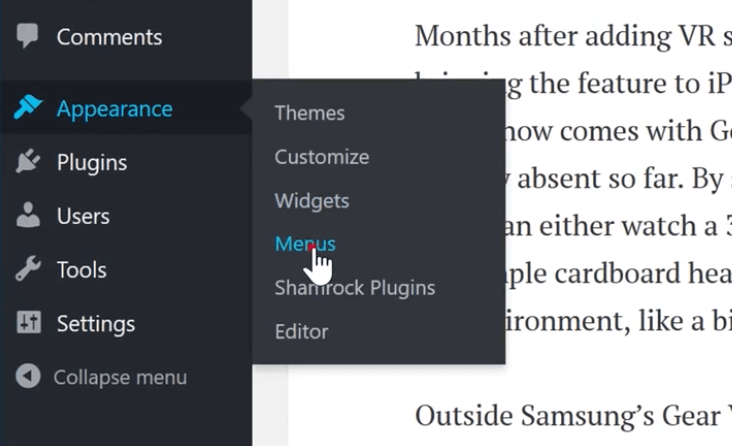
Go back to your blog and click Customize again. This time, select Menus.
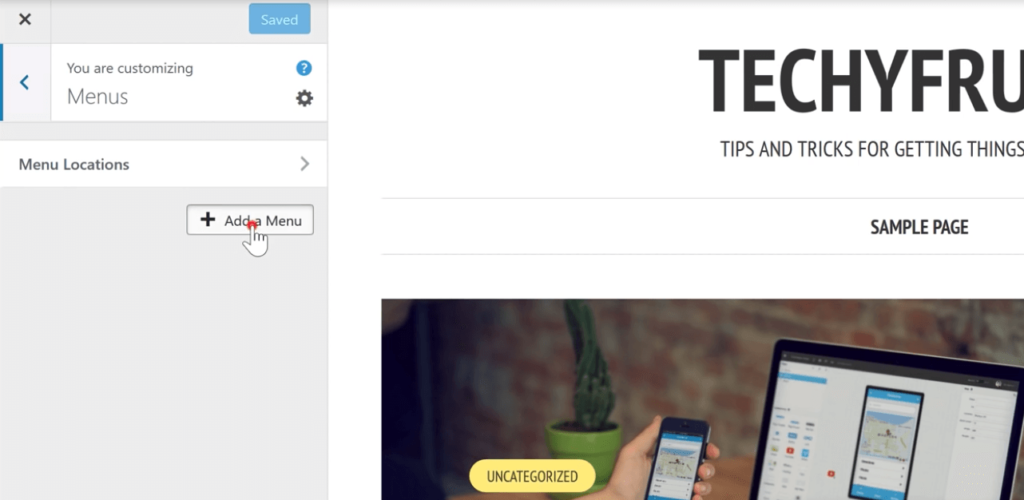
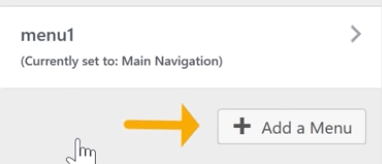
Now click Add a Menu and give it a name. I will name mine ‘menu1’. Once you choose a name, click Create Menu.
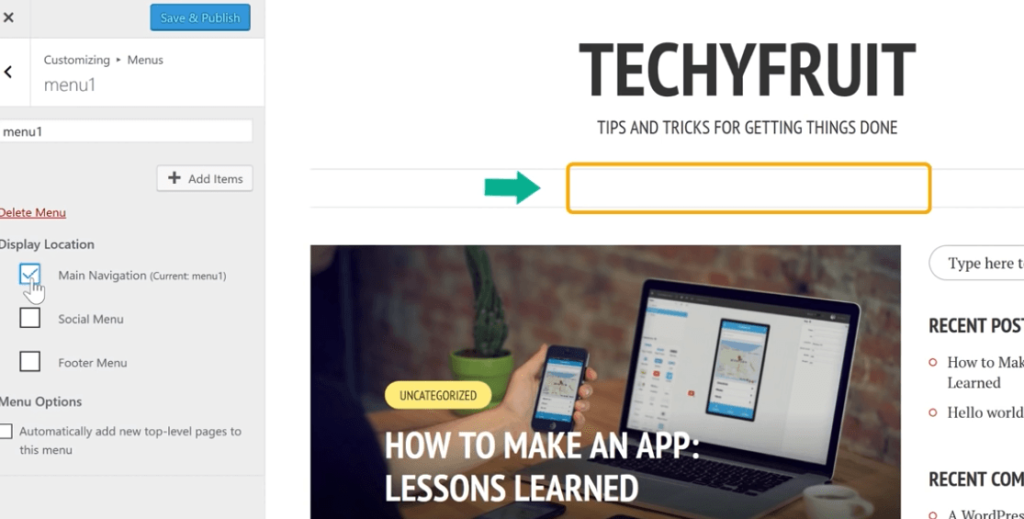
Now you’ll have to choose where you want your menu to appear on the blog. I’ll select Main Navigation. This will make the menu appear at the top.
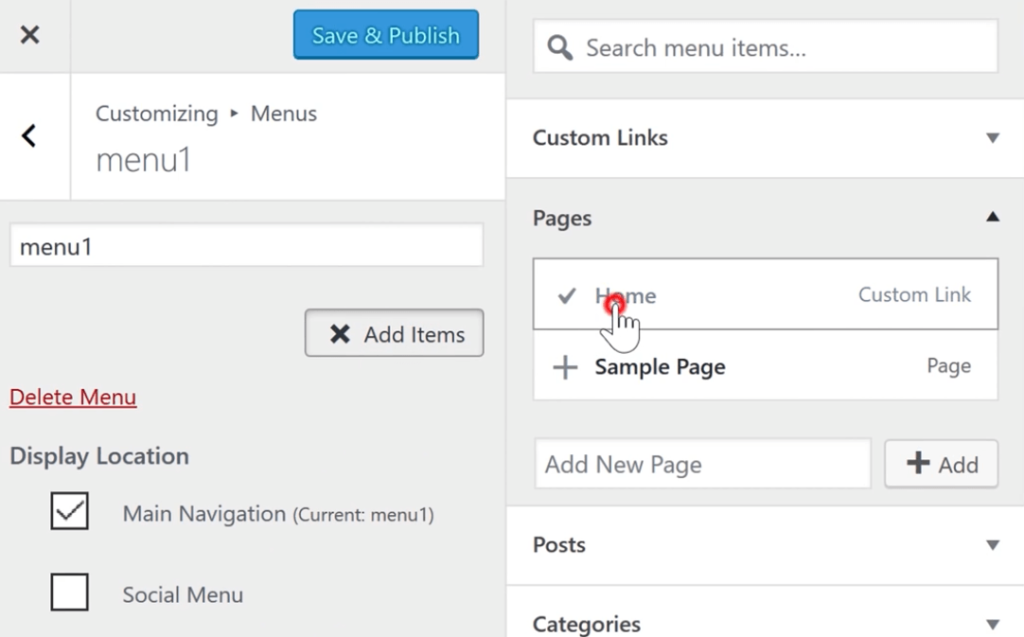
Now we need to add some links to the menu. Click Add Items and select Home. This will add the home page to the menu.
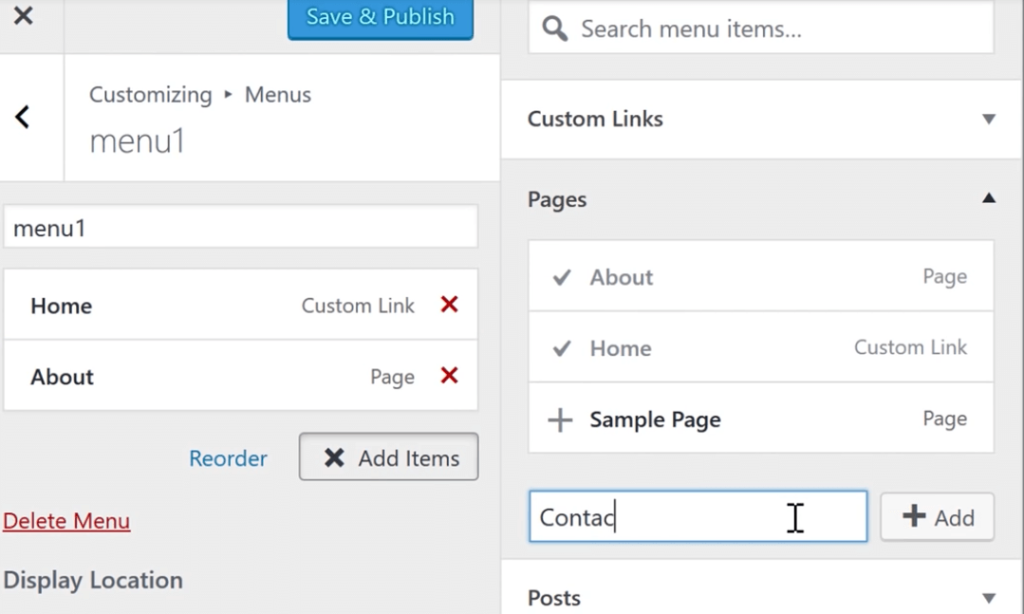
Now let’s add a new page and call it About. This will take your blog user to the About page, which we will create later.
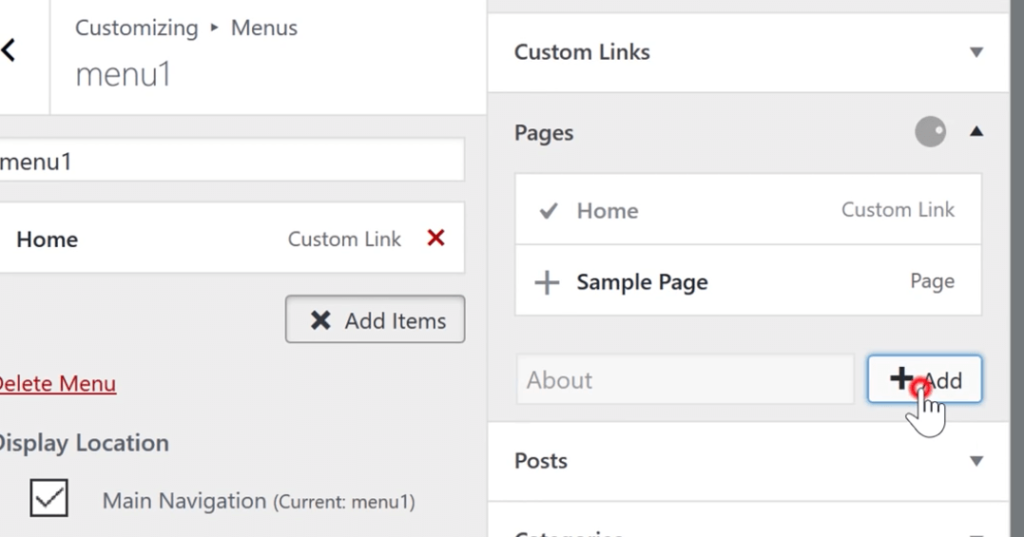
Next, let’s add a page called Contact. This will take users to the page where they can contact you and get feedback. We will create this page later too.
Finally, click Save & Publish. We’ve now created a menu that will help users easily navigate through the blog!

It’s time to add category pages to the menu.
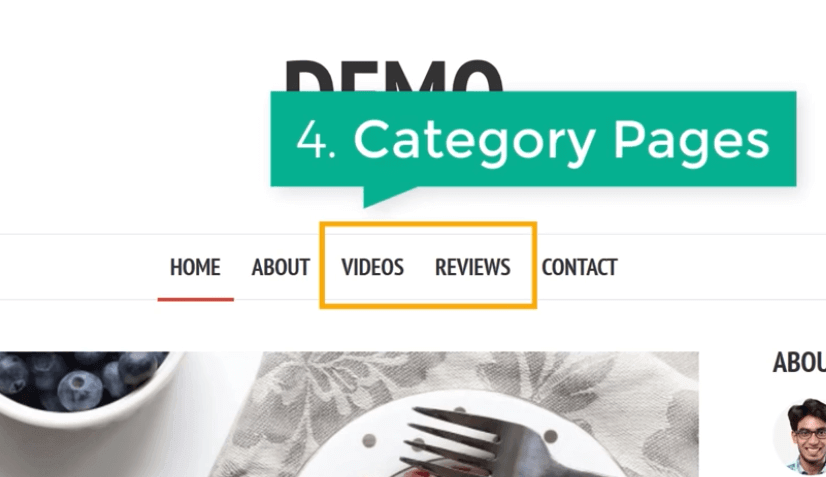
What are category pages?
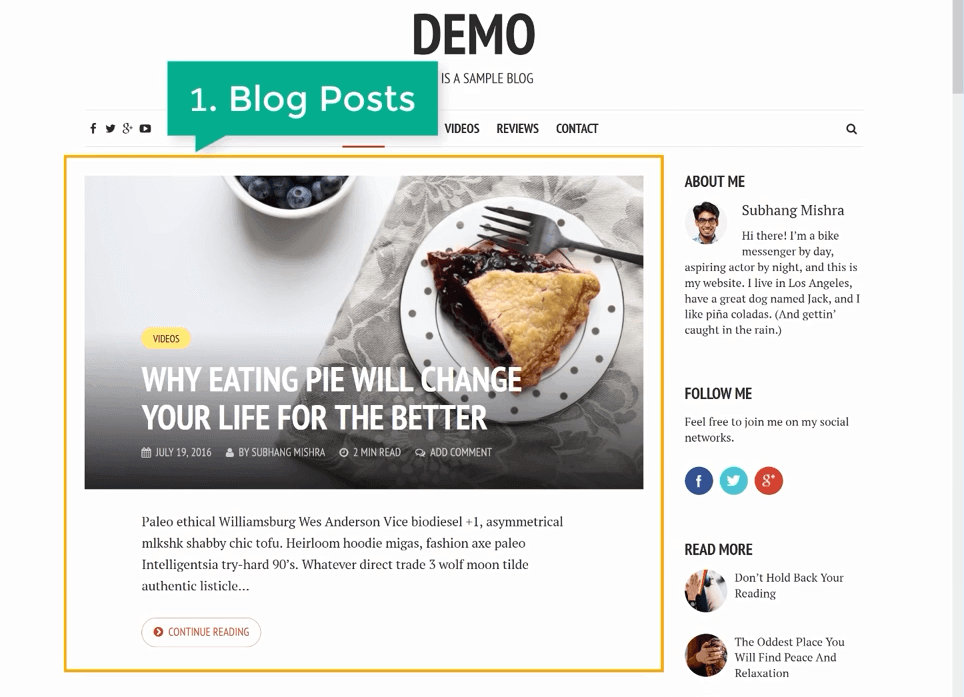
If you look at the Demo site, you’ll see that posts have small labels, such as ‘Videos’ and ‘Reviews’.
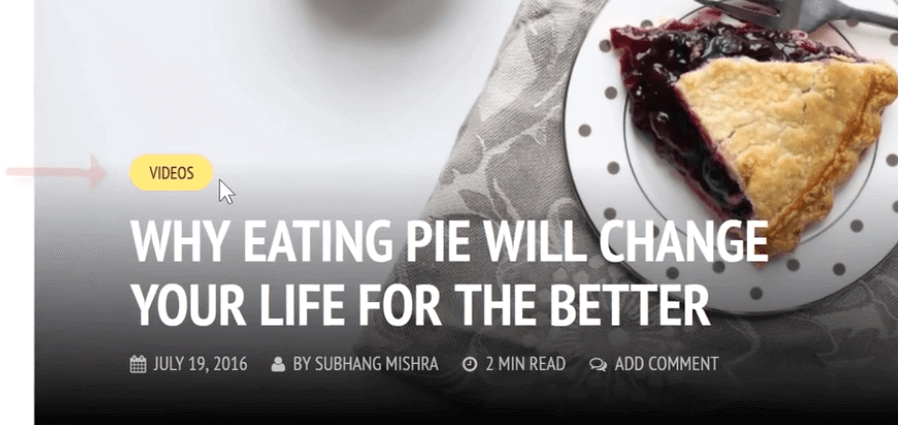
This means that one post is in the ‘Videos’ category, the next one is in the ‘Reviews’ category, etc.
So if you click ‘Videos’ in the top menu of the Demo site, it will take you to a page with posts that are in the video format.
The same logic applies to the ‘Reviews’ item.
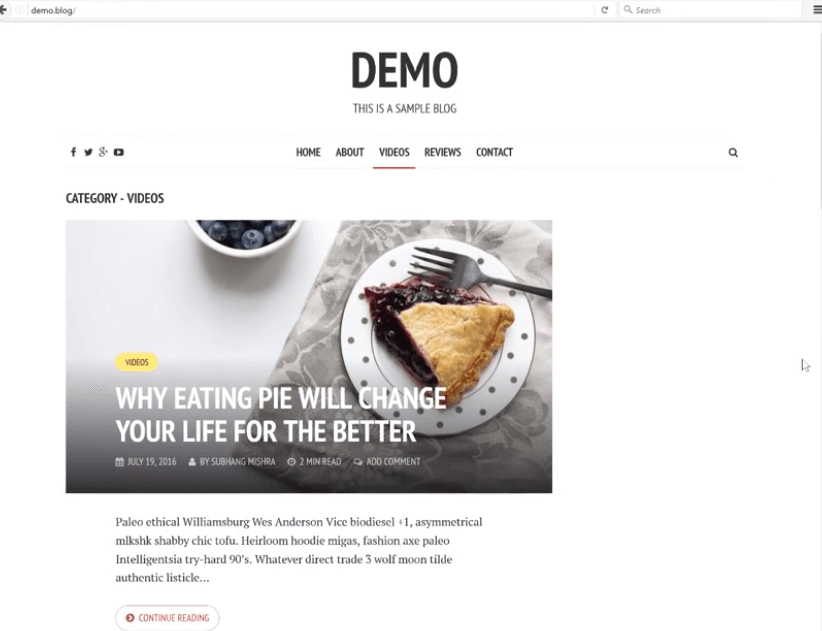
This makes it much easier for users to browse your blog and find the information they need.
Now it’s time to apply this trick to our newly created blog. Go to your blog page and you’ll notice that your first blog post is labeled ‘Uncategorized’. That’s because we do not have any categories yet.
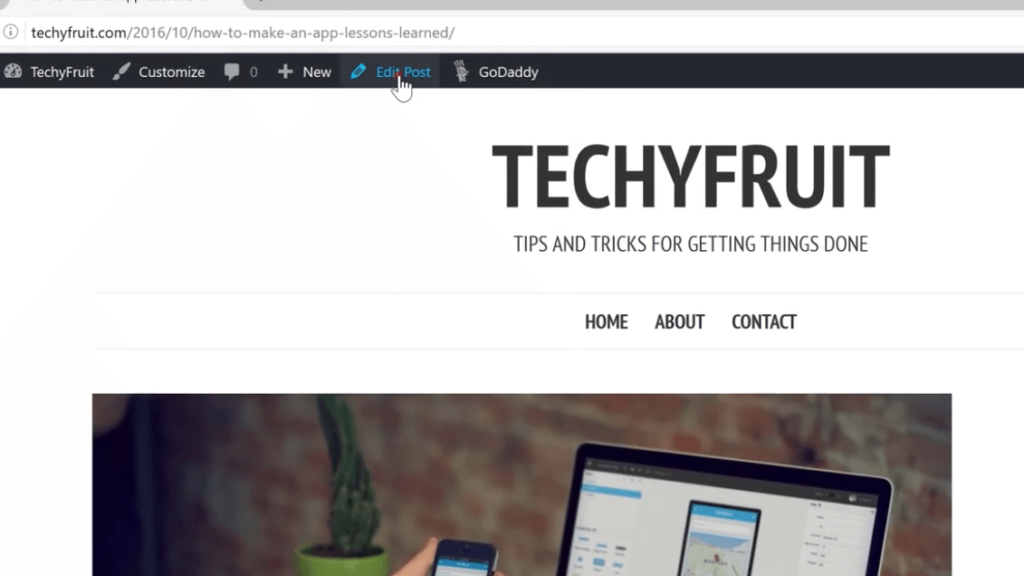
To add categories, click on the post, then click Edit Post in the admin bar.
This will take you back to the post editor. Click + Add New Category and type in a category name. Let’s create the category ‘How-to’.
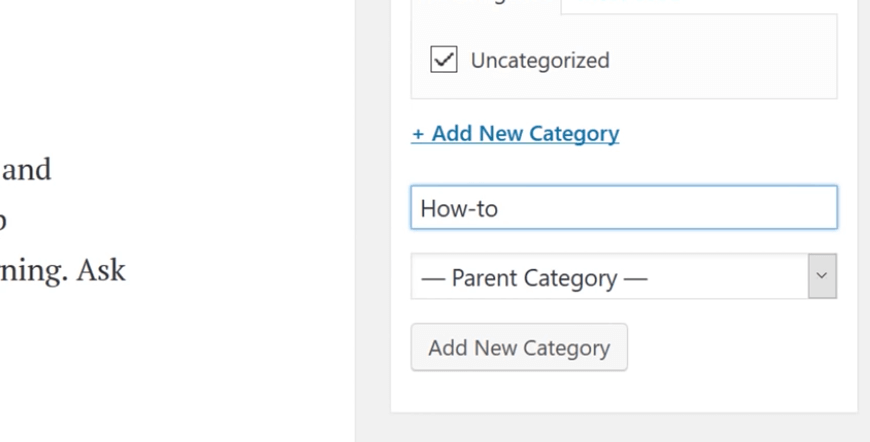
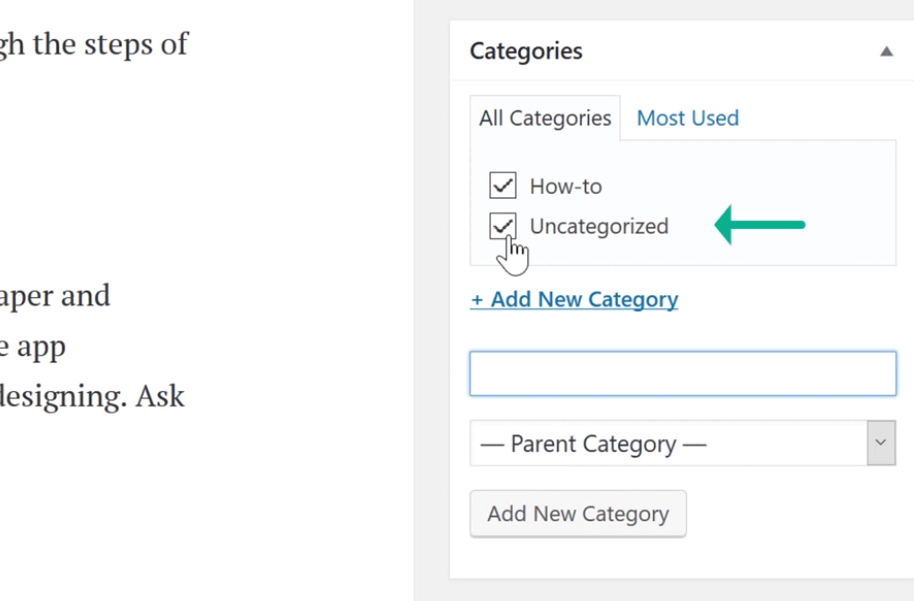
Click Add New Category. Since we’ve just created a new one, we can now uncheck ‘Uncategorized’.
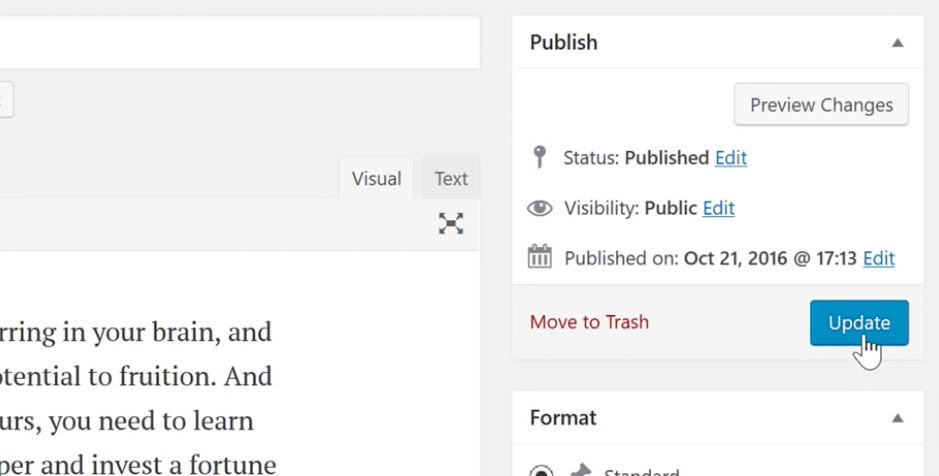
Once everything is done, click Update at the top of the right sidebar.
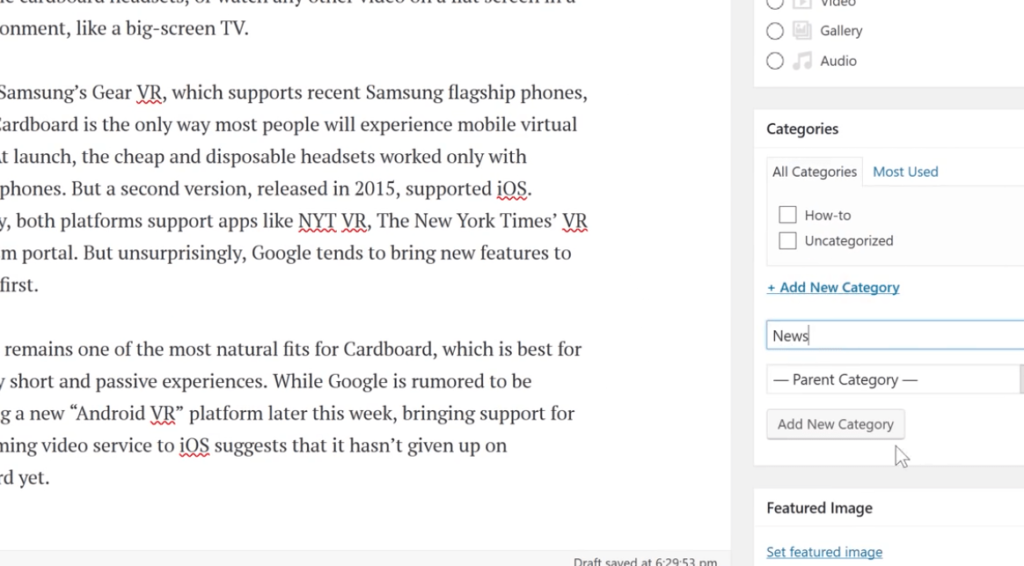
Now’s a good time to create another post. Click Add New and give it a title, then paste the content of your second blog post into the editor.
Create a new category called ‘News’ for this post and for others like it.
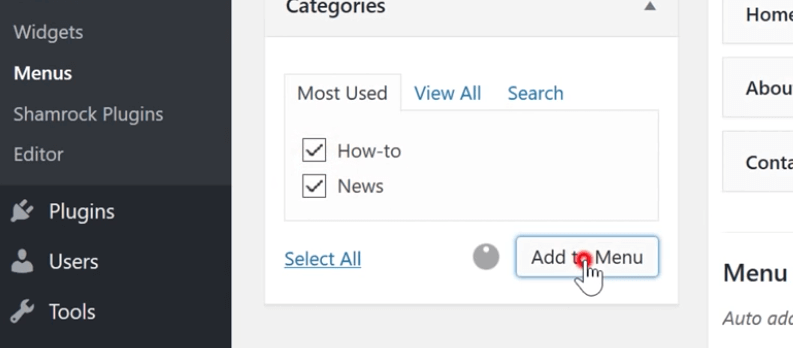
Add a featured image and click Publish. Now when we click ‘Appearance’ > ‘Menus’ > ‘Categories’, we’ll see the categories we’ve just created.
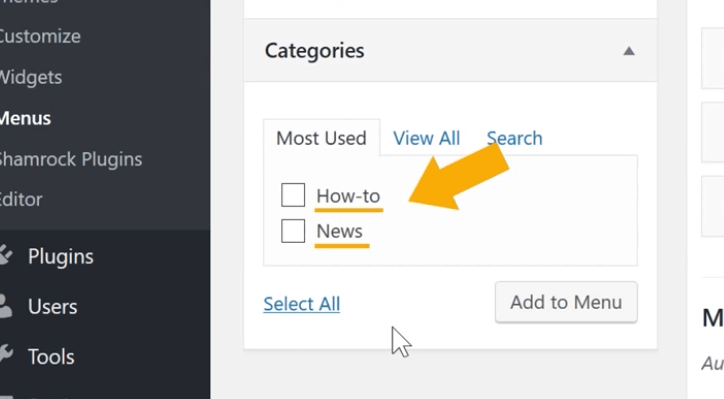
Select the categories and click ‘Add to Menu’. They will now be included in the top menu of your blog.
We should probably rearrange our menu for a better look and ease of use. We can start with dragging the ‘Contact’ menu item to the bottom, under ‘How-to’ and ‘News’.
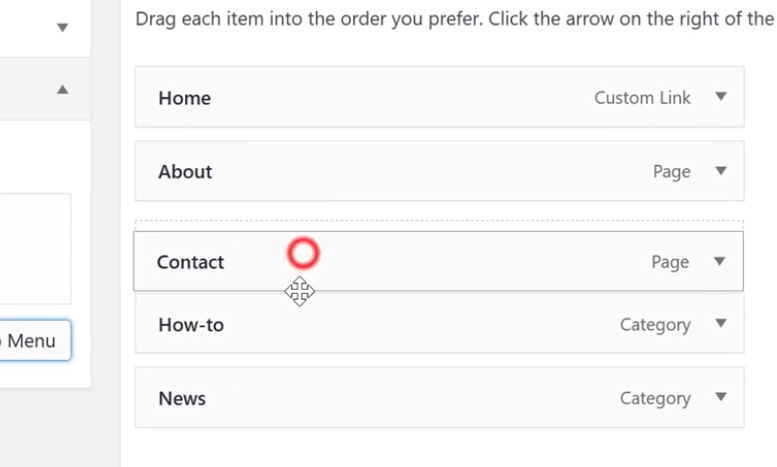
Once you’ve rearranged them correctly, click Save Menu at the bottom of the page.
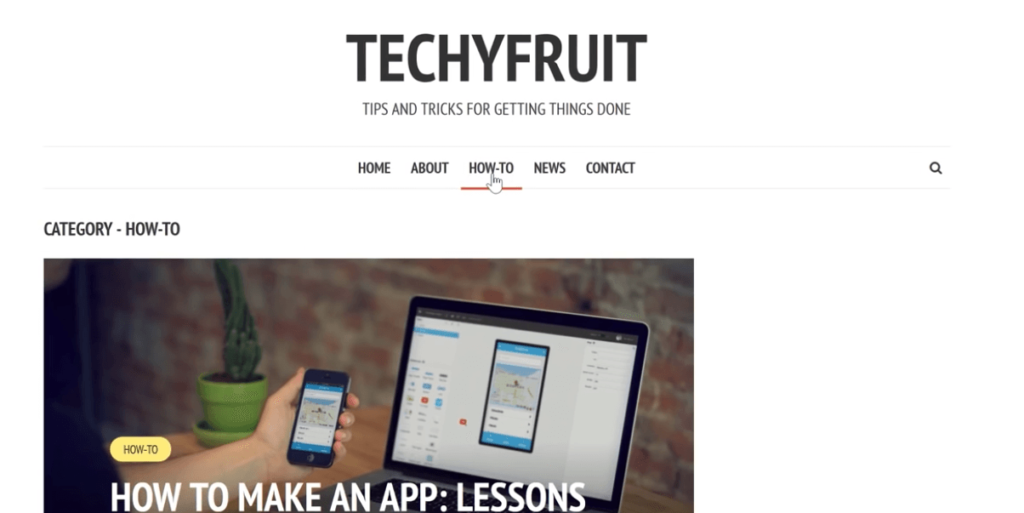
We’ve now added category page links to the menu. When a user clicks ‘How-to’, they will see all the posts in this category.
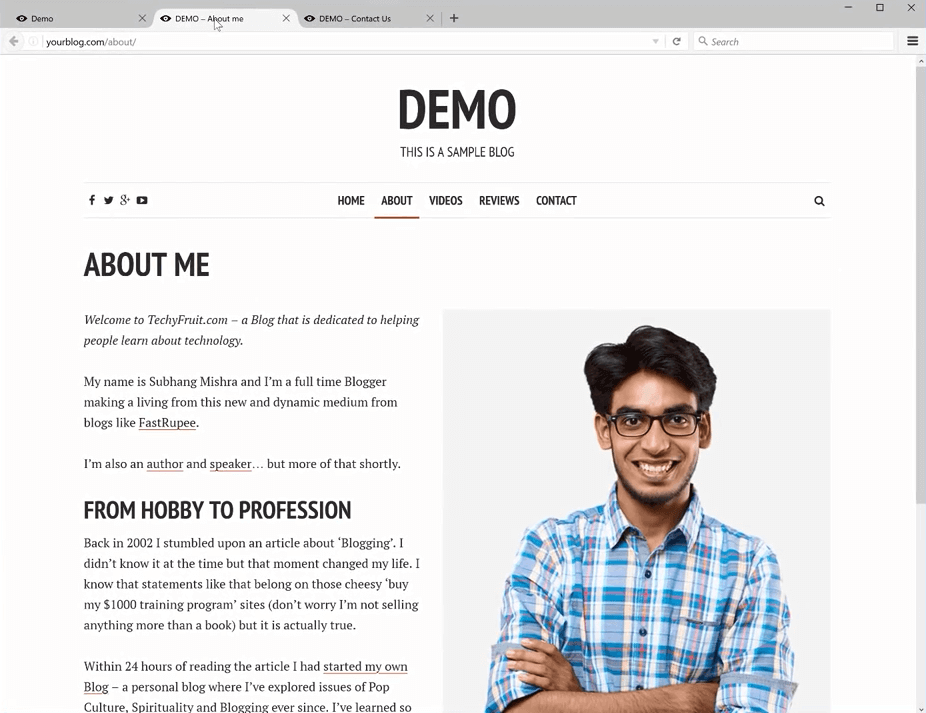
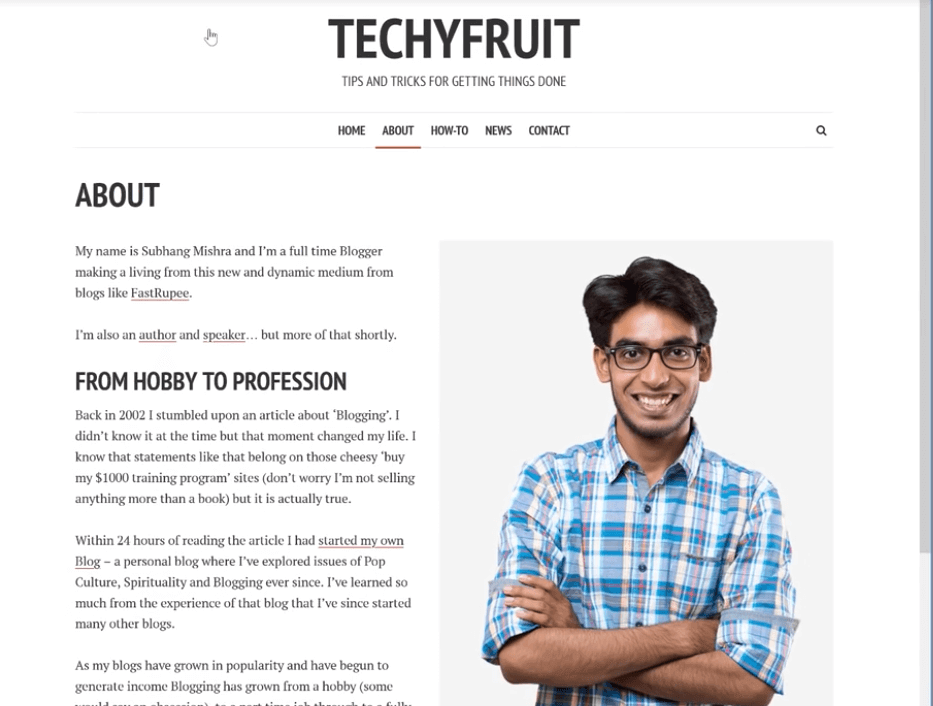
Now it’s time to create an About Me page. This page is important because it tells your readers about you, the person behind the blog. When your readers really connect with your blog, they would naturally want to know about the person behind it.
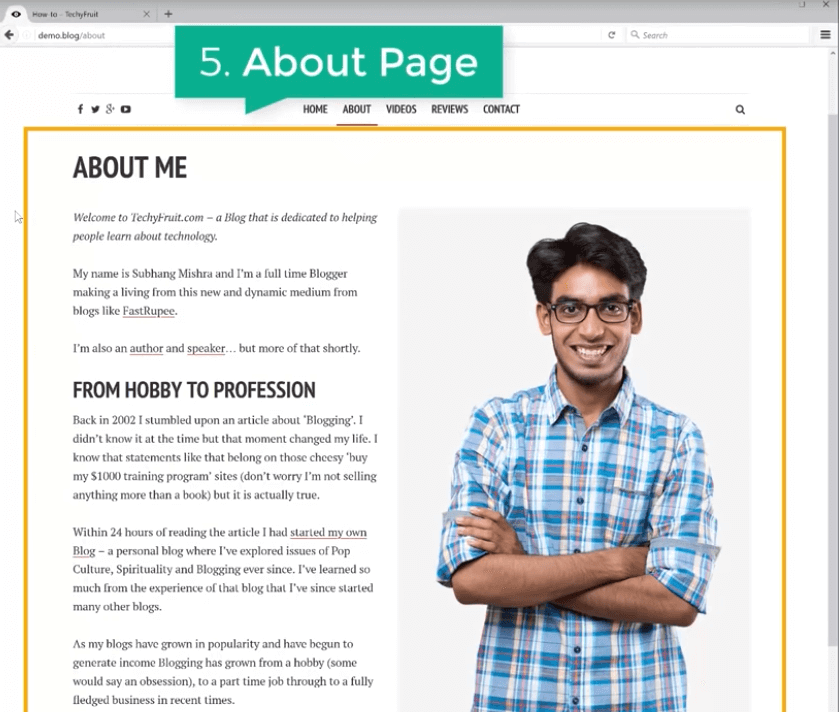
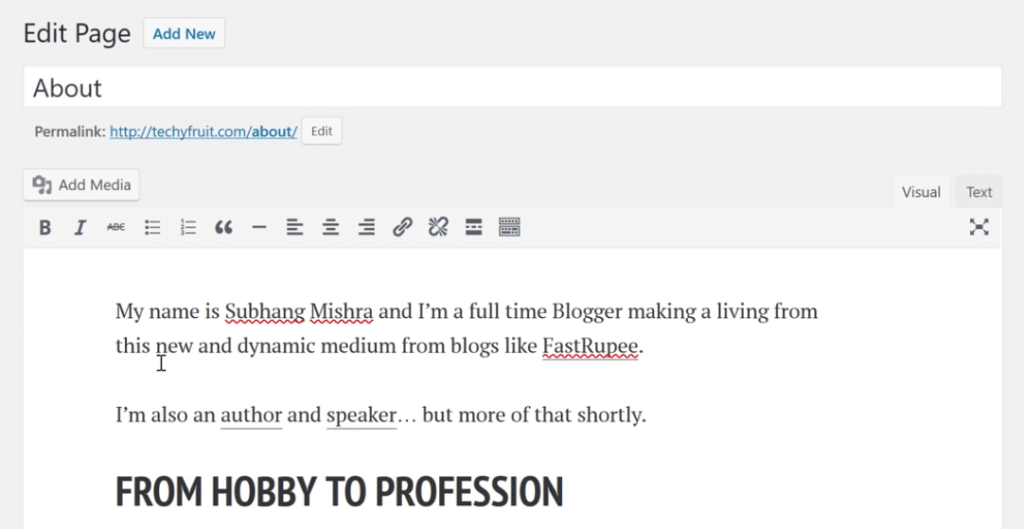
We’ve already created the page but it’s empty right now. Let’s add some content to it by clicking ‘Edit Page’ at the top. Make sure you are on the ‘About’ page!

This will bring you to the editor again. Insert the content here.
Let’s add an Image to spice things up. Click Add Media and upload an image.
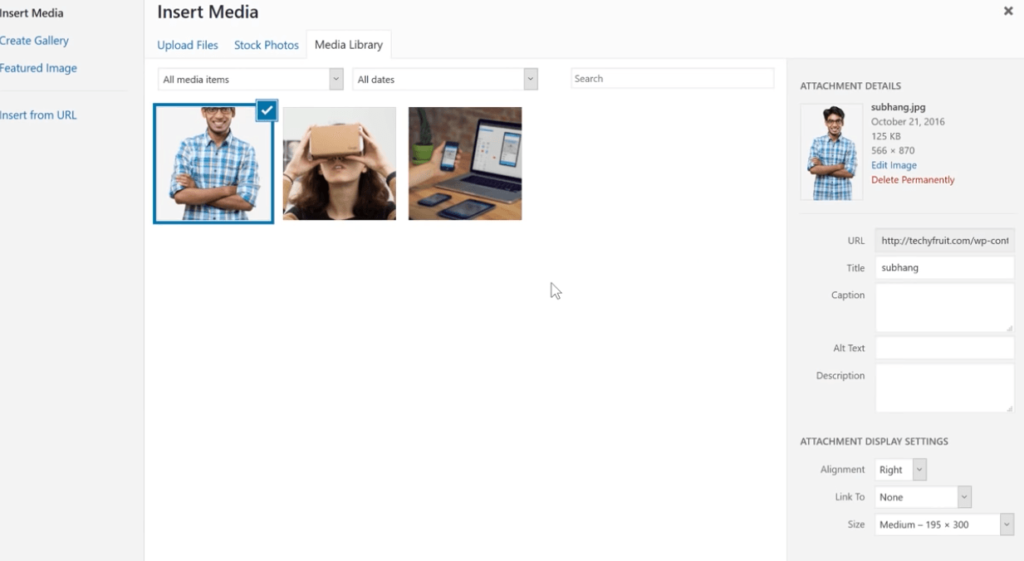
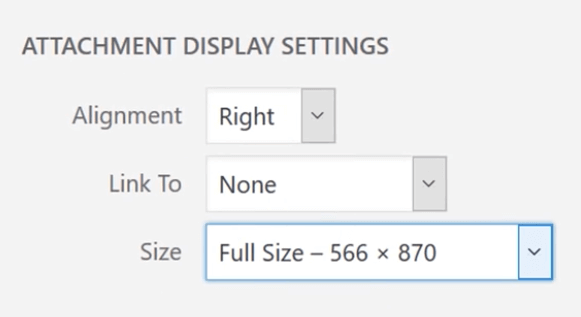
I’m keeping this image full-sized. Make sure you select this size as well.
Once you’ve uploaded your image and selected the size, click ‘Insert into page’.

Click ‘Update’ and view the page. Now we have a great-looking ‘About’ page that tells your readers who you are!
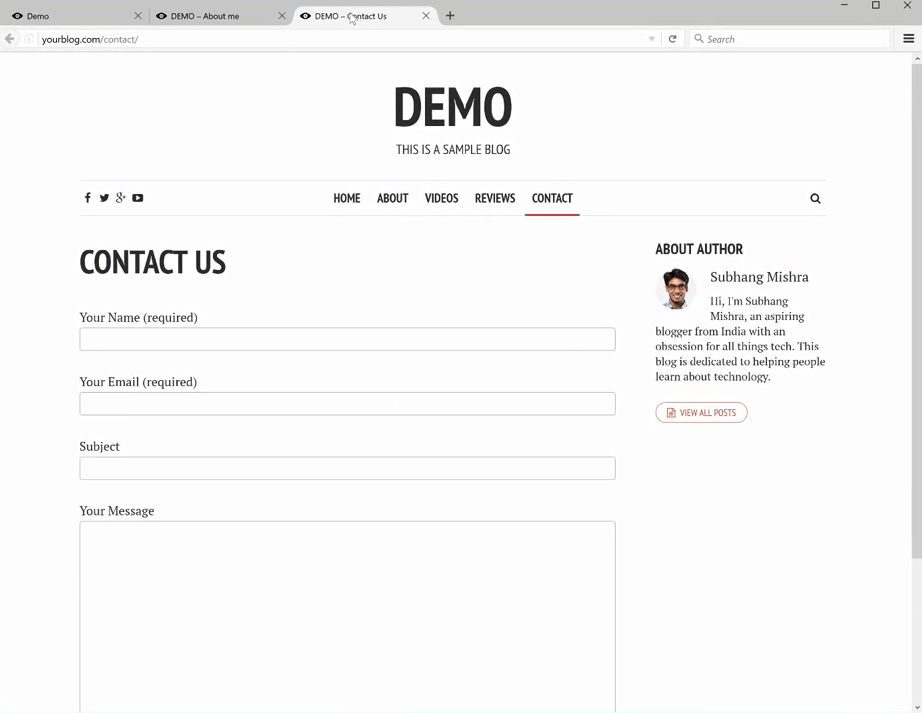
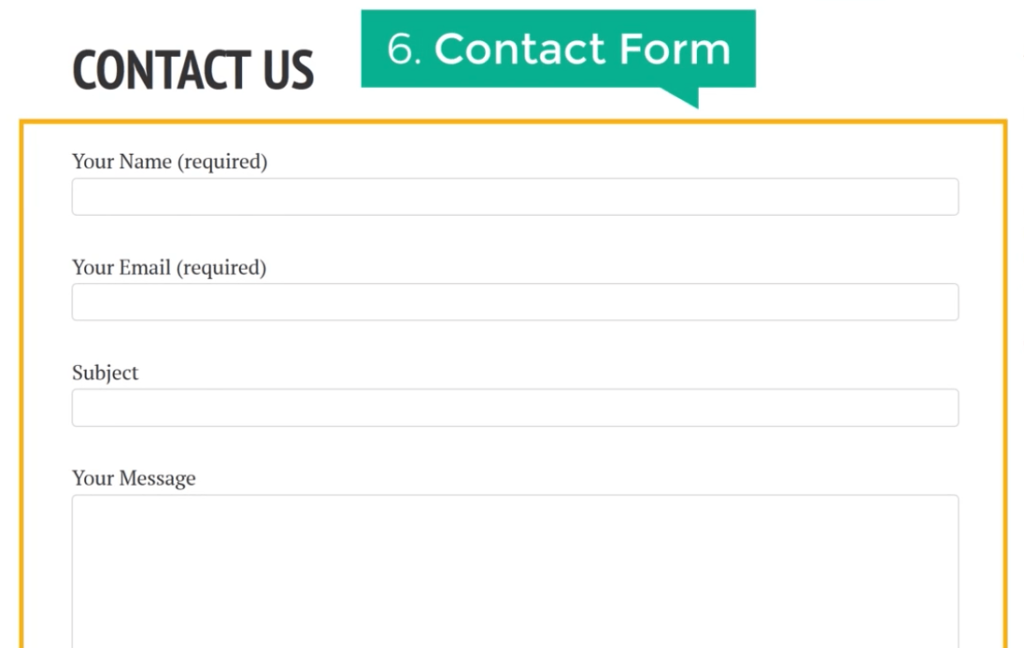
Now that we have created an About page, it’s time to create a Contact page. A page that lets your readers connect with you. We are going to use a contact form for this purpose.
To add a contact form, we need to install a plugin.
To do this, go back to the blog and click Dashboard.
Then go to Plugins and click Add New.
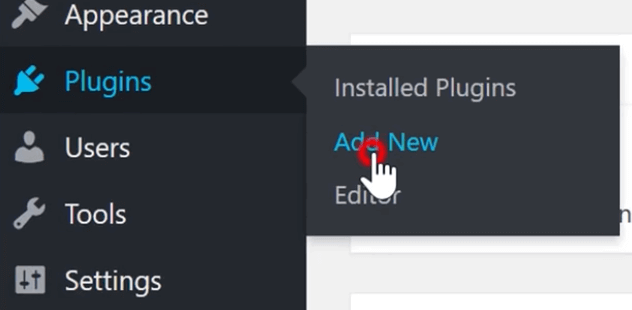
In the Plugins section, search for the plugin Contact Form 7.
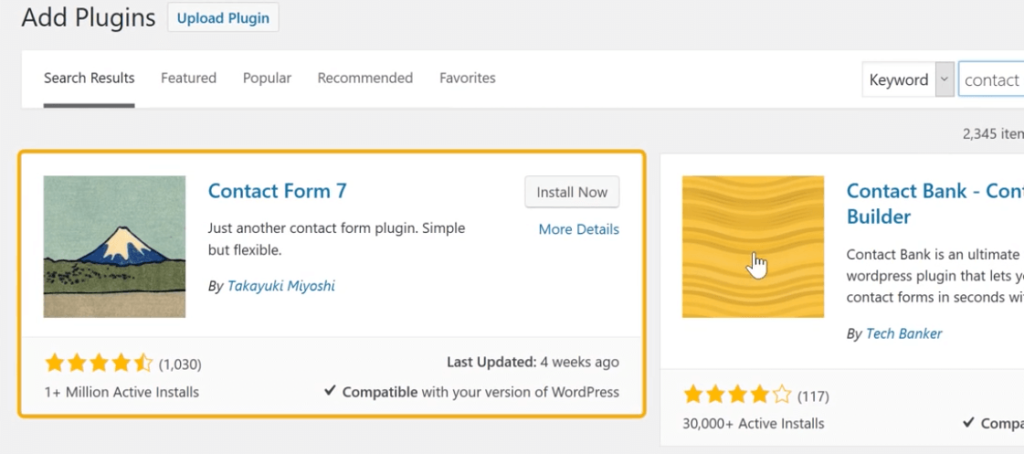
Click Install Now. Once it’s installed, click Activate. A new menu item called ‘Contact’ will be added to your dashboard.
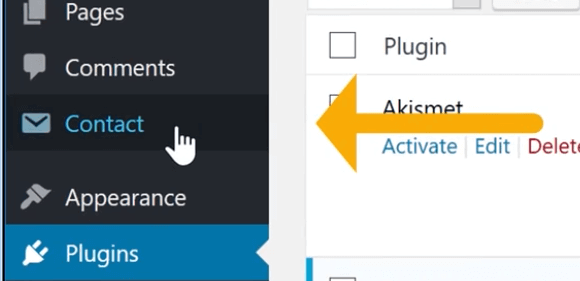
Once you click on Contact, you will notice the default contact form that’s available.
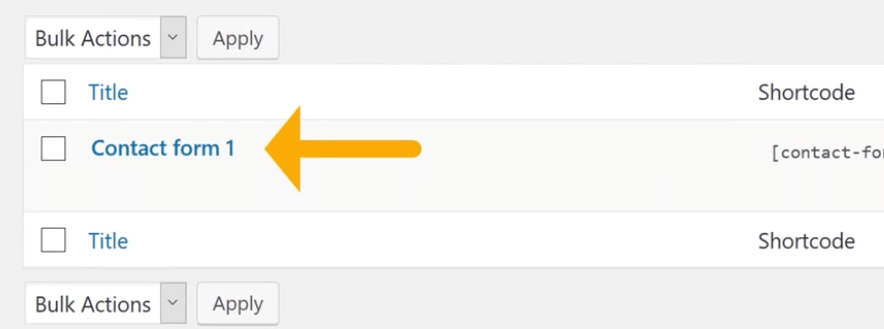
You will see a Shortcode next to it. To add the form to our blog, select and copy the Shortcode.
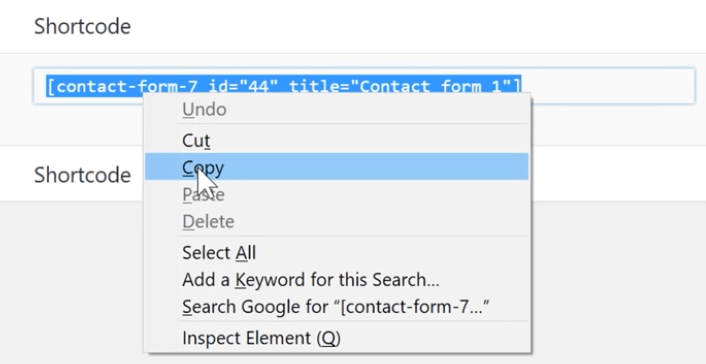
Now we’ll add this shortcode to our page. Go to ‘Pages’ and click ‘Edit’ under the ‘Contact’ page.
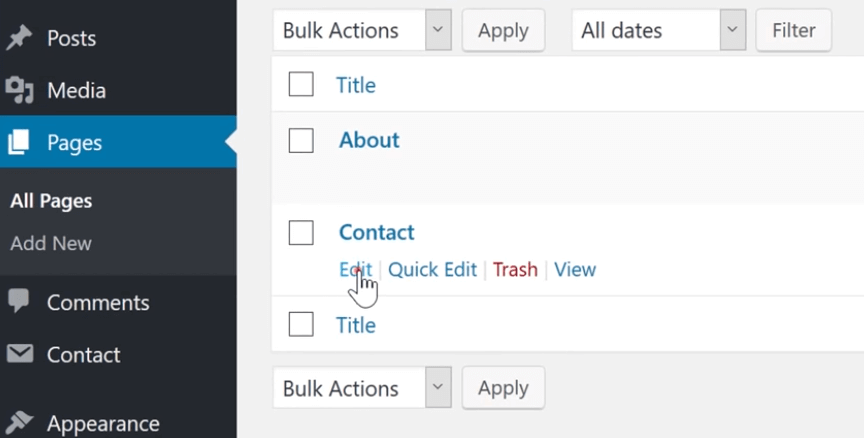
Paste the code into the editor.
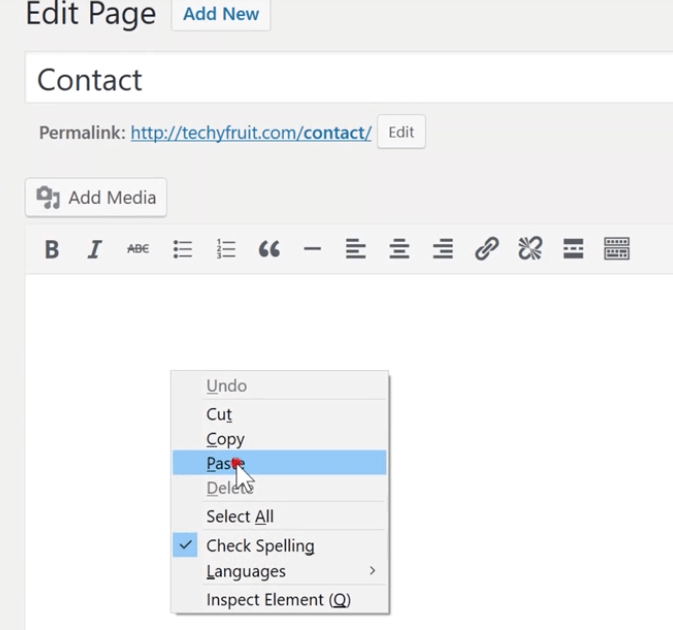
Click ‘Update’ to save the changes and open the page.
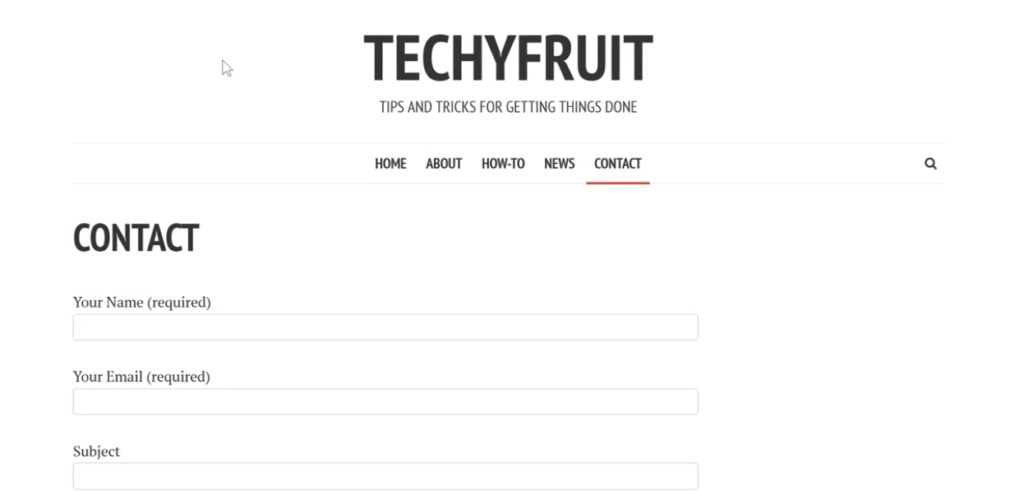
We now have a contact form! Whenever your user enters their message and clicks the ‘Send’ button, you’ll receive an e-mail from them. This is one of the best ways to keep feedback simple and convenient.
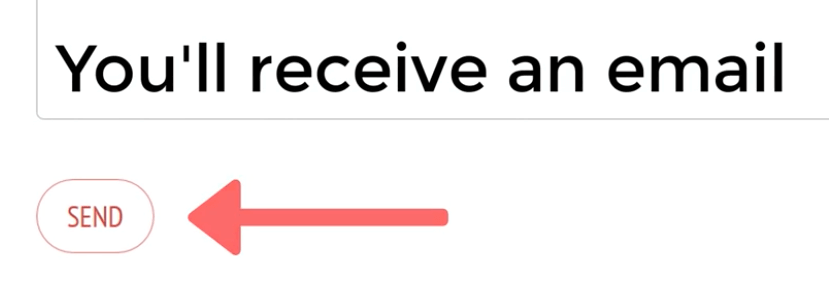
The message will be sent to the same e-mail address you use for your GoDaddy account.
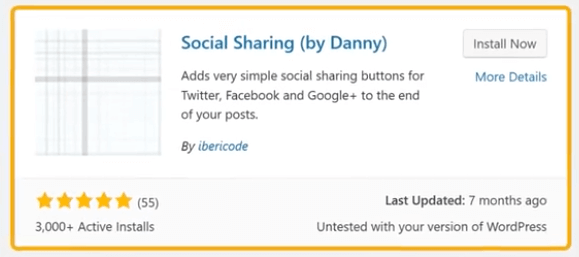
Now that major pages are covered, let’s go ahead and add some Social Sharing Buttons to our blog posts. These will allow the users to share your blog posts on social networks and spread the word about your website.
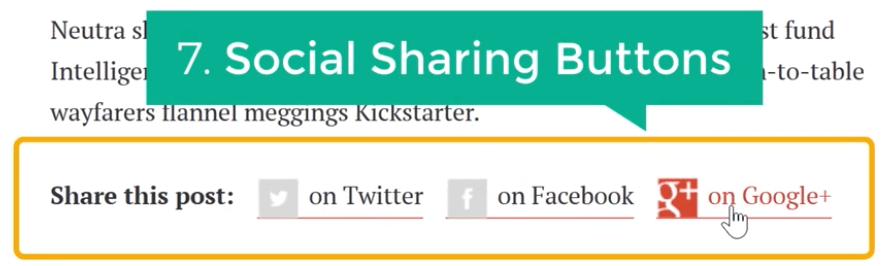
To add these buttons, we need to install a separate plugin that adds these cute social sharing buttons under each blog post!
To add the plugin, search the Plugins directory as you did before, this time for Social Sharing by Danny. Once you find it, Install and Activate the plugin.
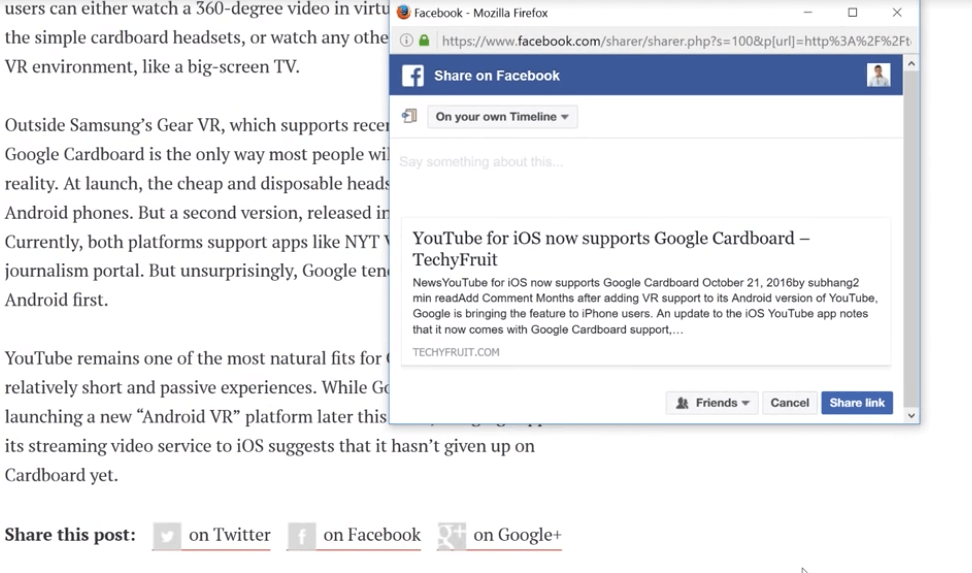
Now let’s go to our blog and see it in action. Open a blog post and scroll down to the bottom, and you’ll see that the plugin works perfectly!
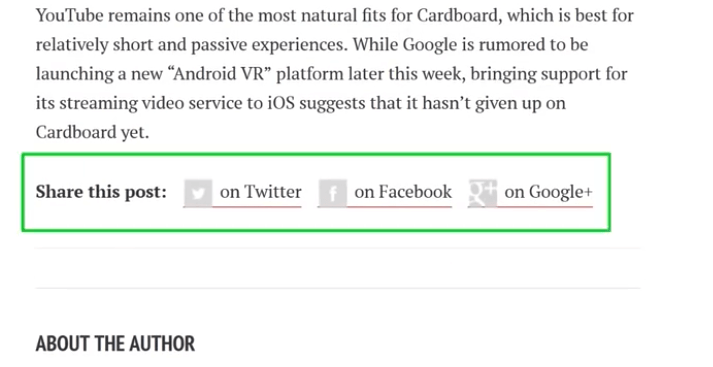
Now your reader can share your articles on social media and show your website to their friends!
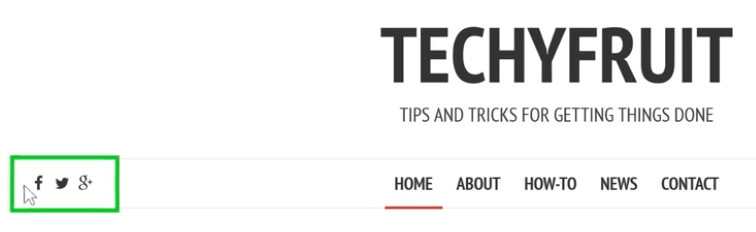
Talking of social media, let’s add social links to the top menu. These links will help your users find you on social media.
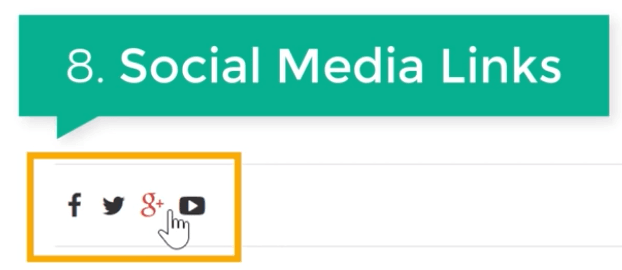
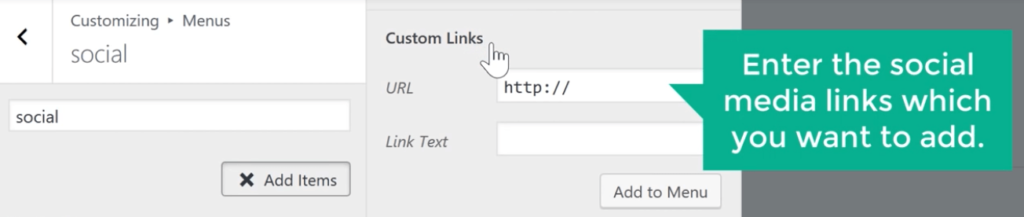
To add them, go back to our blog and click Customize in the admin bar, then select Menus. Let’s create a new menu for social links and name it ‘Social’.
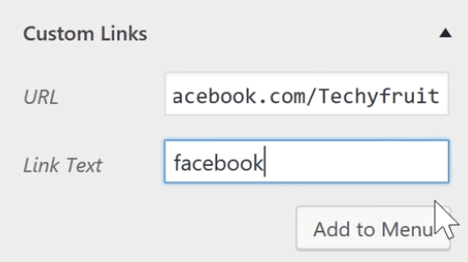
Select Social Menu and click Add Items. Go to Custom Links and enter the social media links you want to add to the menu.
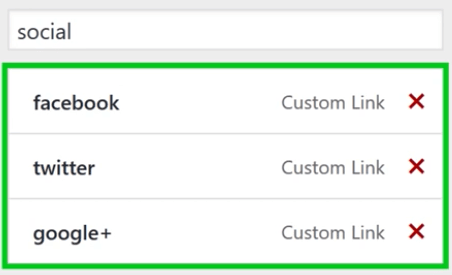
Once you’ve added all the social media links, click Save & Publish and go back to the blog. You should now see your social media links in the top menu!
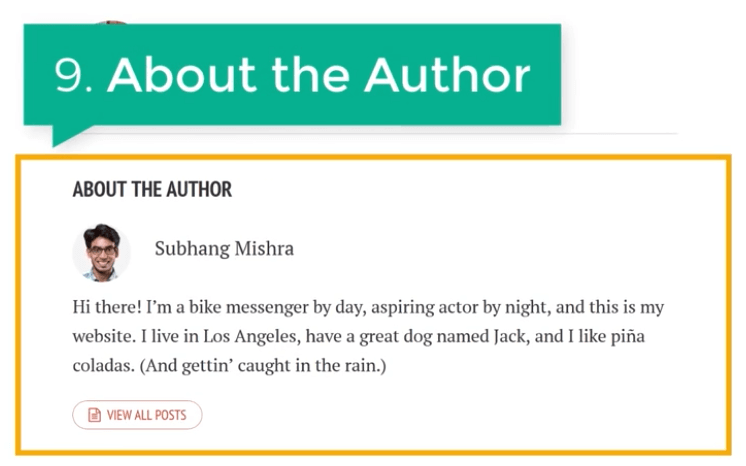
What’s next? Every post should have an ‘About the Author’ section! This section will tell your readers about the author of the article they’ve just read.
So let’s see how you can add one in just a couple of clicks.
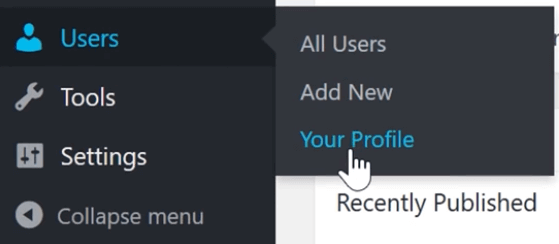
To add this section, go to the WordPress Dashboard and click the ‘Your Profile’ item in the ‘Users’ menu.
From here, you can fill in information about yourself and add a short bio as well as the profile picture you want to display next to your name.
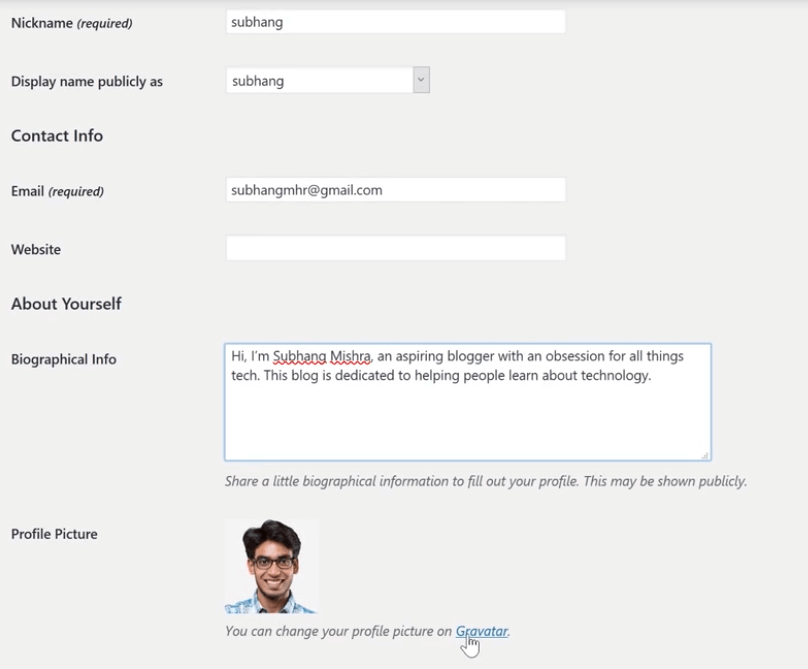
Once you’ve entered all the information, click ‘Update’. Now let’s check how it looks on the blog.
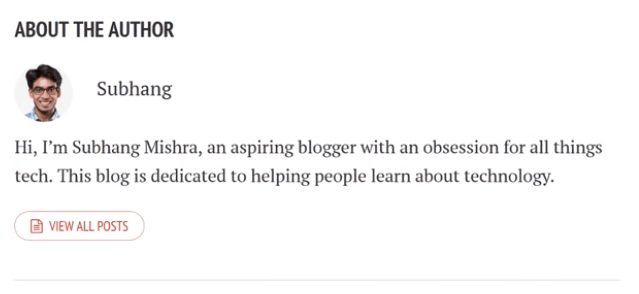
Your author bio will now appear under each of your blog posts!
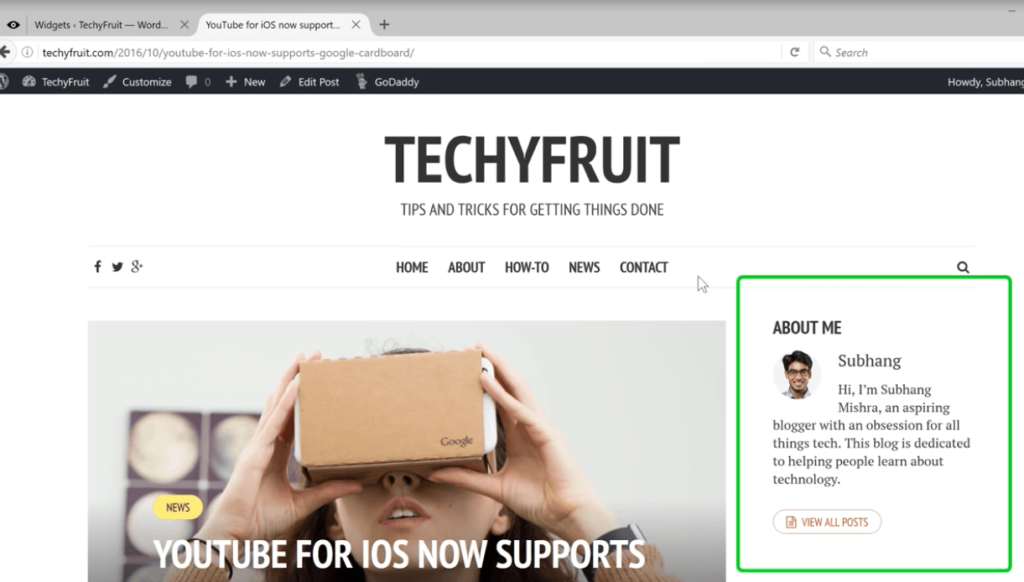
We’re not done yet! Now we should add the ‘About Me’ section to the right sidebar of our website.

To do this, we’ll have to install one more plugin. You know what to do! Search for the Meks Smart Author Widget plugin in the WordPress Plugins directory.
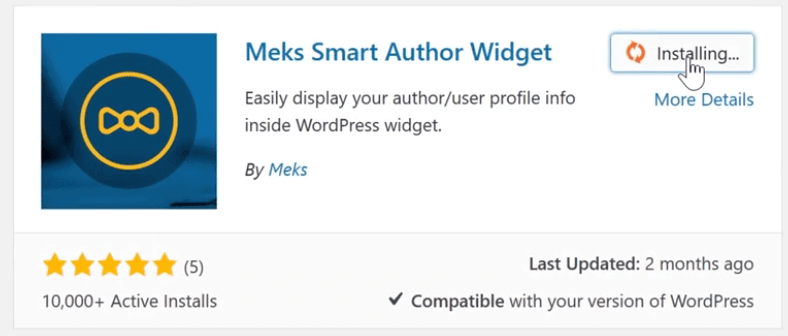
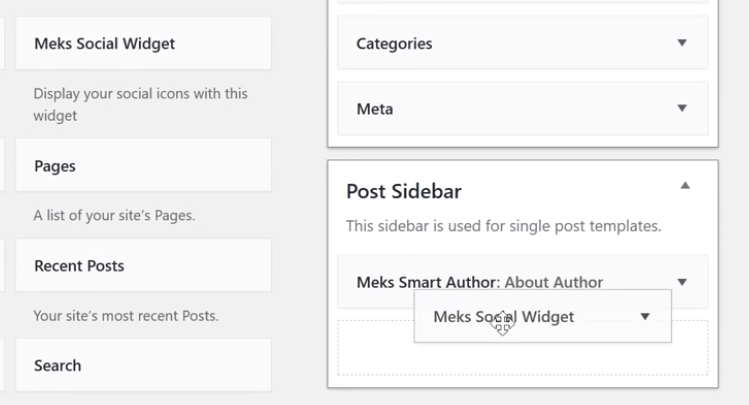
Install and activate the plugin, then go to the ‘Widgets’ panel in the Dashboard, under ‘Appearance’.
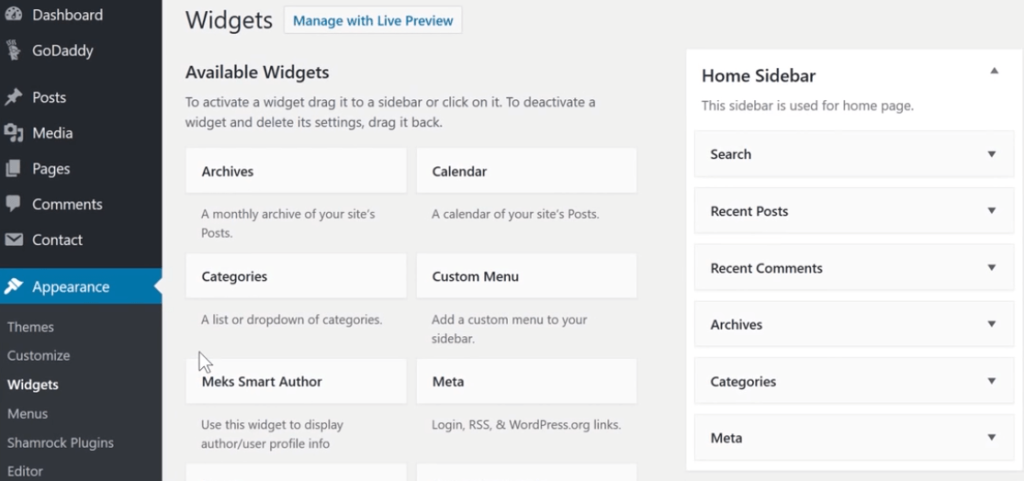
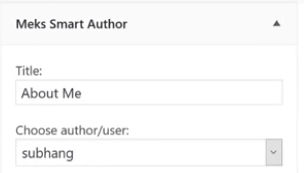
Drag the ‘Meks Smart Author’ widget into the ‘Post Sidebar’ area.
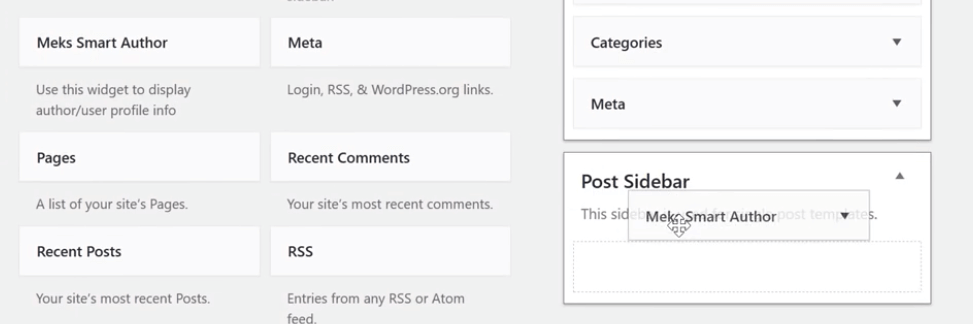
Name this section ‘About Me’ and save the changes.
Go back to your blog and refresh the page. You should now see the ‘About Me’ section in the sidebar!
Let’s add a ‘Follow Me’ section to our sidebar as well.
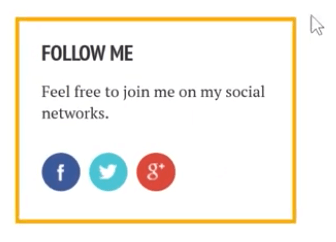
We need to install another plugin that will allow us to add social media links here. Search for the Meks Smart Social Widget plugin, then Install and Activate it.

Go to the ‘Widgets’ panel again and drag the ‘Meks Smart Social’ widget into the ‘Post Sidebar’ area.
Add some text asking your website visitors to follow you on social media, then add links to your profiles on those networks.
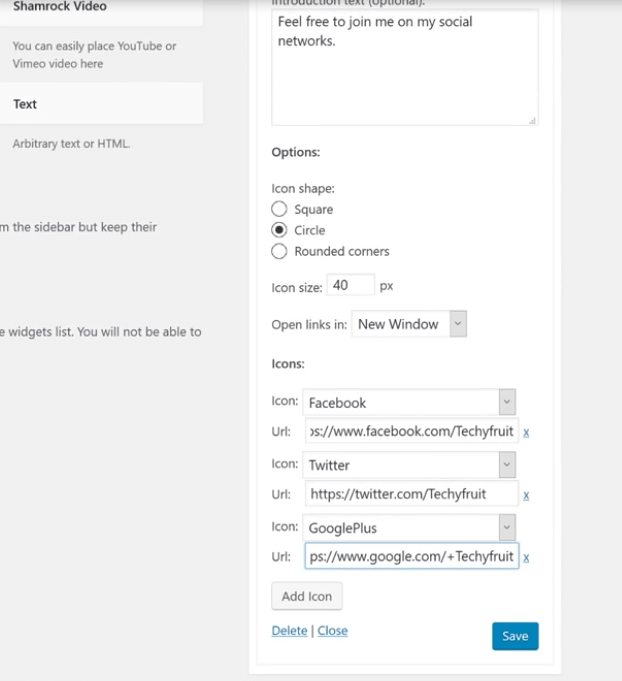
Once you’ve entered everything, click ‘Save’ and check your blog page.
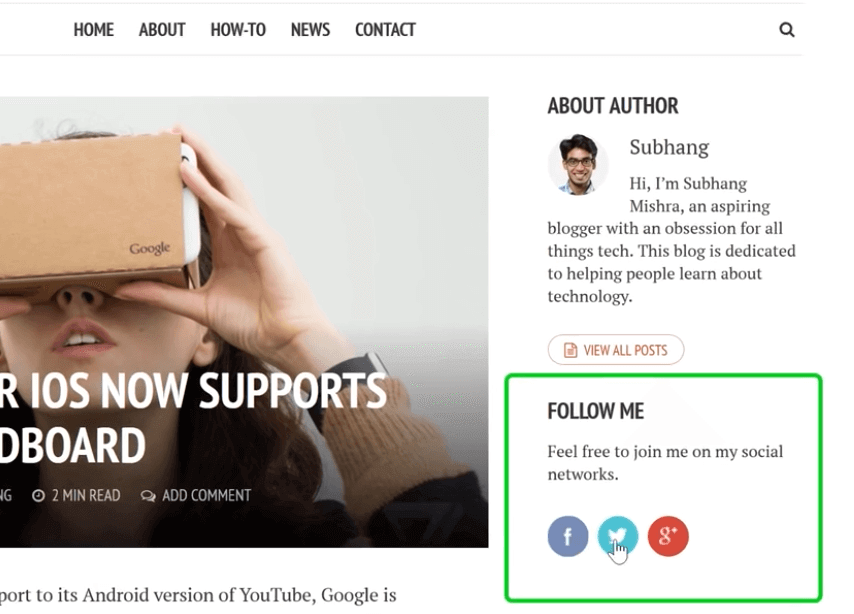
You now have a special section with links to your social media profiles!
We’re almost there! All that’s left to add is a ‘Read More’ section! This section will show your readers more of your articles, inviting them to check out your other blog posts.
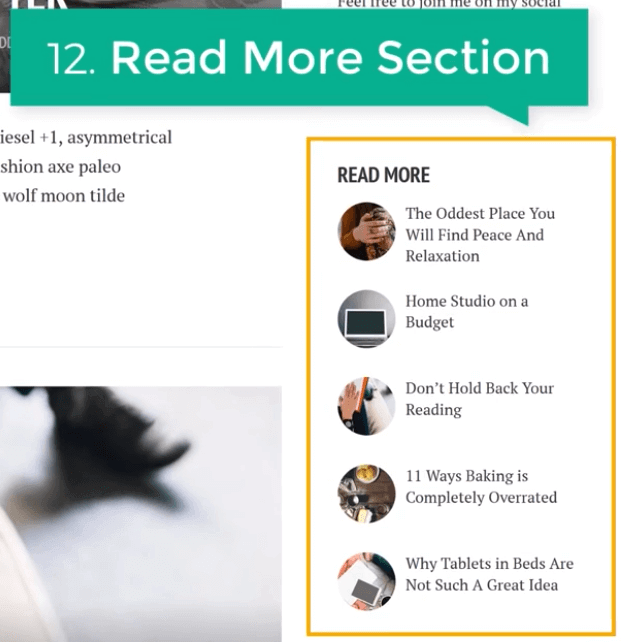
To add this section, go to the ‘Widget’ panel and drag the ‘Shamrock Posts’ widget into the ‘Post Sidebar’ area.
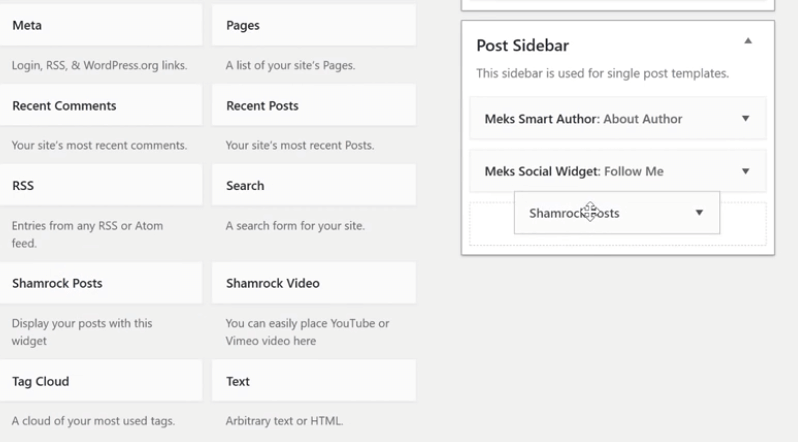
Name the widget ‘Read More’ and save the changes.
Now when you refresh your blog, you’ll see a new ‘Read More’ section in the right sidebar!

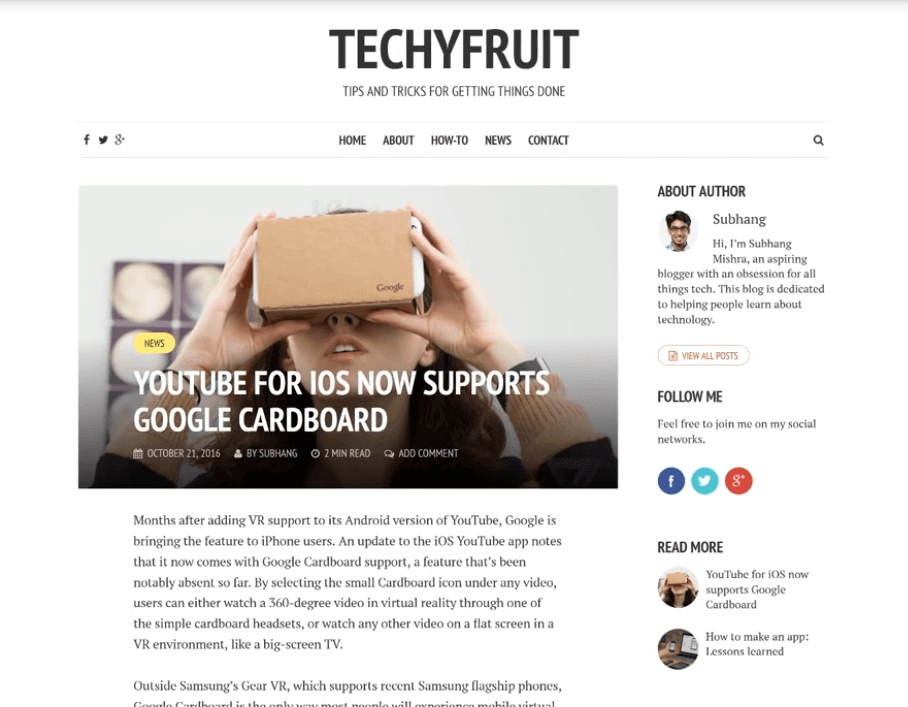
It’s time for the big reveal!
Now that we’ve added all these elements to our blog, here’s how our blog should look,
The best part is that you can apply these steps to any theme you want! Check our Website Learners Themes page to choose the theme of your choice for the blog.
So, that’s it, guys! This is how you can create a blog with WordPress, a fully functional blog. To start your own blog, all you need to do is visit our How to Make a Blog page.
For a more detailed step-by-step tutorial, check our video on How to Make a Blog,
With that, you can create any kind of blog, be it personal or for business purposes, and generate traffic to your website.
Well, It’s 2022 and blogs have grown to be more than just personal journals on your website. In fact, you can literally generate passive income from your blogs!
Don’t believe us? Here are 8 types of blogs that can make money.
But blogs aren’t the only way to make money with your WordPress website. For instance, you can include affiliate links from the top affiliate programs.
To learn about the ways of generating revenue from your website, check our article on the 7 Proven Ways to Make Money on WordPress.
And for more tutorials regarding blogs, and websites in general, Subscribe to our YouTube channel.
With WordPress, creating and writing a blog has become easier, even for absolute beginners. Even someone who isn’t familiar with the process can get started in just 4 steps,
Be it personal or business blogs, one of the common ways to generate revenue is by placing advertisements on the website. It can either be Cost Per Click (CPC), or Cost Per Impression(CPM) depending on the ad networks like Google Adsense.
Bloggers also get paid by other means like sponsored posts, or becoming an affiliate and promoting affiliate links in the content. Whenever a visitor purchases a product through that unique link, the blogger gets paid a commission.
There are several ways to drive paid traffic to your website, but what matters the most is the organic traffic you get from search results. So, the first thing you need to focus on is to get better rankings on the search results.
So, along with improving on the SEO of your website, here are 10 ways by which you can Increase Traffic to your Blog.
To make money blogging, the first thing you need to do is fix a niche. A niche is a specific topic/subject area you are familiar with and capable of writing a blog. It can be anything from Food to Fashion.
To get started, check our article on the Top 8 Blog Niches that make money.
Blogs primarily establish your business as a brand and inform your audience about what happens with your business. Over time, this will result in more and more people visiting your website which eventually increases the sales of your business.
To learn more about it, check our article on Why Blogging is Important for your Business.
Do you want to learn WordPress to build any kind of website you want? Then this is the only course you need to take.
View CourseSEO isn't as difficult as you might think. Learn how to start growing organic traffic to your website with our easy to follow video .
Watch VideoSign up for our WordPress Course today!
12 Comments
Leave a CommentMuzaffer Çevik
Thank you, it’s a very nice narration. So I read this article and set up my own website.
Karthik Tatikonda
We are glad that this blog helped you, Muzaffer. 😁
harisha P
Nice blog, Read from top to bottom. Can you please make a video on building a website using hotel galaxy theme in Wordpress.
Dev Khishan
Hi. I used to find your blog through your YouTube channel. I am so impressed on your learning styles and follow your blog. Thank you for uploading good videos. Thank You.
Andre Whitehorn
Oh mate What might I express? Really… really liked the wordsThank you so much!
Karthik Tatikonda
We are glad that this blog helped you, Andre Whitehorn. 😁
avg pc tune up
My developer is trying to persuade me to move to .net from PHP. I have always disliked the idea because of the costs. But he’s tryiong none the less. I’ve been using WordPress on numerous websites for about a year and am worried about switching to another platform. I have heard great things about blogengine.net. Is there a way I can transfer all my wordpress posts into it? Any help would be greatly appreciated!
Karthik Tatikonda
Hi Alvirez, we request you to send a mail to [email protected], our support team will guide you.😁
ZAKARI YUSUF
Well explained. Very helpful. Thanks alot
Karthik Tatikonda
We are glad that this blog helped you, Zakari Yusuf. 😁
tf2 hacks
I used to be recommended this web site by my cousin. I’m now not certain whether this post is written by him as nobody else recognise such particular approximately my difficulty. You’re amazing! Thank you!
http://www.rid2690.com/13672/tf2-free-hacks-2-sparkly-cheat/
Raj
Hii shyam, i love your posts , videos , website because they look really awesome and Superb content as well.i have search and seen most of then saying that bluehost is the best more advtages unlimited domains……so on.but as a begginer i can’t afford or riak that much on bluehost and there as so many videos but not have much clarity as you give in your videos so
i want to request you to make a video on EXACTLY HOW WE CAN MOVE OUR WEBSITE FROM GODADDY TO BLUEHOST ? bec i’m really inspired by your youtube channel and blog to make a website on godaddy ( bluehost is expensive for a begginer) which is affordable by me for now and i had an idea to make another blog/move this blog, so i want to Use bluehost then ie after getting some or even nominal earnings from my blog to have confidence to start on bluehost. i want to move to bluehost .
i hope you will understood my intention/need
So will You please make a Videos on that.