How to Get A Free SSL For Your WordPress Website
Posted on
April 22, 2020
by

in
Web Development
Do you get this “ Not secure” message on your website?
It means that your website doesn’t have an encrypted connection, meaning you do not have SSL on your website.
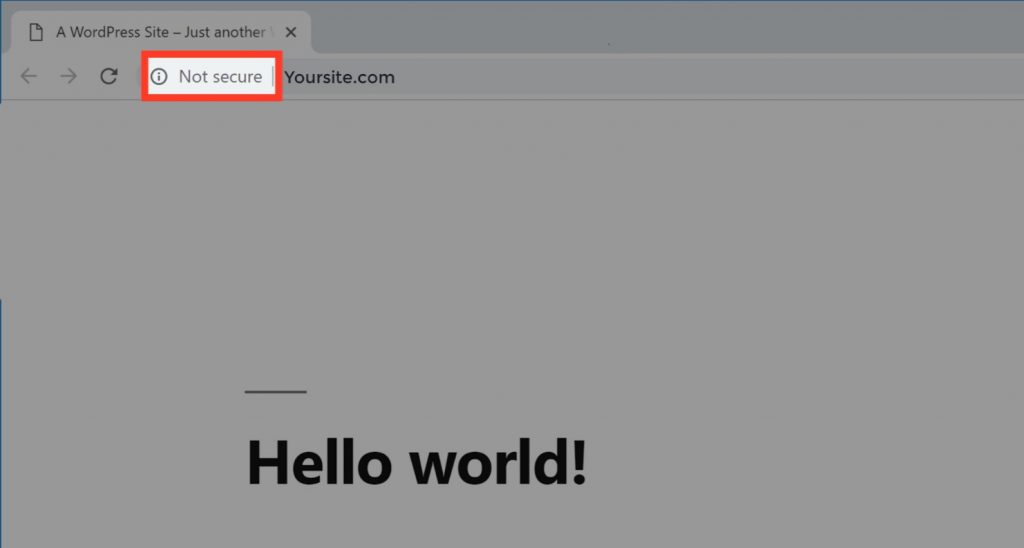
Now if you want to change this “Not secure” message into the secure lock symbol, you need to get an SSL for your website.

So, in this article, we will look at,
SSL (Secure Sockets Layer) is a digital security certificate that secures the data that goes from the user browser to the website they are visiting and vice versa. When you have SSL on your site, it ensures that the data transferred between your website and your visitor is safe.
Also, when your visitors see the lock symbol on your site, it will make your visitors trust your website.
So Let’s get started!
We’re going to get a free SSL for your WordPress website in just 5 steps,
Cloudflare is where we are going to get our free SSL
1. So go to cloudflare.com
2. And then click sign up.

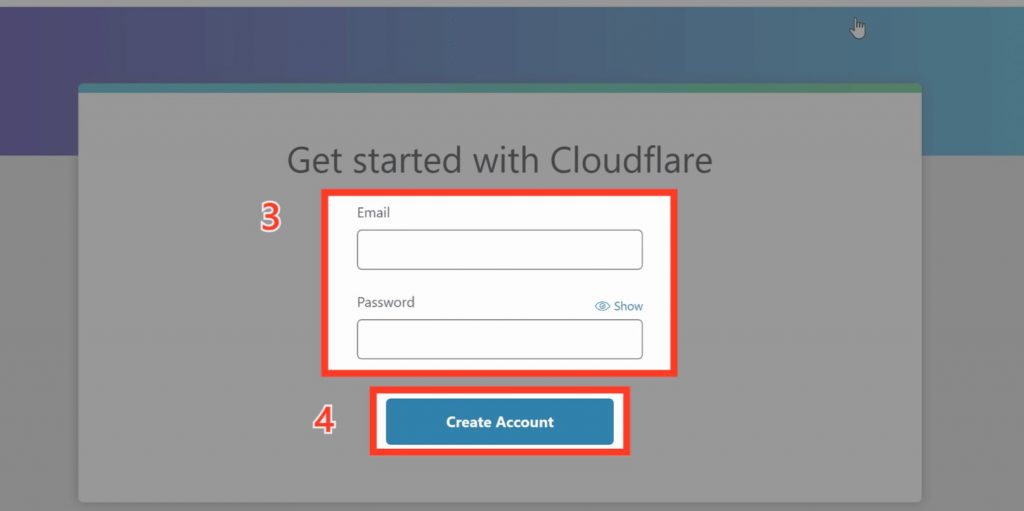
As soon as you click sign up, it will take you to the page where you can create the Cloudflare account Now
3. Enter your details and
4. Click create account
And your account will be created.
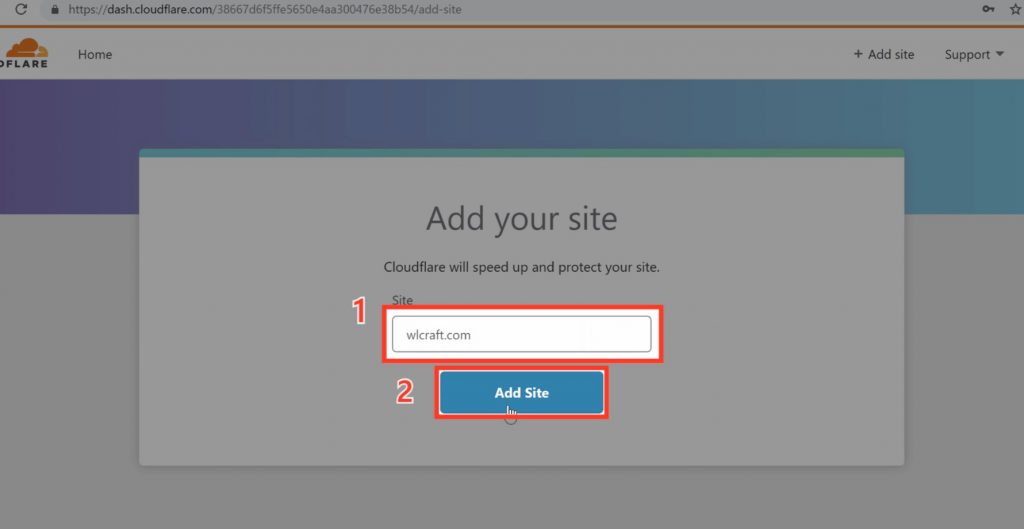
To add your site to Cloudflare.
1. Enter your website URL and
2. Click add site
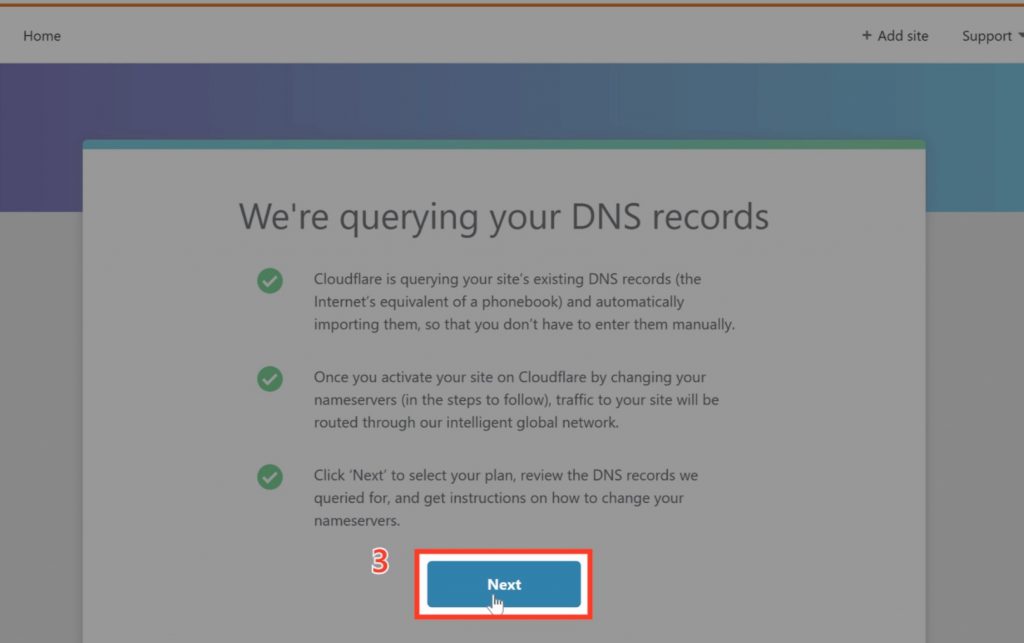
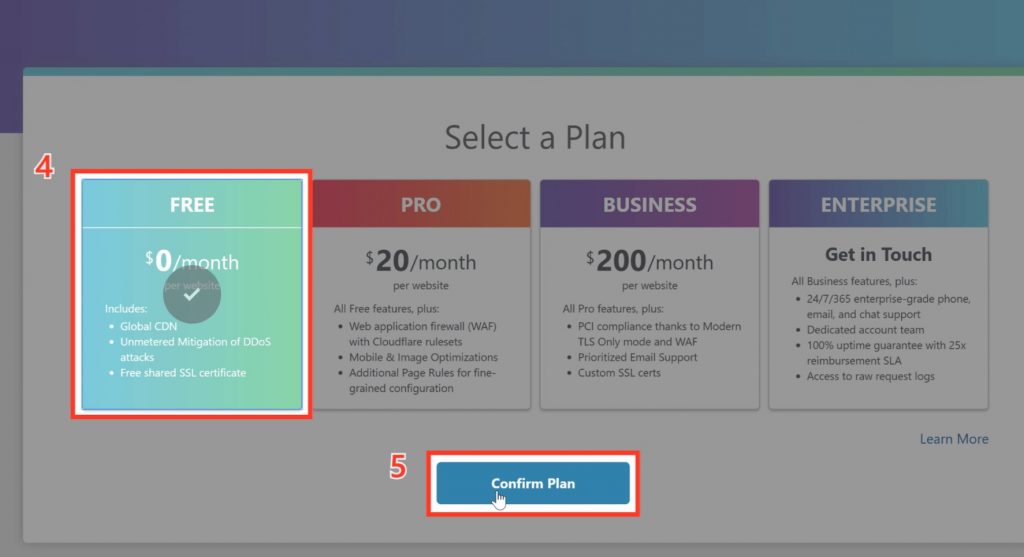
3. And then click Next to select a Cloudflare plan.
4. Now select the free plan and
5. Click Confirm
6. Next, it will take you to this page, here you just click Continue.
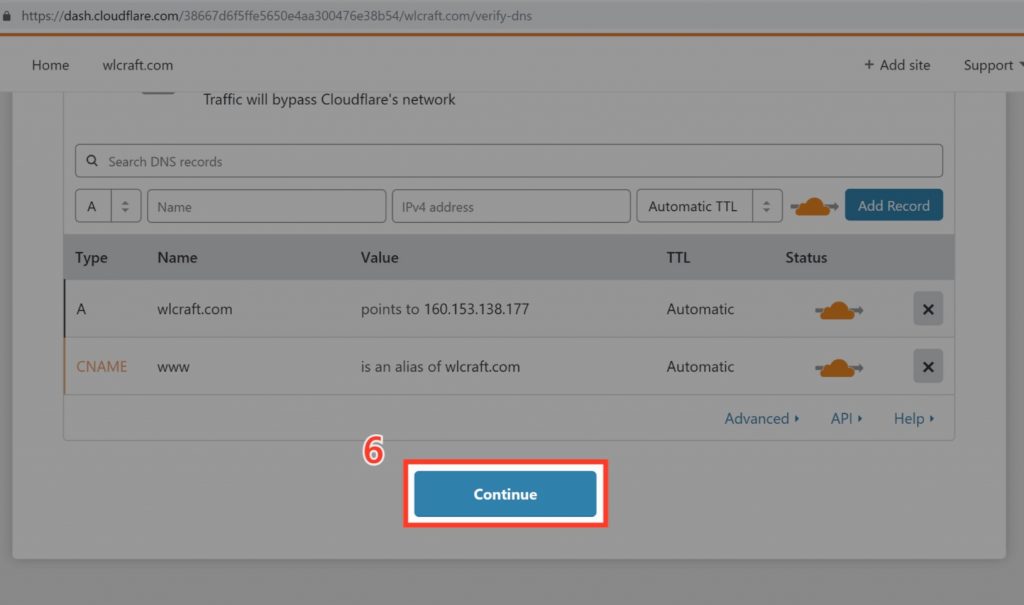
Now Your website will be added to Cloudflare.
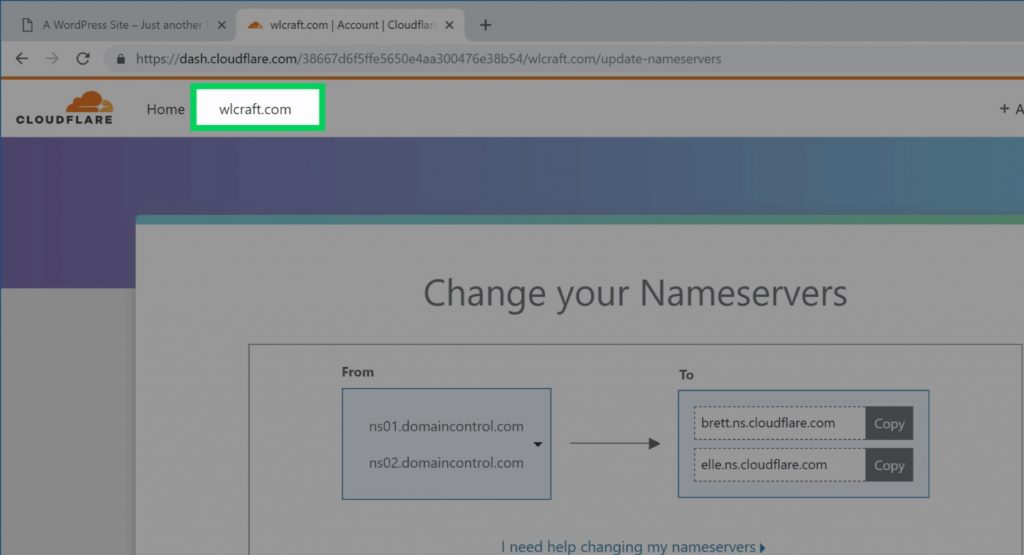
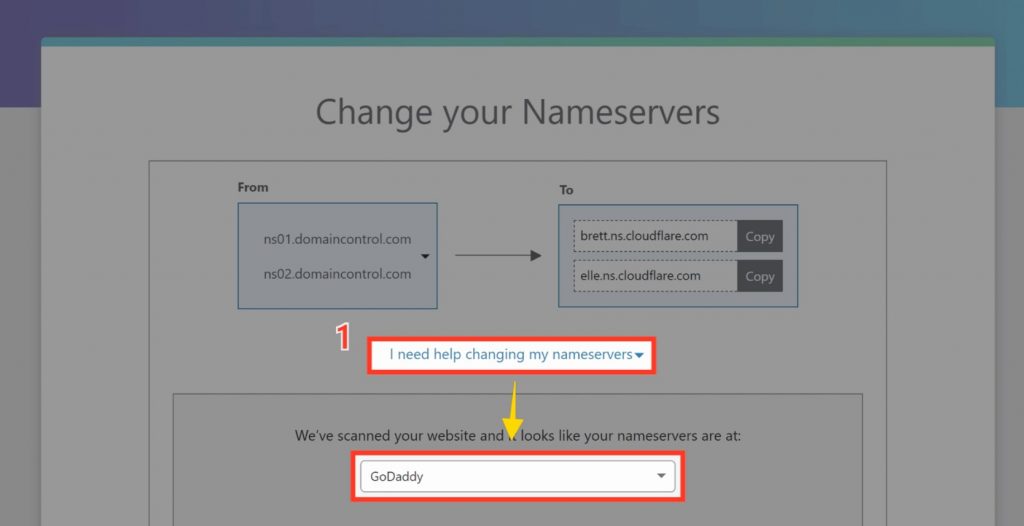
In order to connect Cloudflare to your domain, we need to add these nameservers as shown in the image to your domain. So to add these nameservers, you need to first, log in to your domain provider’s website.
1. To find out your domain provider, just click ” I need help changing my nameservers ” you can see that, GoDaddy provides our domain.
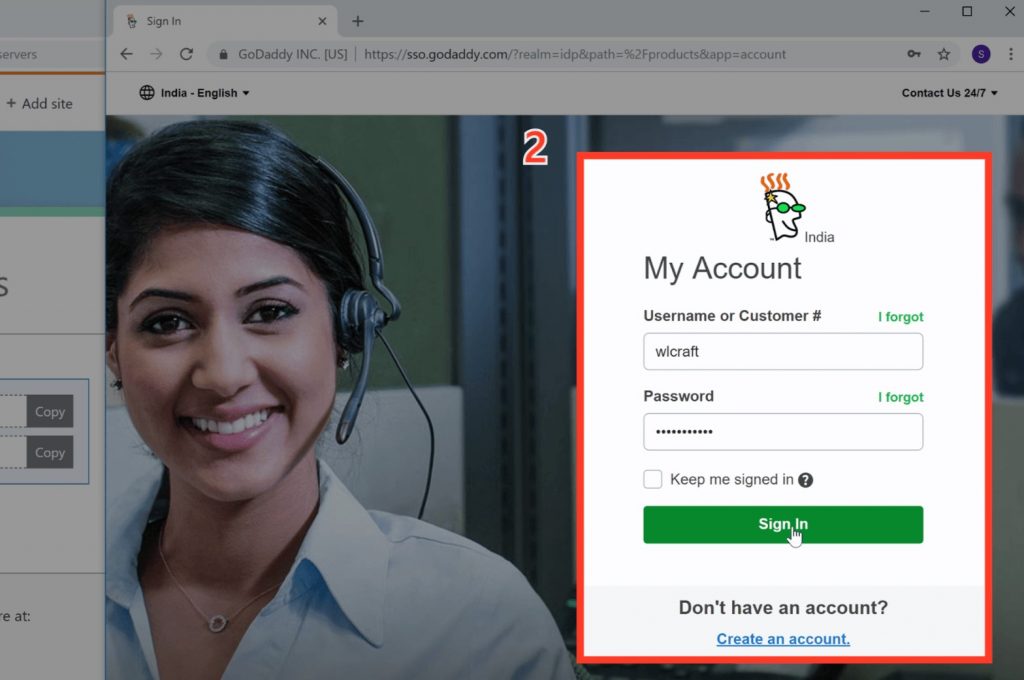
So to add the name servers, you need to log in to GoDaddy.
Now go to GoDaddy and
2. Sign in to your account.
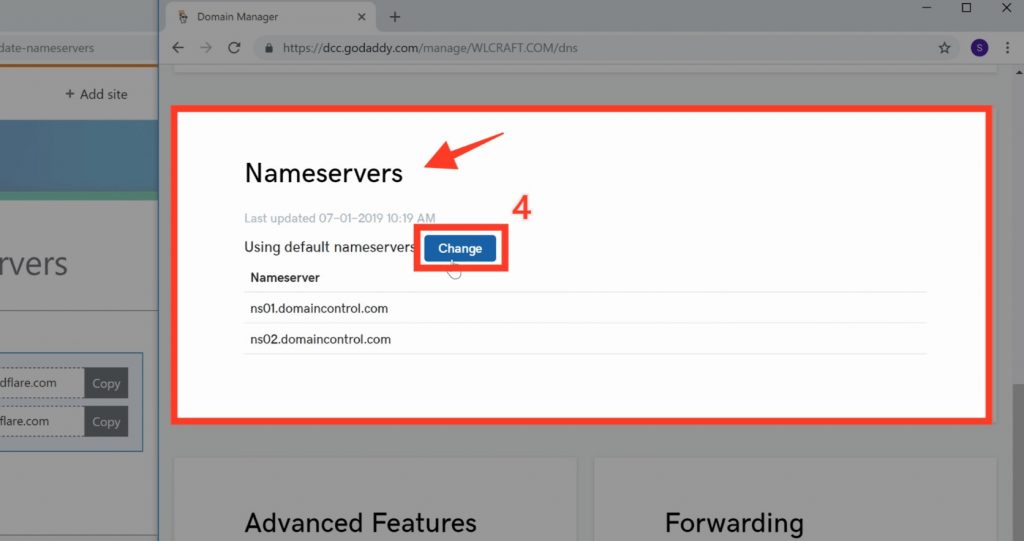
Once you have logged in to your GoDaddy account, you can see the domain which you have added to Cloudflare. Now to change the ‘nameservers’, of your domain,
3. Just click DNS.

4. Now go to nameservers and click Change.
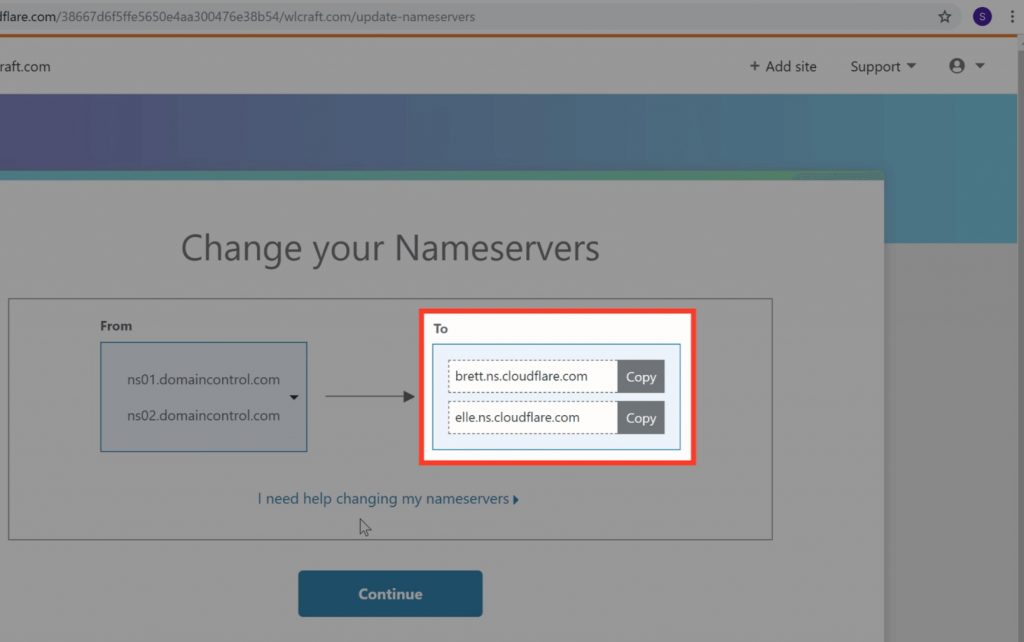
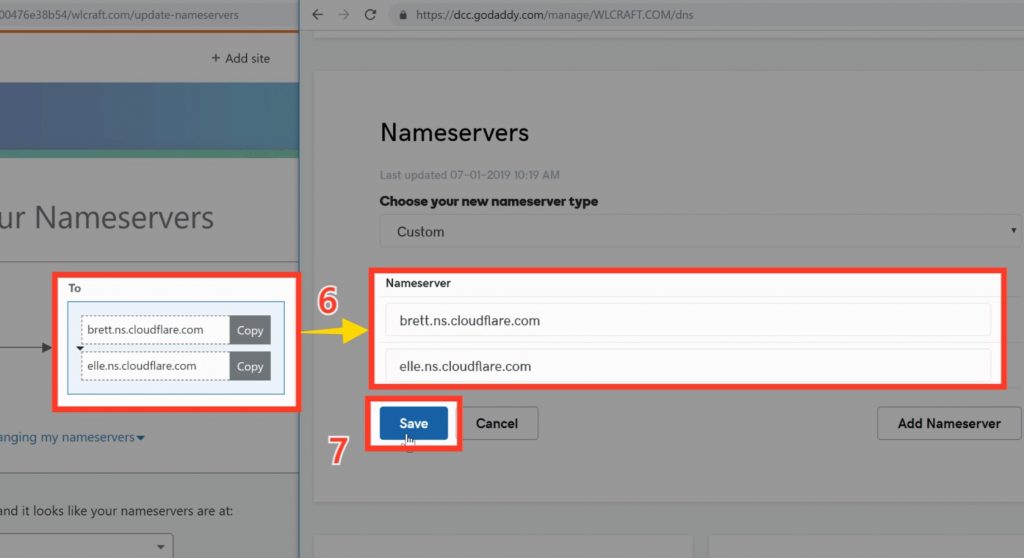
5. And then choose Custom from Choose your new nameserver type, once you have chosen the custom the nameservers fields appear, there you need to enter the details, which is provided in Cloudflare.
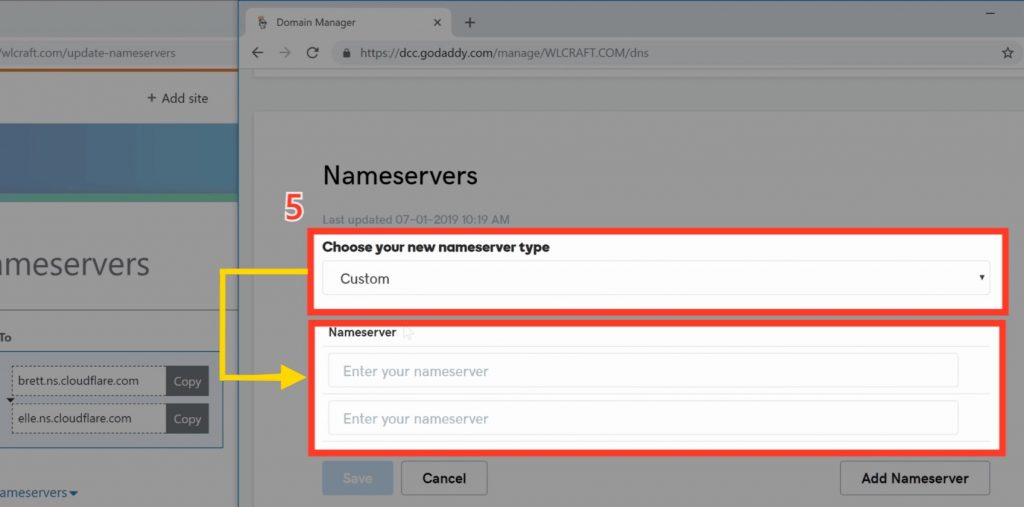
6. Now copy the details from the Cloudflare one by one and add it in the GoDaddy name server
7. And click Save.
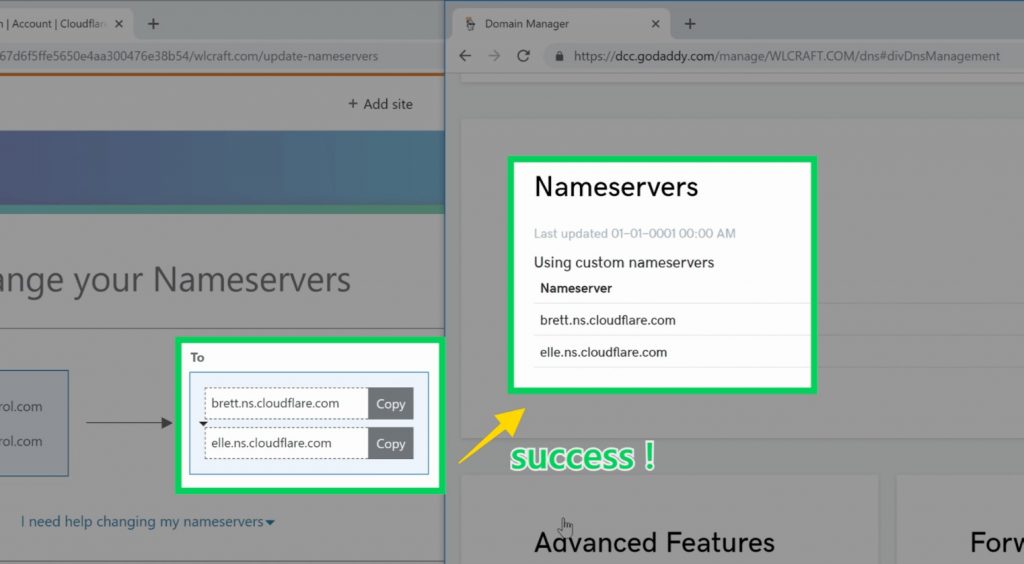
So now we have successfully added the nameservers to our domain.
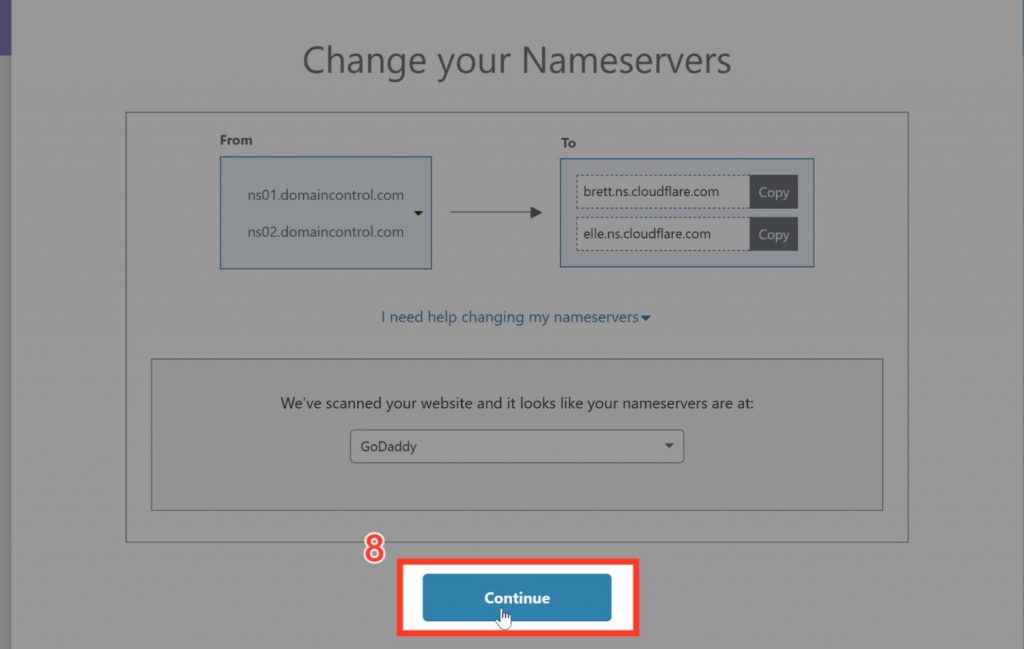
Now let’s go to Cloudflare and click Continue.
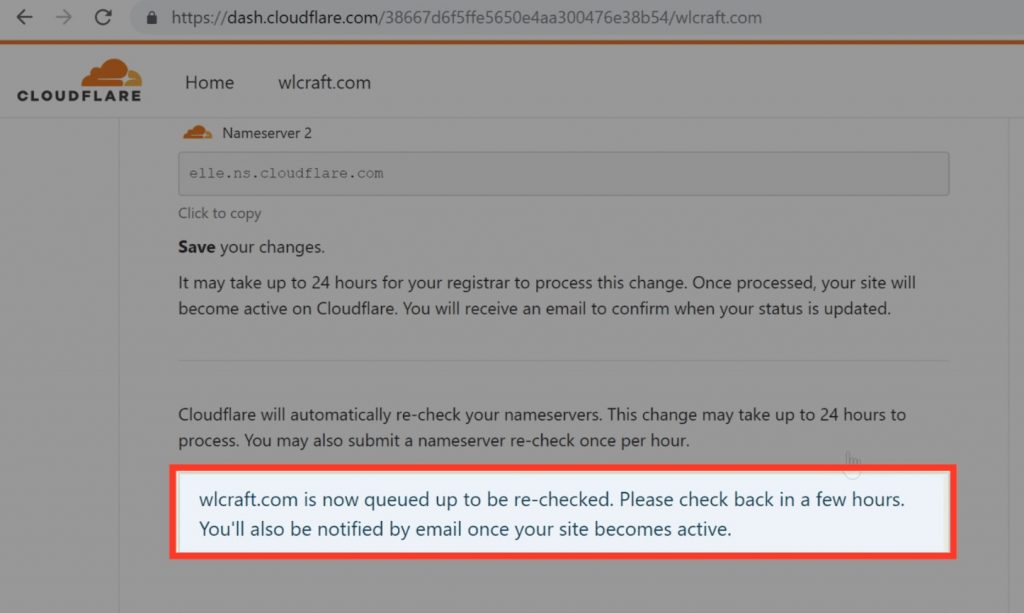
9. Now to check if the nameservers are changed just click Re-check now And you will get the message as shown in the image.
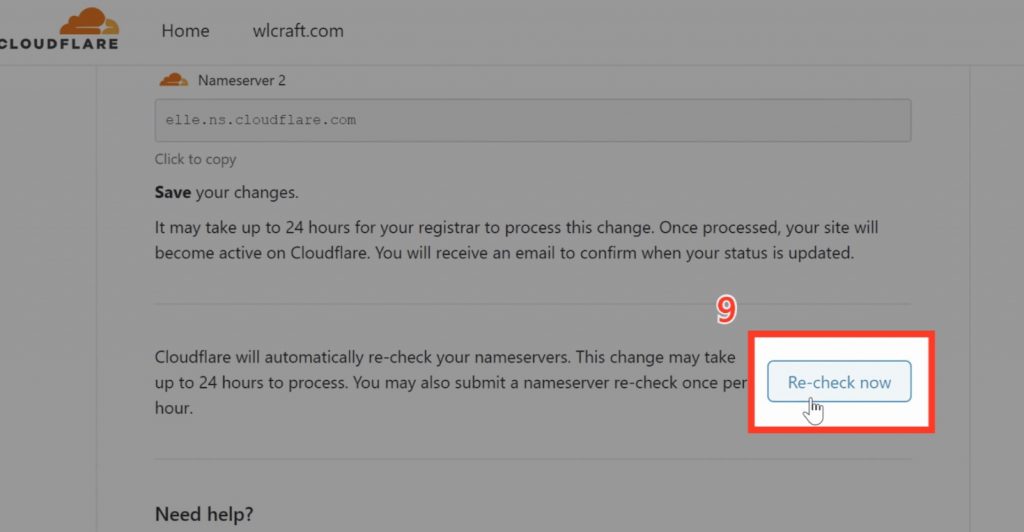
And now if you click refresh you should see this green icon as in the image which means your nameservers have been changed.
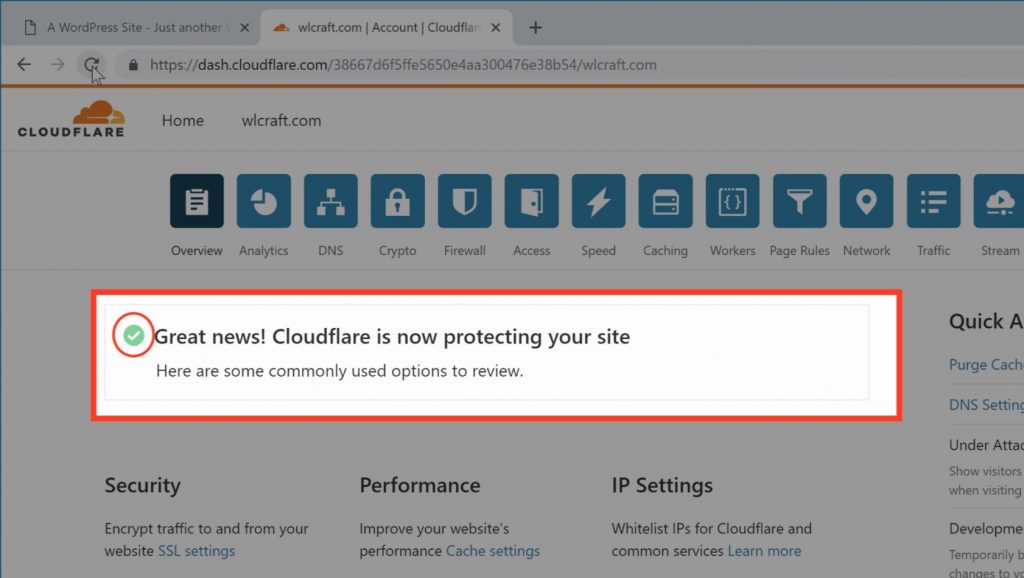
Now even if you don’t see this green icon immediately
You can still go to the next step and everything will work at the end of this tutorial.
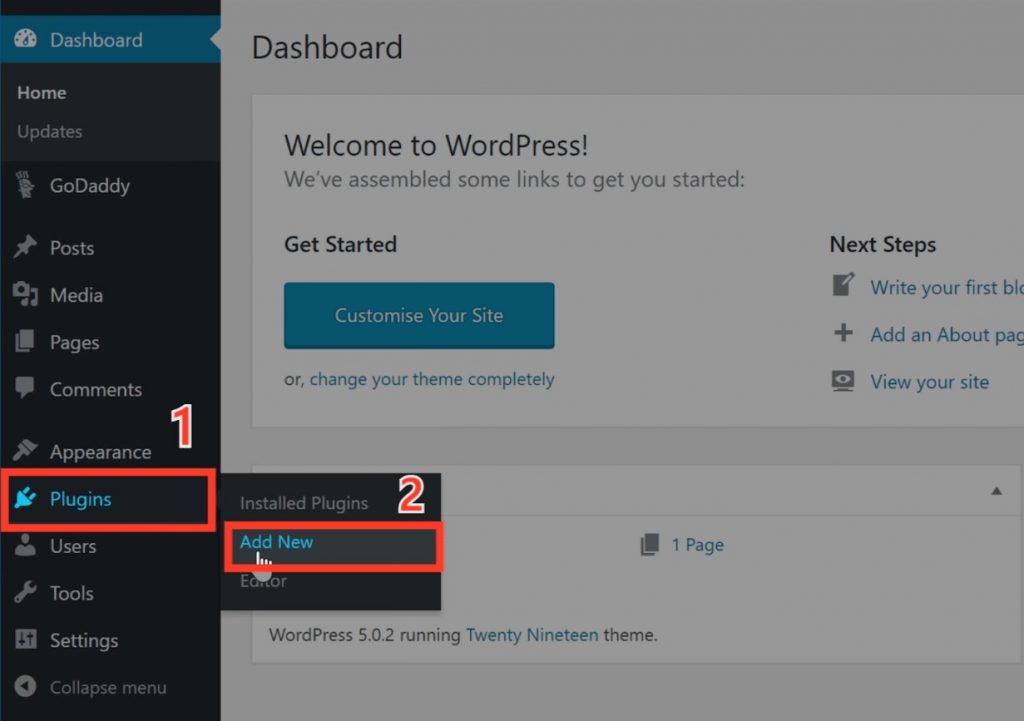
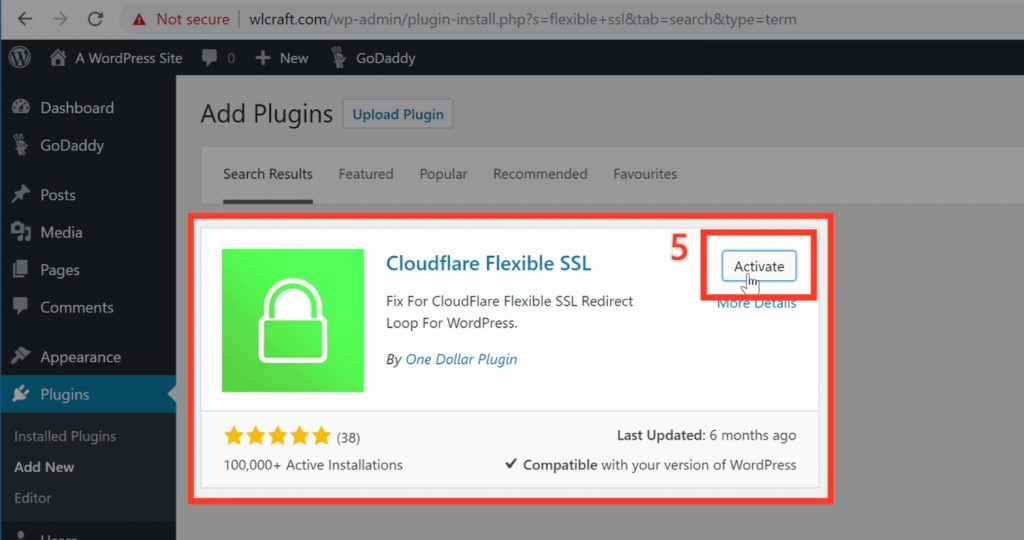
Now to install the plugin, go to your WordPress dashboard and
1. Go to Plugins and
2. Click Add new
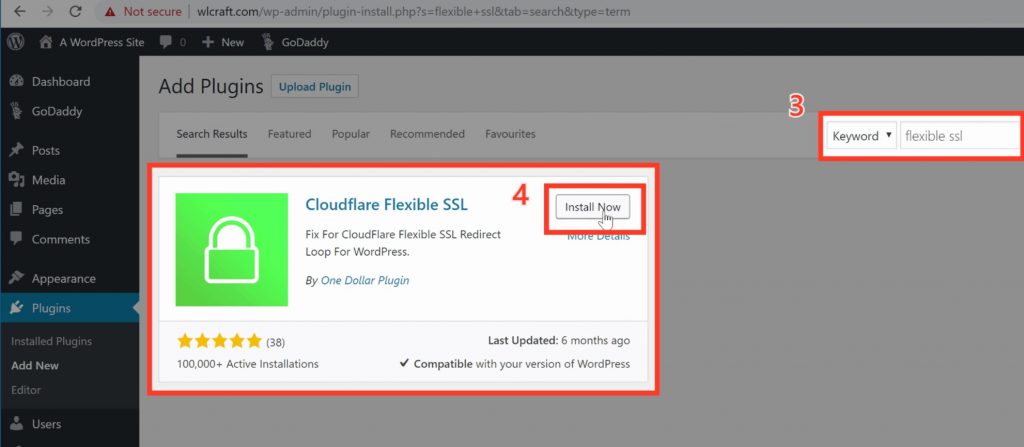
3. Now search for a plugin called Flexible SSL.
And you will get the Cloudflare Flexible SSL plugin,
This is the plugin which is going to help us to connect our site with Cloudflare and enable SSL on our website.
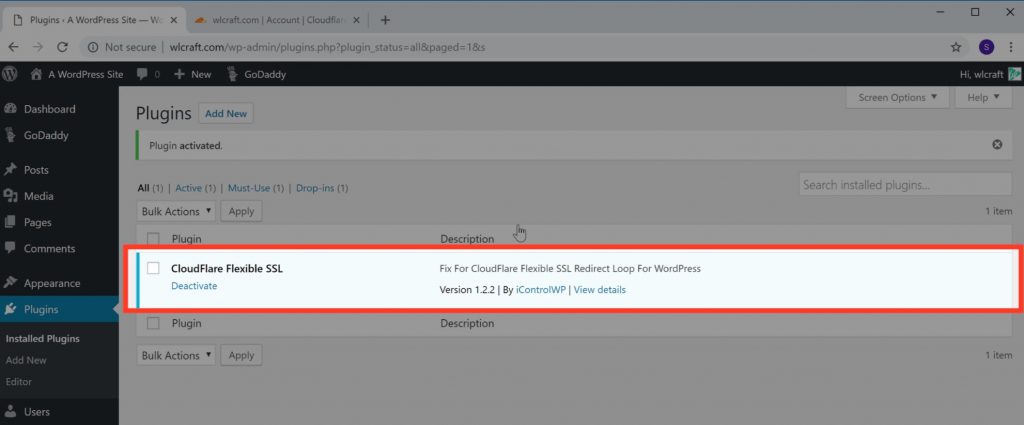
4. Now to install this plugin just click Install
5. And Activate,
So now we have installed the Cloudflare plugin in WordPress
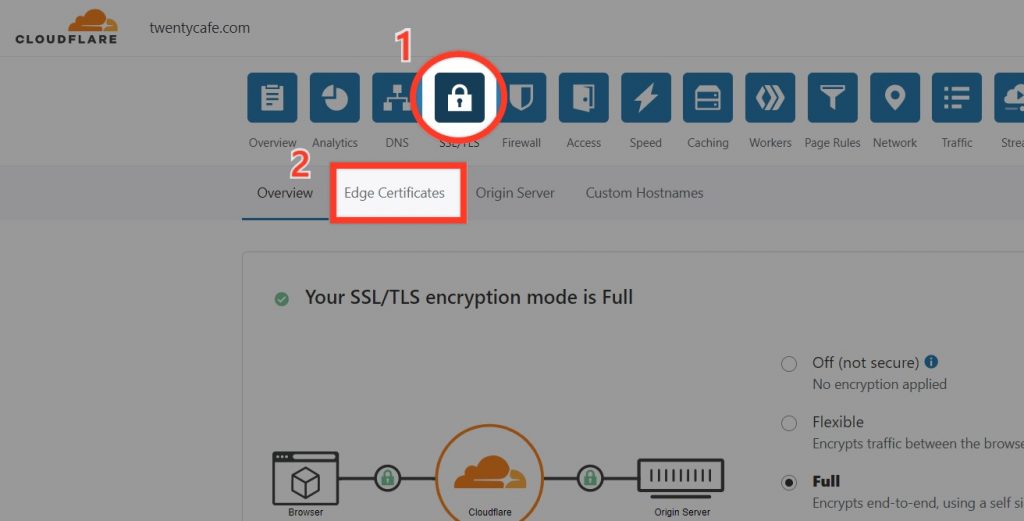
Now the final step is to enable SSL in Cloudflare.
So to do that, go back to Cloudflare,
1. Click the lock icon as shown in the image
2. And then click Edge Certificate
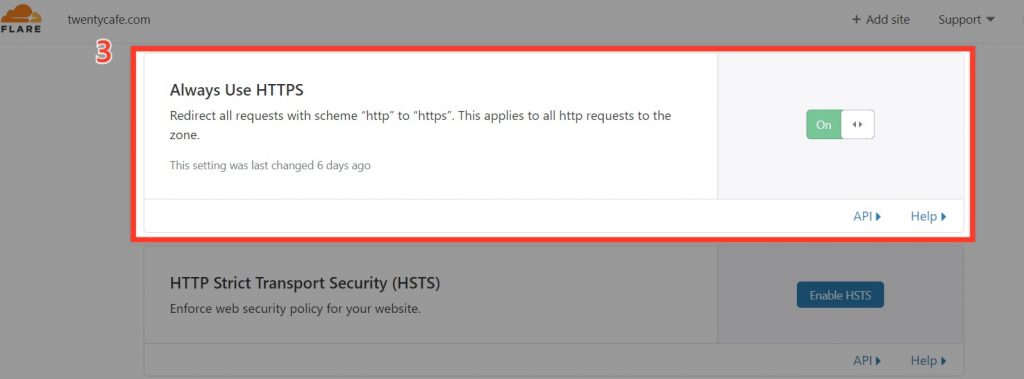
3. Now scroll down to ‘always use https’ And then turn it on. Now as soon as you turn this on, your website will now be secured with SSL
Now if you go to your site you can see that before we had this “Not secure” message.

Now if we click refresh, you can see that we now have the lock and the HTTPS, Which means we have now got the SSL
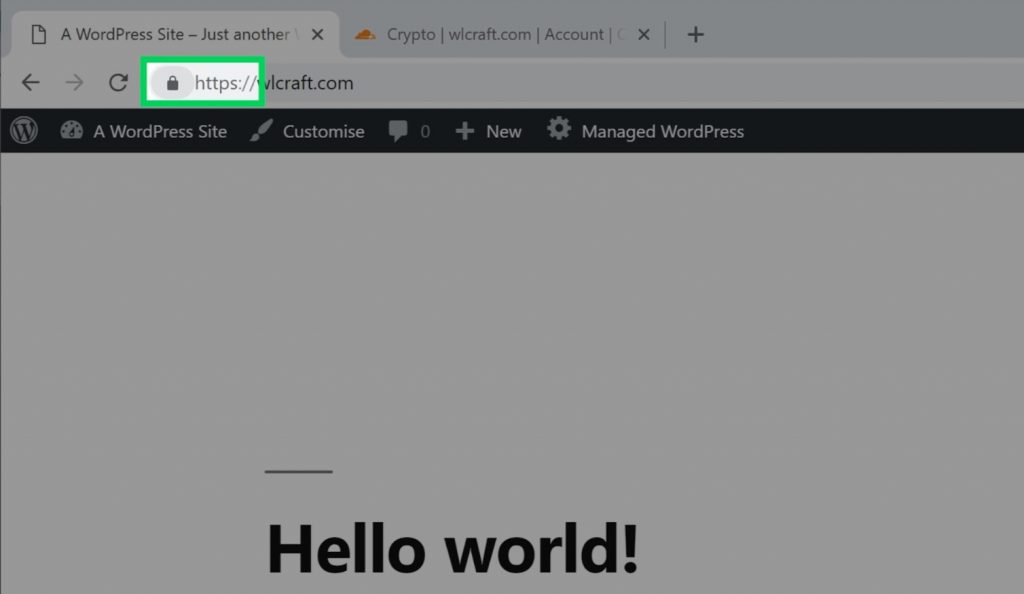
So now if you click the lock symbol you can see that our browser says the Connection is secure.

Now if your site didn’t load properly just wait for a few minutes and then load it from a different device, it will work after a few minutes.
And that is how you can get a free SSL for your WordPress website. Here’s a video tutorial for the same to follow along,
And if you’re still using a generic email address for your business (ex:[email protected]) you can read this guide to get a business email for free. (ex:[email protected])
And for more tutorials on customizing WordPress websites, Subscribe to our YouTube channel.
SSL is used to secure the data that goes from the user’s browser to the website and vice versa. So when you have SSL on your site it ensures that the data between your website and your visitor is safe.
1.Create an account on Cloudflare
2.Add your website to Cloudflare
3.Change your nameservers
4.Install the Cloudflare plugin in WordPress
Do you want to learn WordPress to build any kind of website you want? Then this is the only course you need to take.
View CourseSEO isn't as difficult as you might think. Learn how to start growing organic traffic to your website with our easy to follow video .
Watch VideoSign up for our WordPress Course today!
22 Comments
Leave a CommentSai Harshitha
I have followed the same procedure mentioned, even though my ecommerce website is not secured
Swarnarajan
Hi Sai Harshitha, we request you to send a mail to [email protected], our support team can help you with that 🙂
raiyyan
thank you so much for your advice but it says it is not accessible with the subdomain.
Karthik Tatikonda
We are glad that this blog helped you, Raiyyan. Please send a mail to [email protected] with a screenshot the issue that you’re facing, so that we may assist you better.😁
Mohan Jayanth
What if our domain providers and web hosting are different companies how to get free SSL certificate
Karthik Tatikonda
Hey Mohan. We request you to please contact our support team via email: [email protected] to help you out 😁
Khyati Gupta
Thank you so much for this info! It was so simple and now I got a free SSL certificate just by following a couple of steps.
Karthik Tatikonda
We are glad that this blog helped you, Khyati. 😁
T.V.MANOJKUMAR
I own a free website as taught by you,
Funpills.ezyro.com
But iam not able to verify SSL Certifications.
Is there any way
I have tried some plugins like freessl and zerossl but they failed to verify DNS and verification files uploaded in cPanel.
Karthik Tatikonda
Hi Manoj, I request you to please contact our support team via email: [email protected] to help you out.😁
I have tried the above steps still my site is not https
Will it take time ,
Karthik Tatikonda
Hi, Sometimes it may take 1-2 days time. If it is not activated after 1-2 days, please send a mail to [email protected] 😁
Shudip
This is not done in new version of godaddy….& i didn’t update my wordpress ….
Soo in the new version of godaddy all your earlier videos are not worked ….Give me any idea about that.
Karthik Tatikonda
Hi Shudip, We request you to send a mail to [email protected], our support team will help you out.😁
RUQAIYA SHAIKH
Hey!!! omgg i just got what i was looking for thankyou so much for letting me know about the free ssl. Really been of great help.
Karthik Tatikonda
We are glad that this blog helped you, Ruqaiya Shaikh. 😁
Anoop
I followed these steps, Cloudflare SSL Status is showing Active, but my Site is down now. 🙁
Karthik Tatikonda
Hi Anoop, Sorry for the inconvenience caused. We request you to send a mail to [email protected] our support team will help you out.😁
Yashkant Soni
1. This process is for one time use?
2. If it is valid for only a month, this can be used every month?
Please help me out for the above mentioned queries…
Karthik Tatikonda
Hi Yashkant Soni, Once you follow our instruction and enable SSL on your website, The SSL certificate will be enable for your website as long as your domain is connected with Cloudflare.
If you remove the connection with Cloudflare, you will loose your SSL certificate. There is no monthly renewal for this SSL. Please send us an email to [email protected], if you need more assistance :grin:.
Kavali Suresh
Thank you so much madam. Your explanation is very clear. Easily can understand.
[email protected]
We are glad that this blog helped you, Kavali Suresh. 😁