Imagine a customer adds a product to the cart but doesn’t make the purchase on your website?
How amazing will it be to remind them on their mobiles about the cart abandonment?
You can do that and even more by sending SMS notifications from your E-commerce website.
While you are already using Email as a communication channel, SMS is far more effective for quick reminders and notifications.
Research shows that SMS marketing has the highest click-through rate (CTR) of hyperlinks (6.16%), compared to email marketing (2.80%), search advertising (1.98%), and social media advertising (0.05%).
So, anyone can use SMS to fuel their business growth by effectively communicating with their customers.
In this article, we’ll show how you can add SMS gateway to your E-commerce WordPress Site.
So by the end of this article, you’ll be able to send SMS notifications to your customers just like this.

To follow this tutorial, all you need to have is an e-commerce website.
If you don’t have an e-commerce website, you can easily create one by watching this video.
How to Add SMS Gateway to your E-commerce website
We will add the SMS feature to our website in just three steps,
- Create an Account on the SMS Alert Website
- Connect the Account to Your WordPress Website
- Enable SMS Notifications to our Customers
Bonus Step: Notify your Customer about the Product which is Back to Stock.
Step 1: Create an Account on the SMS Alert Website
SMS Alert is the tool that’s going to help us send SMS to the customers.
To create an account on SMS Alert, click here and it will take you to the official website.
To create your account, click on ‘Register.’
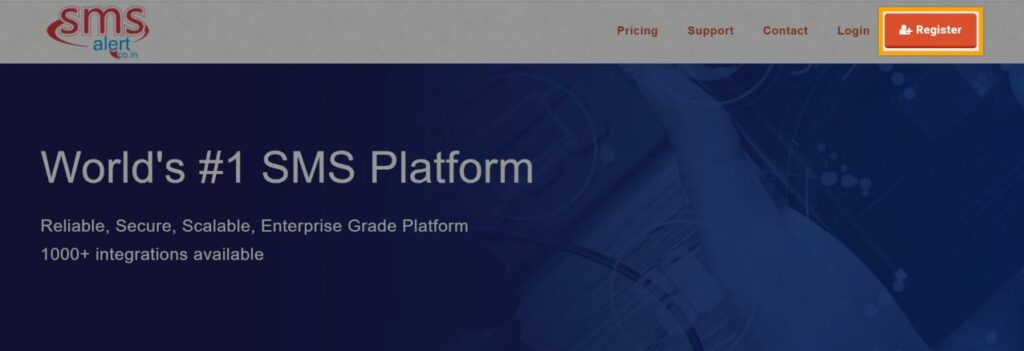
And then enter these details.
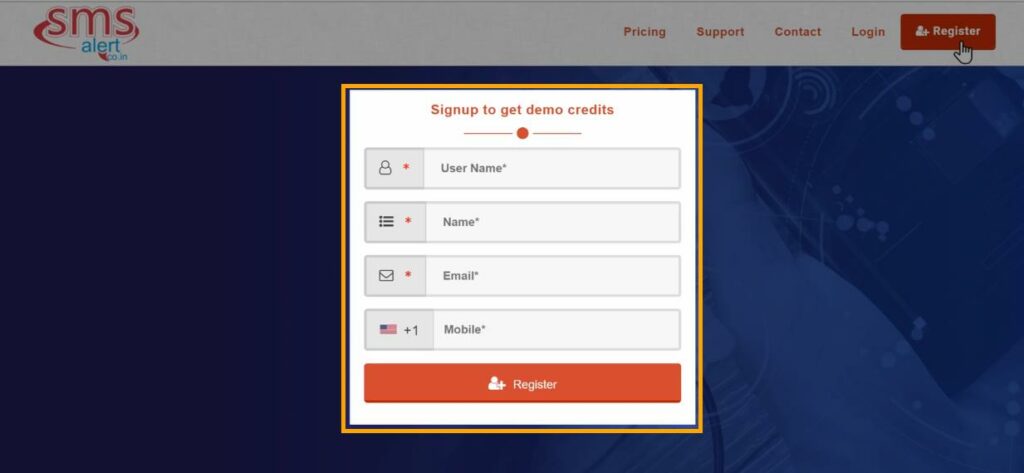
Once you have entered your details, click ‘Register,’ and your account will be created.
Now, you will receive an OTP on the mobile number that you’ve entered.

So, just enter the OTP and click ‘Validate OTP.’
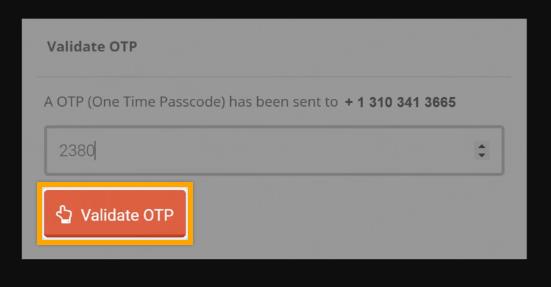
Now, we’ve successfully created an account on the SMS Alert website. Once you have created the account, we can go to the 2nd step to connect this account to your website.
Step 2: Connect the Account to Your WordPress Website
To send SMS from your website, we need to install this plugin on your WordPress Website.
To install the plugin, go to your WordPress dashboard. Now go to ‘Plugins’ and click ‘Add New.’
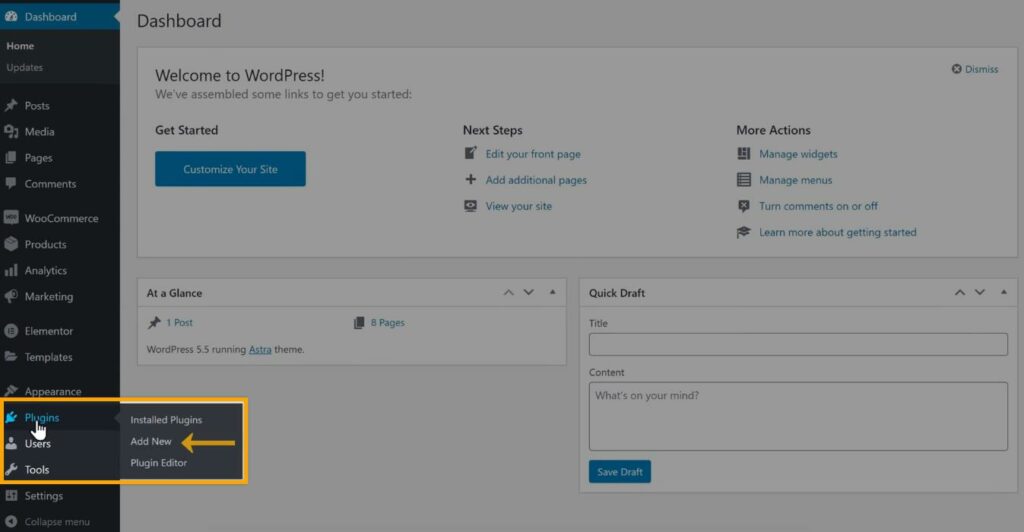
In the Add Plugins section, search for the ‘SMS alert’ Plugin.
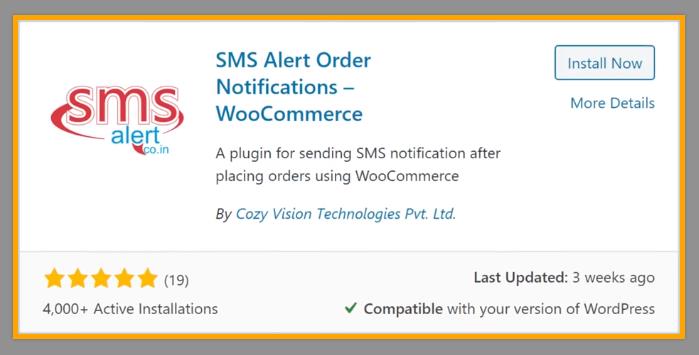
So, this plugin will help us connect our website to the SMS alert account.
To install this plugin, click ‘Install’ and then click ‘Activate.’

We have successfully installed the plugin.
To connect your website to the SMS alert account, we need to log in to our SMS alert plugin.
So to login to this plugin, go to ‘WooCommerce’ and click on ‘SMS Alert,’ and you will get this page.
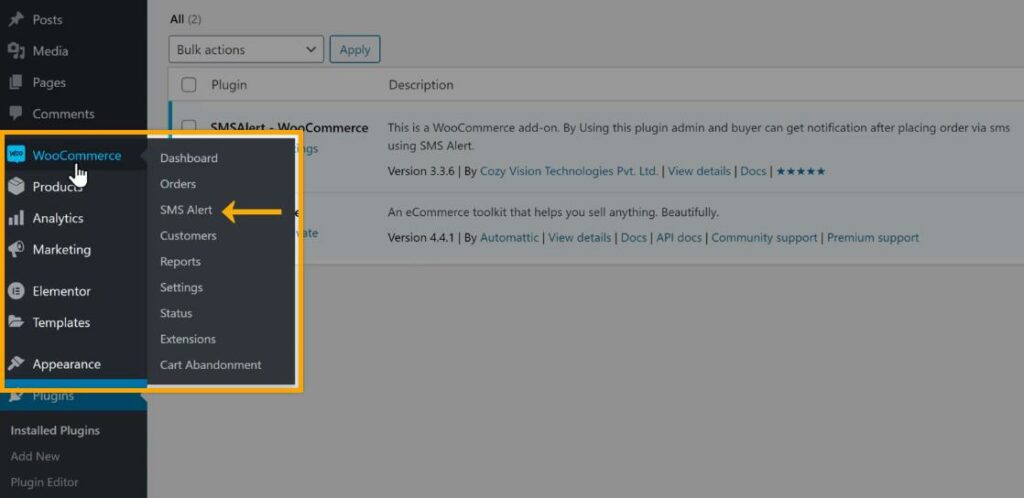
Now here, you need to enter the login details of your SMS alert account.
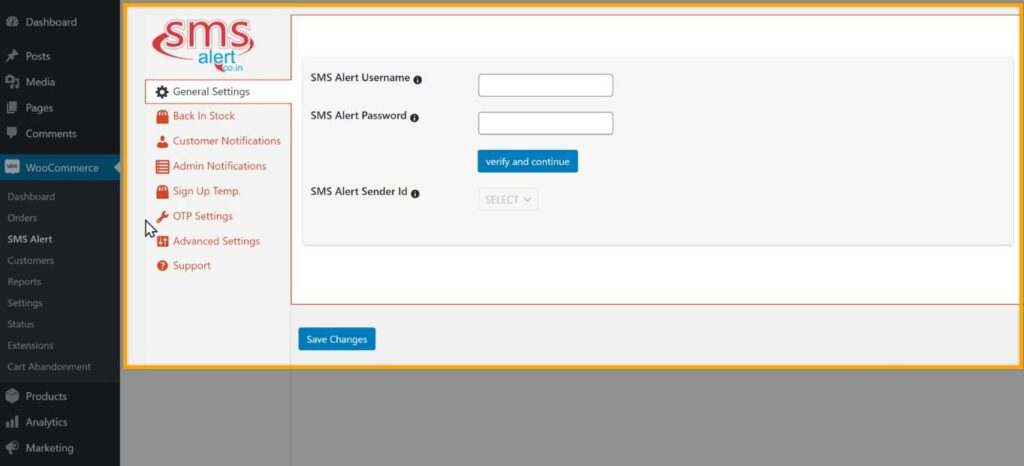
As soon as you create your SMS alert account, you’ll receive the login details to your email address while creating your SMS account.
As you can see, we got the mail from the SMS alert, so open it, copy these details, and paste it on your website.
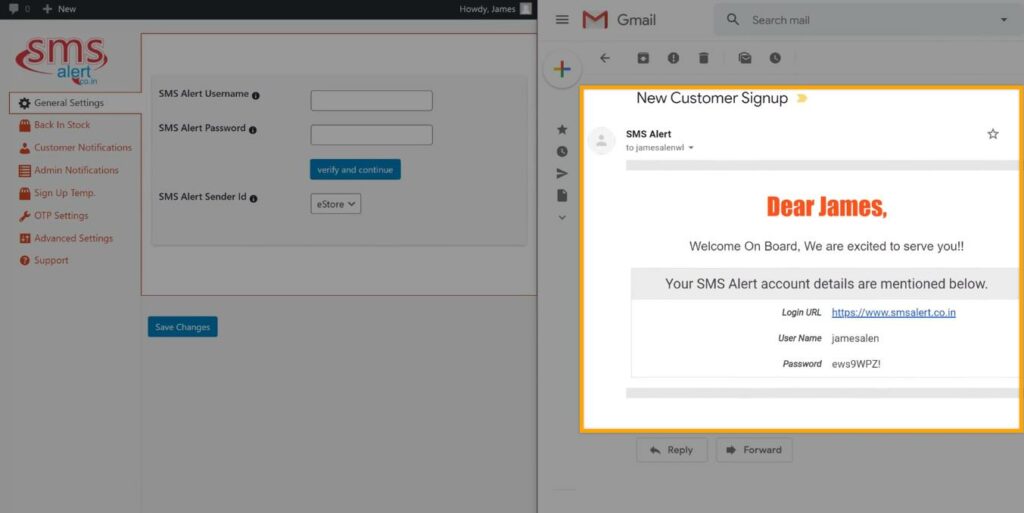
Once you have entered the login details, click on ‘ Verify and Continue’ and click ‘Save Changes.’

So now we have logged in to this plugin. Now enter the mobile number where you want to receive the email notifications. Once you’ve entered the number, click on ‘Save Changes.’

So now, we have successfully connected the SMS alert account with your website.
Once you have connected your account, we can now go to the final step to enable SMS notifications to our customers.
Step 3: Enable SMS Notifications
Once you enable the SMS notifications, you can start sending SMS to your customers.
So, to enable it, go to Woocommerce and click on SMS Alert and then click on ‘Customer Notifications.’
Now select when you want to send the SMS to your customers from this list and click on ‘Save changes.’
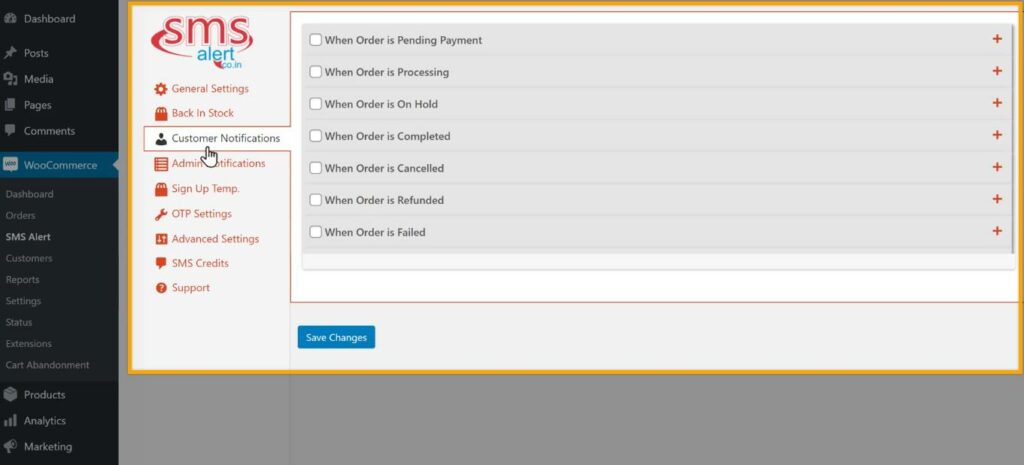
So now we’ve successfully enabled the customer SMS notification, and your customers will receive notifications on their purchases.
Next, let’s see how you can verify your customer before placing an order. Suppose a customer is placing an order and processing the order. You want to ensure that the order is genuine.
So, How can you Verify your customer?
You can do that by sending an OTP to your customer’s mobile number during the time of purchase or placing the order.
OTP is a one-time password that is sent to the customer’s mobile number to verify their number on our website.
So the customer has to enter the OTP and verify their mobile number before placing the order.
Enabling the OTP Feature
To enable it, go back to your WordPress dashboard and then go to OTP Settings (in your Plugin).
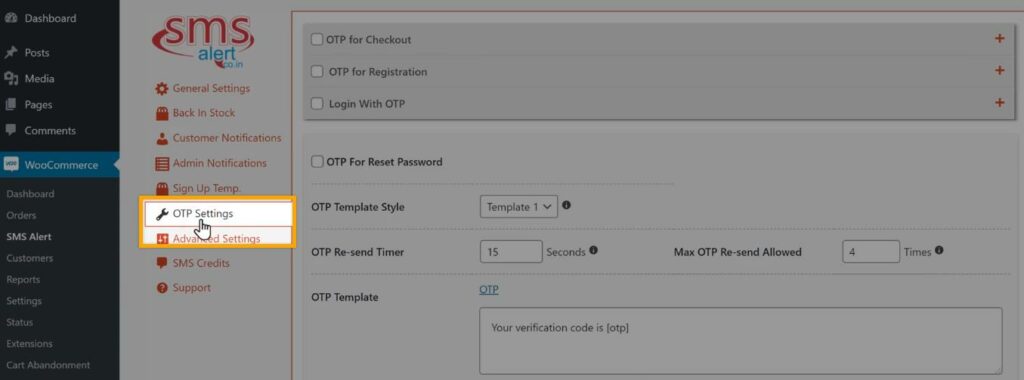
Now to add the OTP feature on your checkout page, enable the option “OTP for Checkout.”
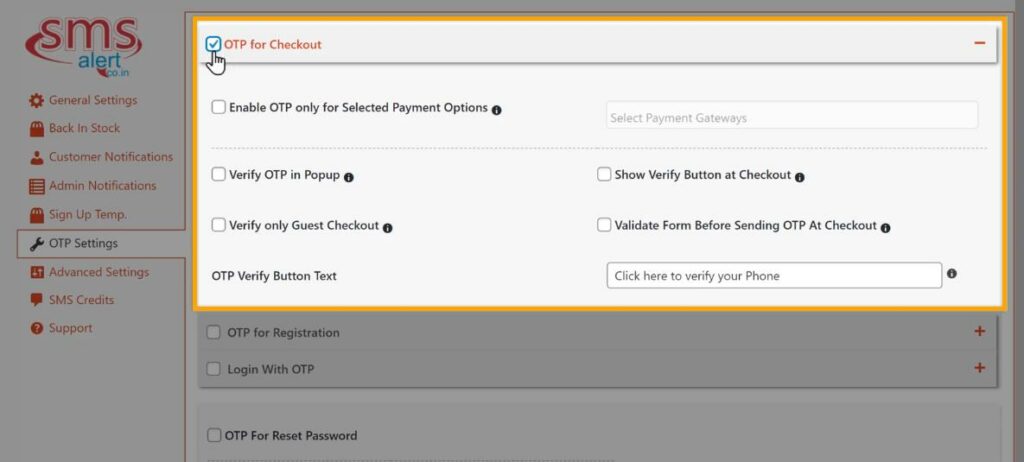
And if you want to enable OTP verification, when your customer selects a particular payment method, enable the option “Enable OTP only for Selected Payment Options.”
Then click here and choose your payment method for which you want to enable OTP Verification.
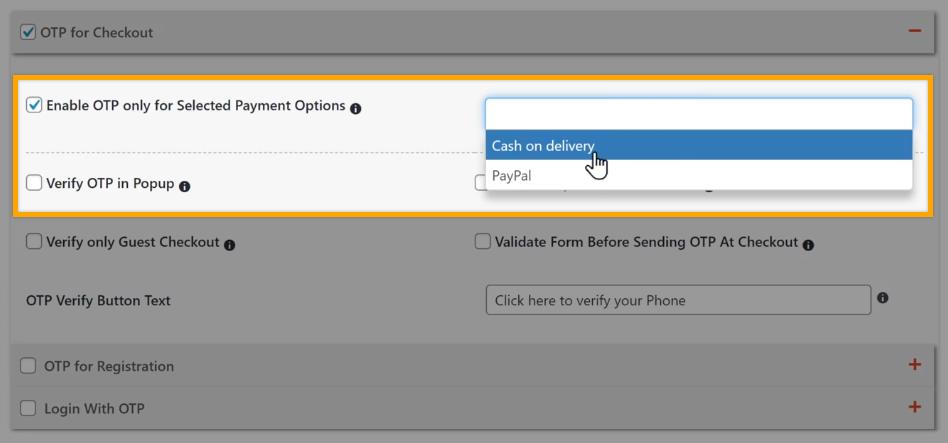
Here, by selecting ‘Cash on delivery,’ you ensure that the OTP will only be sent to people who opt for the COD option.
So, when the customer selects cash on delivery payment, they will get an OTP to their mobile number for verification.
Now instead of the ‘proceed to checkout button,’ if you want to show the OTP verify button on your checkout page as shown here,
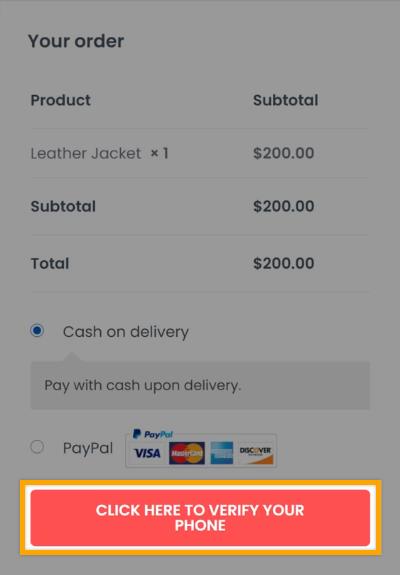
Enable the option “Show Verify Button at Checkout.”
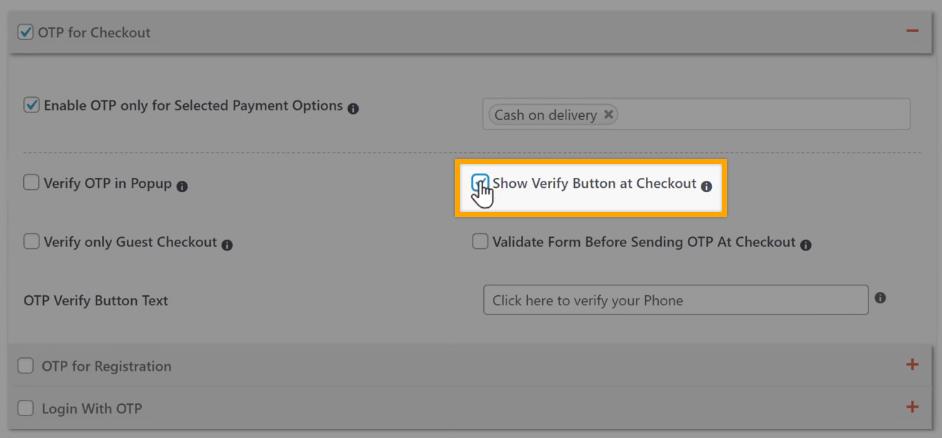
And if you want to show an OTP Verification in a Pop-up on the checkout page like this,

Just enable the option “Verify OTP in a Popup.”
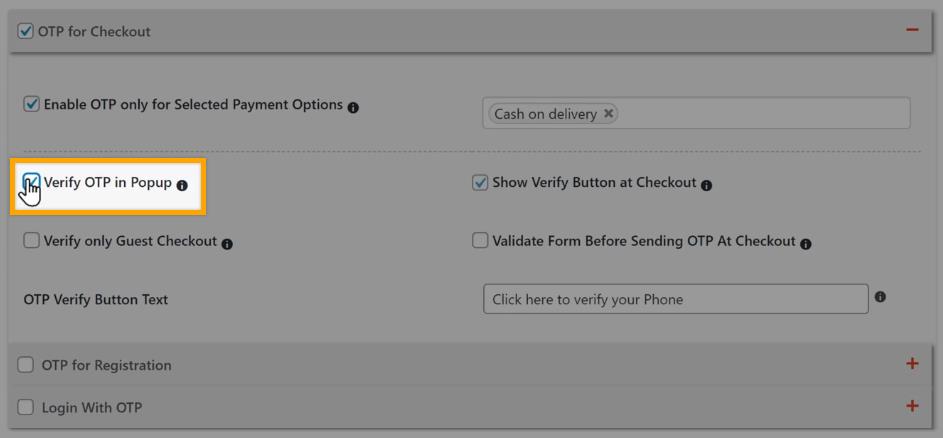
Once you’re done, click ‘Save changes,’ and the OTP feature will be enabled on your website.
If your customer adds the product to the cart and clicks on ‘proceed to checkout and selects ‘cash on delivery’ as the payment method, it will ask them to verify their number to place the order, as shown here.
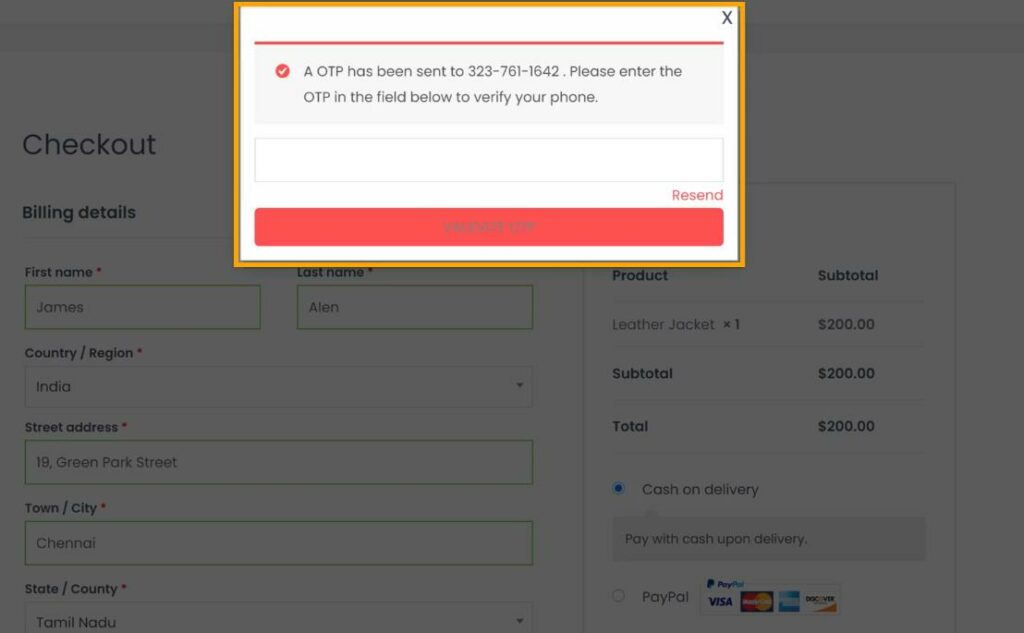
So once they enter the OTP and then click on ‘Validate OTP’, their mobile number will be verified.
So, once your customer verifies their phone number, they will be able to place the order on your site.
So this is how you can verify your customer before they place an order on your website.
Next, let’s go to the BONUS part of this tutorial, where we will see how you can notify your customer about the product which is back in stock.
Bonus: Enabling Back in Stock Messaging Feature
Now let’s say your customer is looking for a product on your website that is not available right now, and you want to notify your customer when it is back to stock.
How will you notify your customer about it?
You can do that easily by sending an SMS to your customer when the product is back in stock.

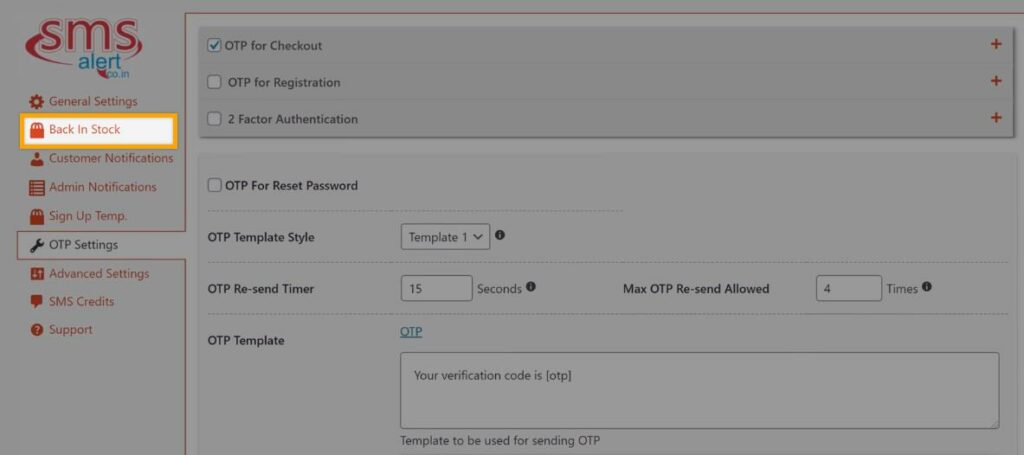
To send ‘back in stock’ SMS, go back to your dashboard and click ‘Back in stock.’
Now select both of these options ‘send msg to the customer when product is back in stock’ and ‘send msg to customer when product is subscribed,’ and then click ‘save.’
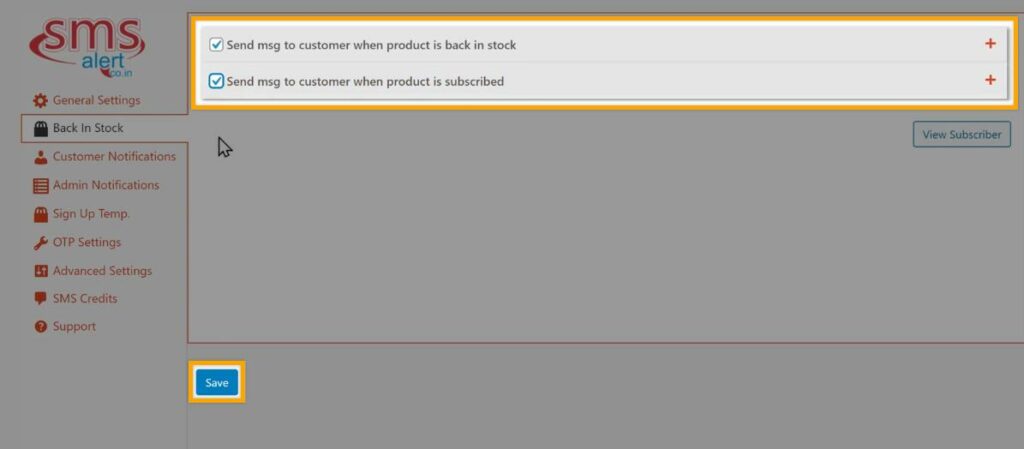
Now the back-in-stock feature will be enabled on your website.
If a customer selects an ‘Out of stock’ product from your website, they can enter their phone number to get a message whenever the product is back on stock.
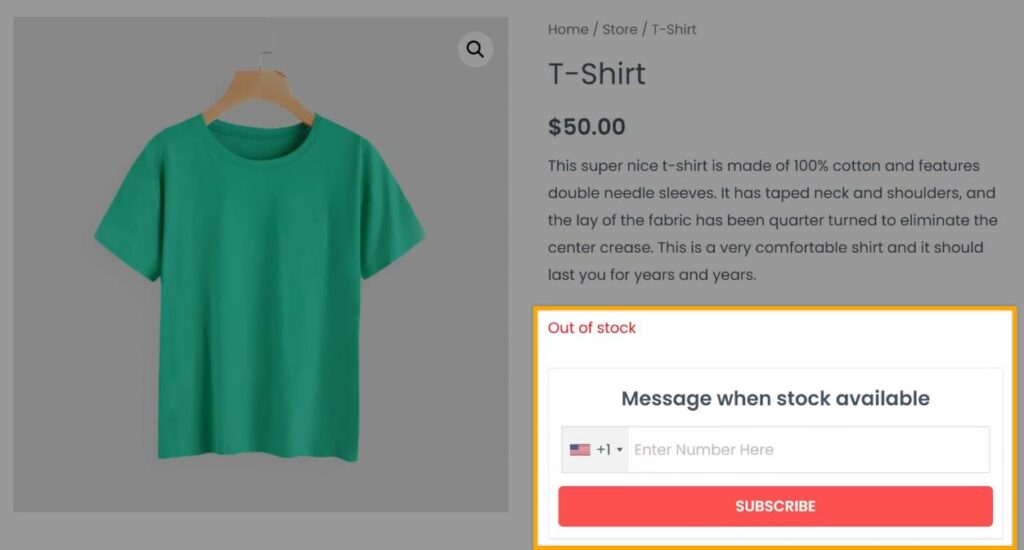
So, when this product is back in stock, your customer will get an SMS to their mobile number. So once the product is back in stock, your customer will receive an SMS like this,
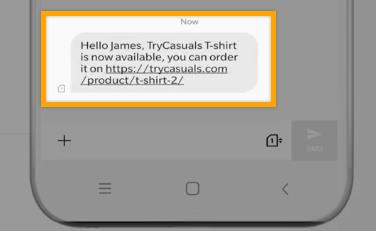
So this is how you can notify your customer when the product they’re required to look for is back in stock.
Next, let’s see how you can receive SMS notifications when a customer places an order on your site.
How to Receive Notifications when a Customer places an Order?
So to receive the SMS about the orders placed on your site, go to your website’s dashboard and click ‘admin notifications.’
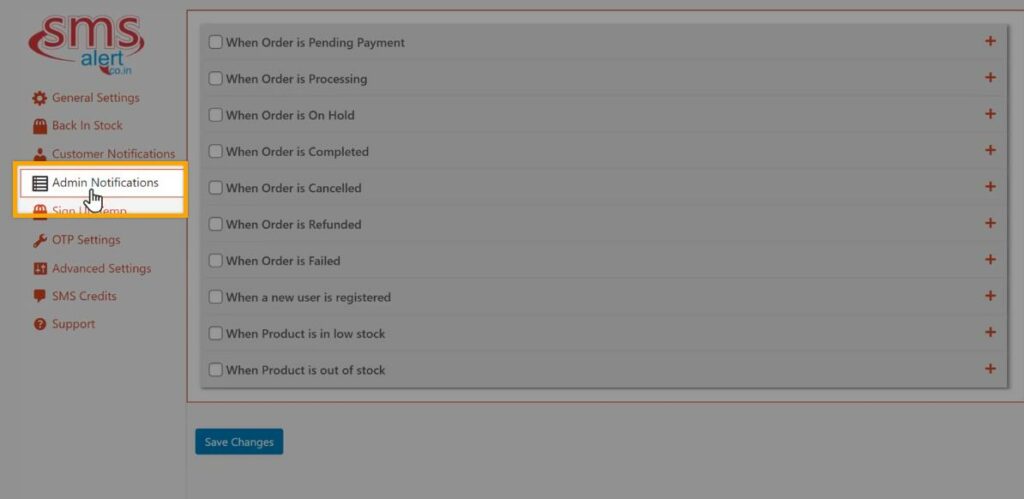
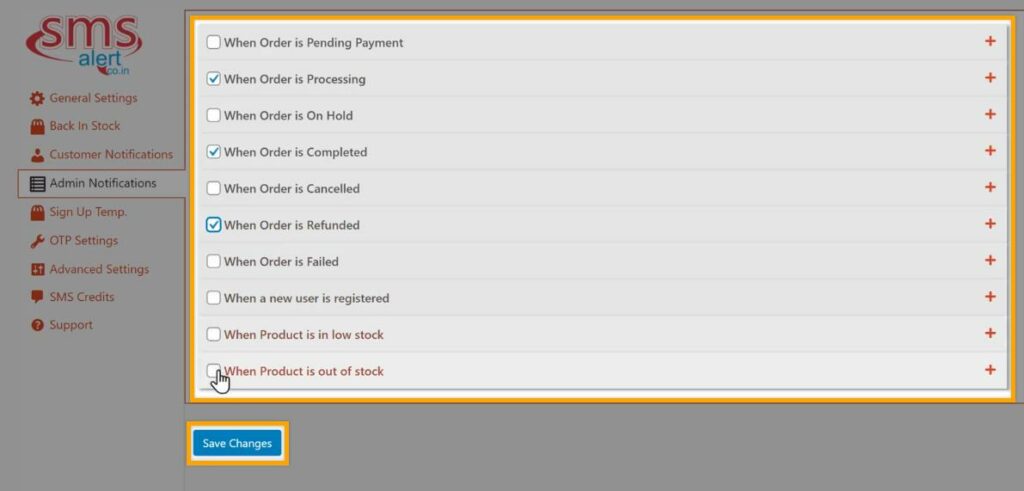
Here you can see a list of options to choose from when you want to get the SMS notifications.
Once you have chosen the options of your choice, click ‘Save.’
Now, when a customer places an order, you will start receiving SMS to your mobile number, as shown here.
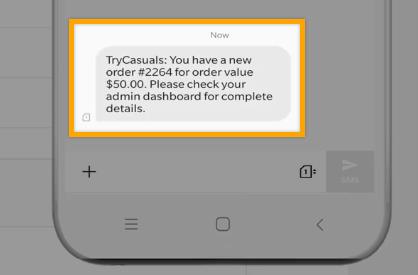
So this is how you can receive SMS notifications when a customer places an order.
Now, if we go to the SMS alert account, we can see a trial account.
Since it’s a free trial account, we will get only 5 SMS credits which mean we can send only 5 SMS from this account. So now, to send more SMS, we need to purchase the SMS credits.
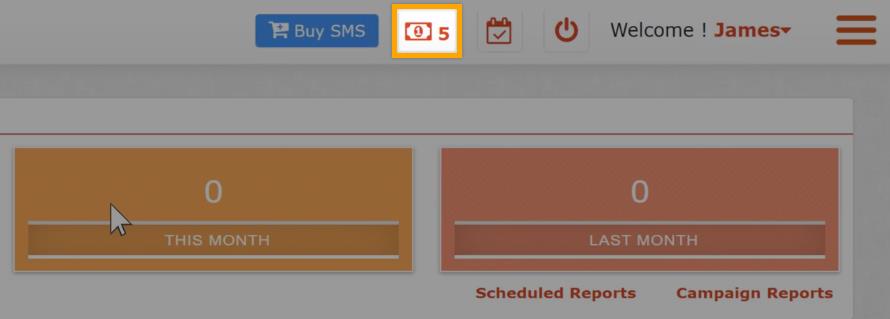
So to buy more SMS credits, go to your dashboard and click ‘Buy SMS.’
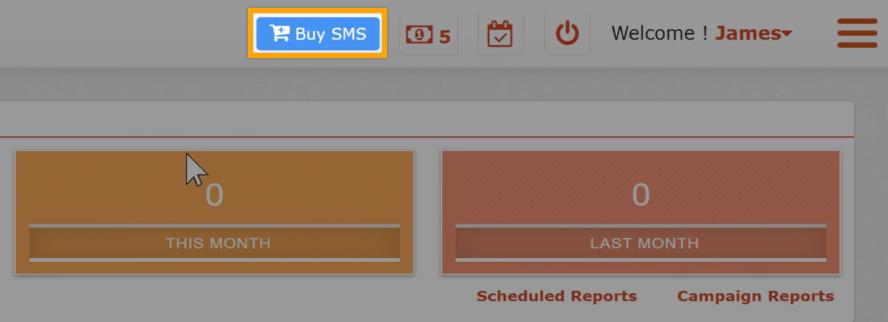
To purchase the SMS (credits), the minimum credit value is 5000, which means you can send up to 5000 SMS to your customers.
So, enter the details and enter the SMS credits you want and then proceed to checkout.
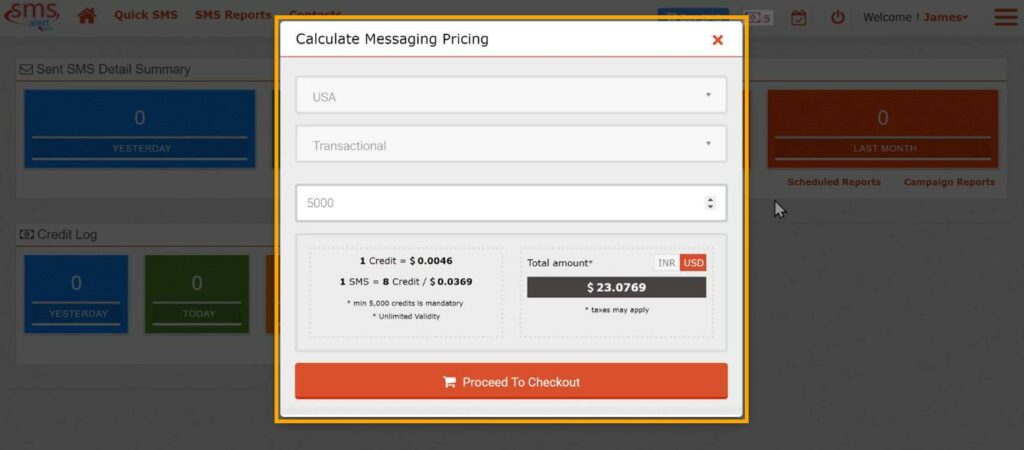
And once you have got the credits, you can start sending SMS for your orders.
So that’s it, guys; this is how you can send SMS to your customers from your E-commerce websites.
Conclusion
It’s critical to build relationships with your customers and be on the top of their minds when they think about your products, and SMS alerts can do just that. So what we have here is a simple way to send SMS notifications from your eCommerce site to customers.
You can start by creating an account on SMS Alert, connect it to your WordPress site, and after that, enable the SMS Notifications. Then, at last, you can add the cherry on the top by allowing the “Back in Stock” option.
So, if you’re ready to set up an SMS Alert on your website, then click here to begin the process.
And if you want to learn more about WordPress, subscribe to our YouTube channel.
Add a Comment
Leave a Comment