How To Create A Free Business Email
Posted on
August 15, 2018
by

in
Guides
So let’s first see what a business email is.
A business email is simply an email address that contains your business name.
For example, rather than having ‘[email protected]’ as your business email address, you would have ‘[email protected]’ instead.
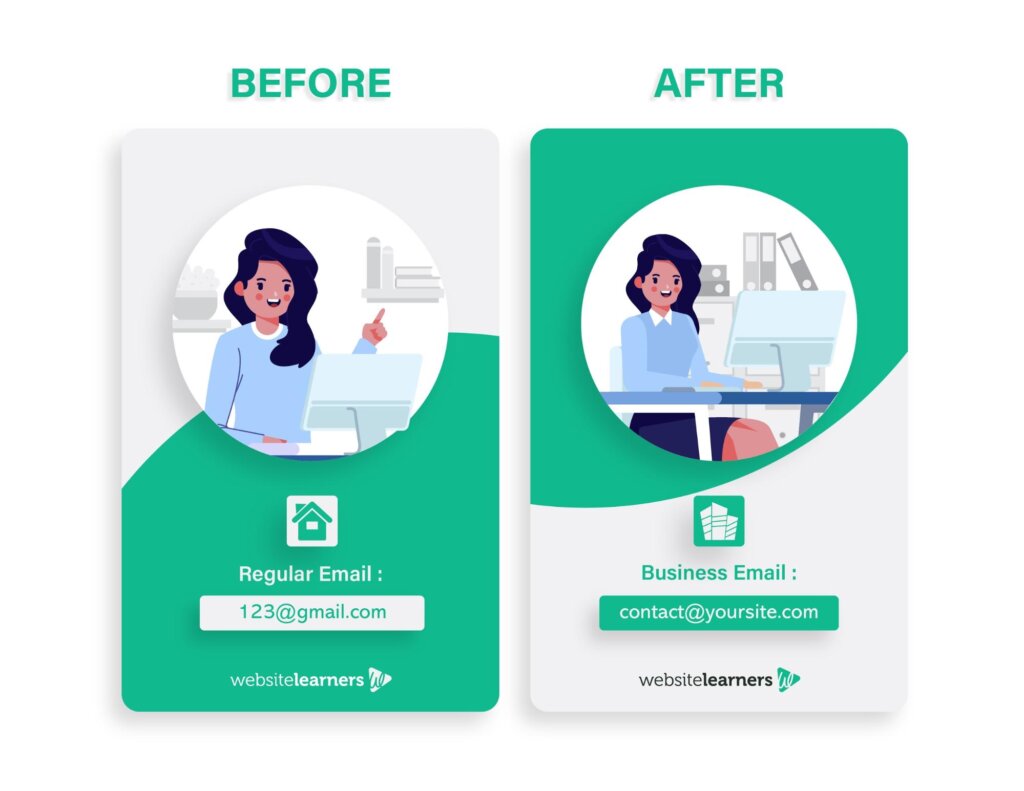
Having a business email helps you to build your business. It makes your communication more professional, and it helps customers to trust your website and branding.
If you use a generic email such as [email protected] for business purposes, you will appear to customers as an individual, rather than a business entity.
By using [email protected], you will appear much more professional for business purposes.
It also serves as a way of advertising your business when you send emails from your business account, and place your business email on your stationery items such as business cards.
Better yet, you can also use a business email to differentiate sections of your business, making it easier for customers to contact the correct department.
For instance, you can create a [email protected] email address for customer support or [email protected] for receiving sales inquiries from your customers.
To follow this guide, all you need is a domain name from GoDaddy. Buying a domain name from GoDaddy is a quick and simple process.
If you do not have a domain name yet, simply head over to GoDaddy to secure one, before returning to continue following this free business email tutorial.
Once you’ve secured your domain name, let’s get started!
So, We are going to create a free business email in two parts:
We are going to create your business email in three steps,
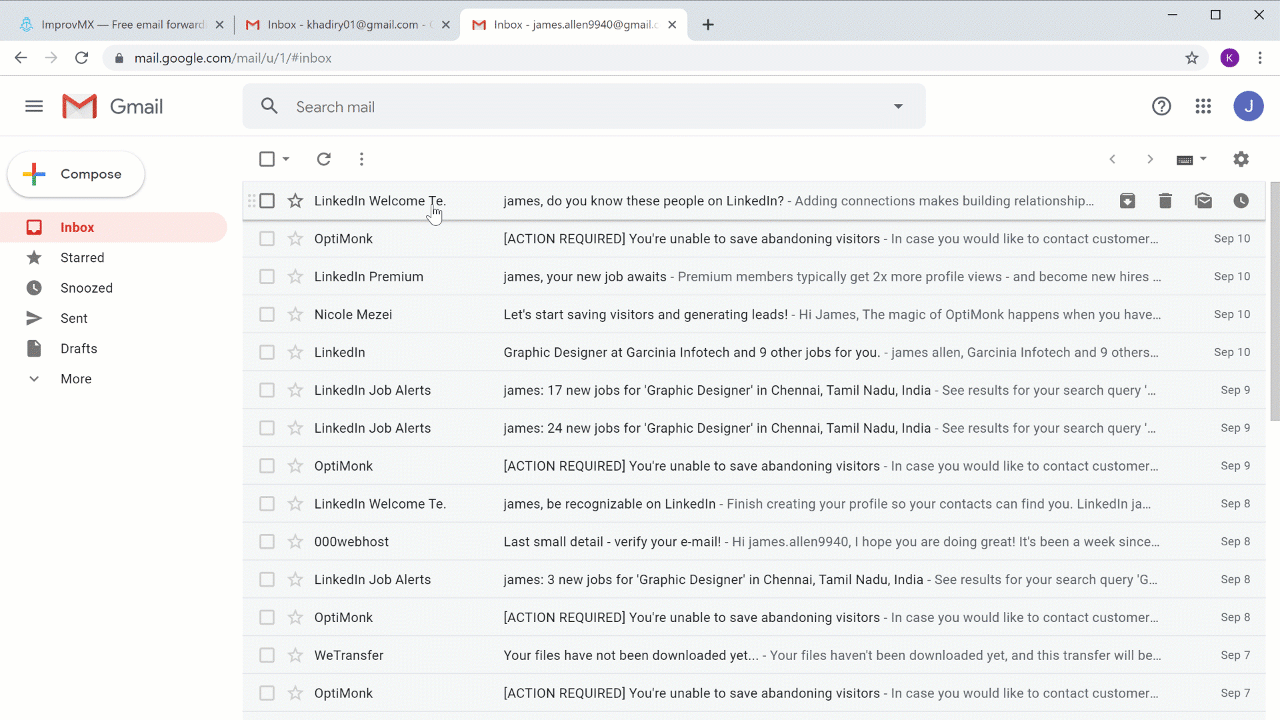
First, we are going to create a business email using improvMX, before linking it with your Gmail account. Linking to Gmail makes your business email easy to manage since it’s exactly the same as managing your personal Gmail inbox.
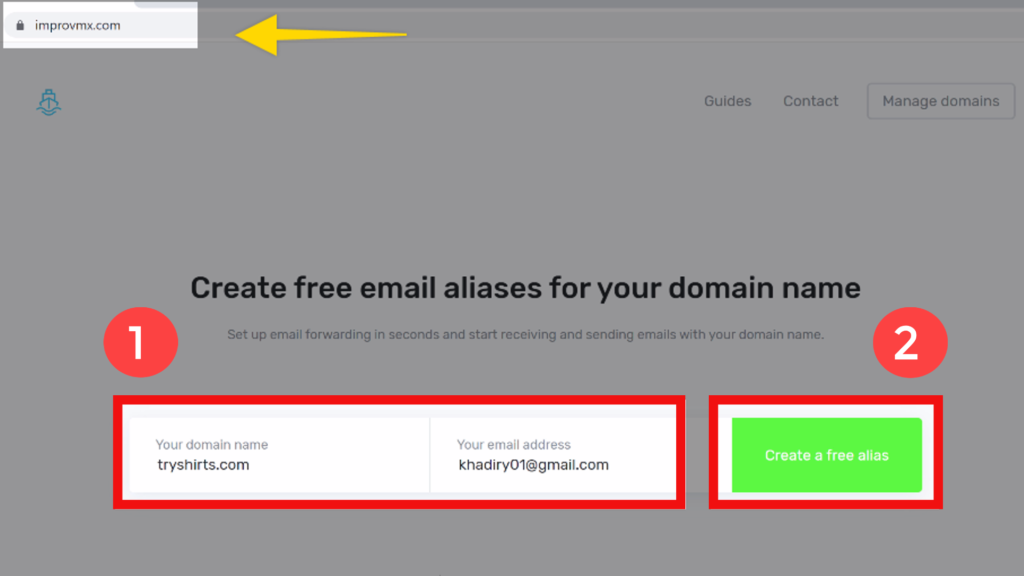
ImprovMX is a website that allows you to forward all emails coming into your business email account, to another inbox where you can read them.
All you have to do is go to improvmx.com and enter your domain name and Gmail address.
Remember the Gmail address is where you want to read emails forwarded from your business account.
So, for example, I’m going to enter my domain name which is ‘tryshirts.com’.
Now we have successfully created our account in improvmx.
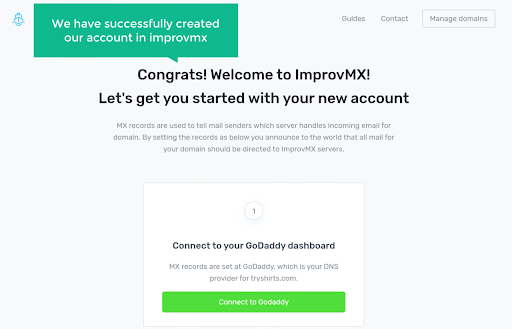
Once you have created your account, it’s time to move on to the next step.
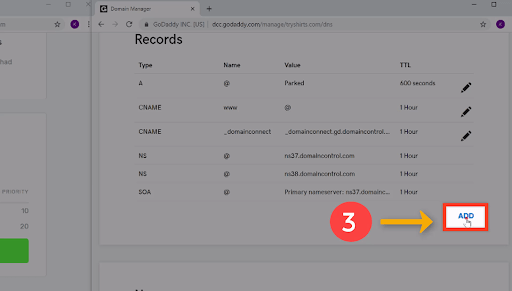
Now we need to add the improvMX records to the DNS page. To find those details, just scroll down and you will see the MX entries displayed below.

Next, you need to add these records to your DNS page.
To find your DNS location, simply scroll up. As you can see, the DNS is with Godaddy.
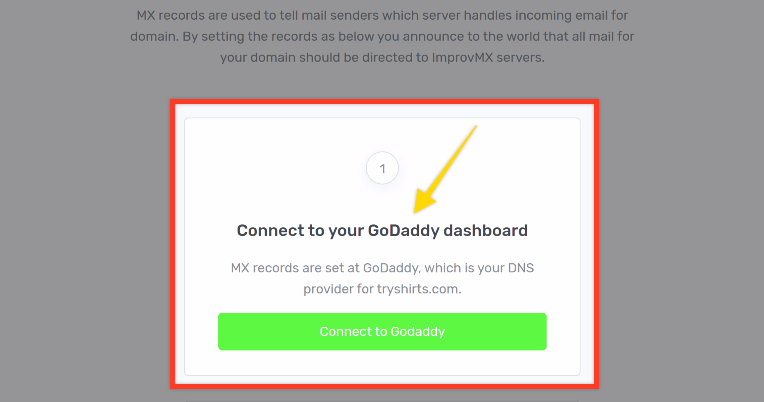
Therefore, to add the DNS records, you need to log in to Godaddy.
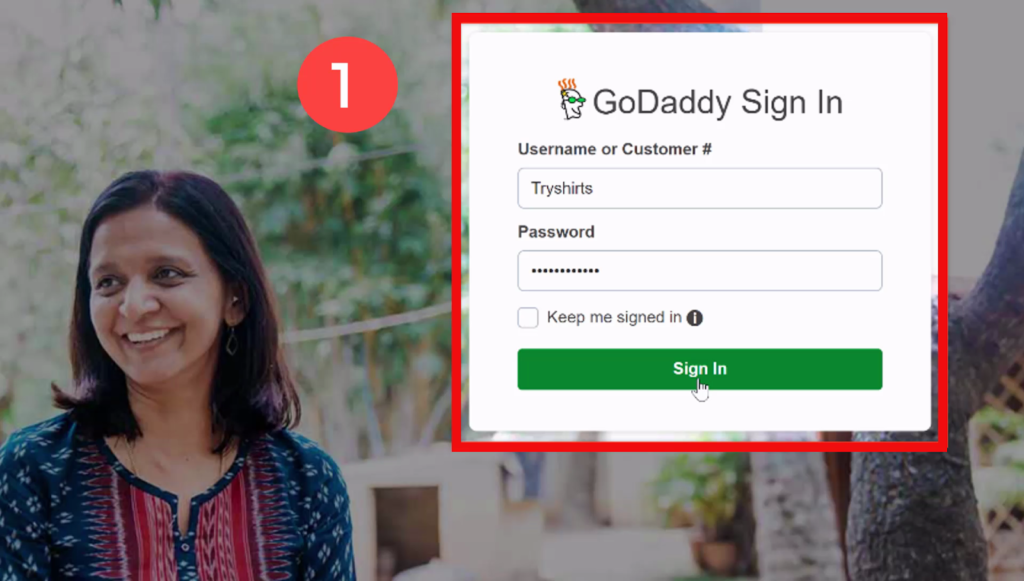
Once you have logged in to your GoDaddy account, you’ll see your domain listed here.

Once you’ve got your MX entries to hand, you need to add them to the DNS page as demonstrated below.
Make sure to delete any old MX entries before adding these new records. When you’re ready, let’s add the records one by one.
In the type field select ‘MX’ and enter ‘@’ in the host field.
Next, copy the MX entry values and paste them into the matching boxes in the priority order shown below.

Once you have added the first record,
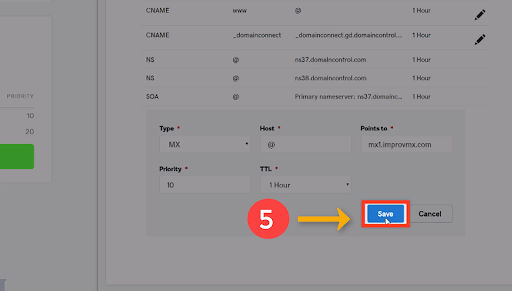
Now we’ve added our first entry, it’s time to repeat the process for the second.
Hopefully, you have now successfully added both these records to your DNS page.

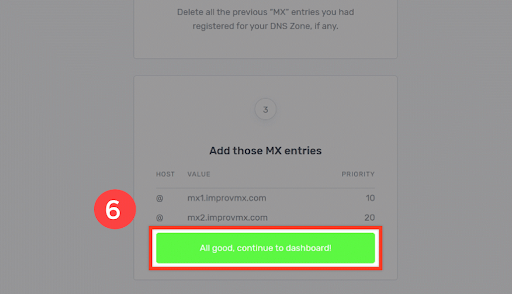
You will arrive at this page.
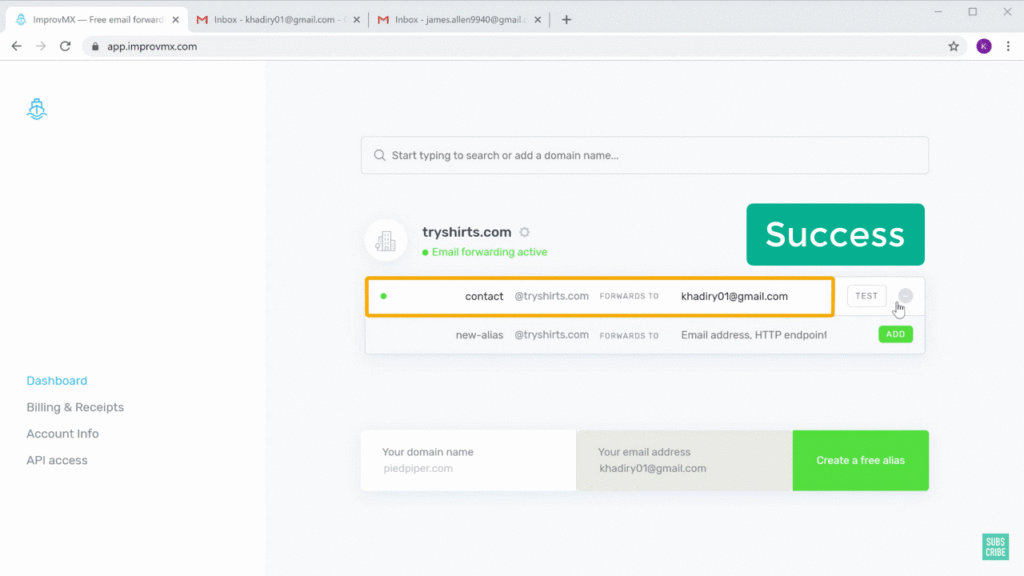
You should see that improvMX is now active.

Once you’ve received this message, we can go to the last step.
By creating an email forward, all emails coming to your business email account will be forwarded to another inbox where you can read your emails.

To create an email forward, you need to take the following steps:
It can be anything, such as [email protected]
As you can see, here I have entered ‘contact’ @tryshirts.com
Here, you can see I have entered my personal Gmail address.
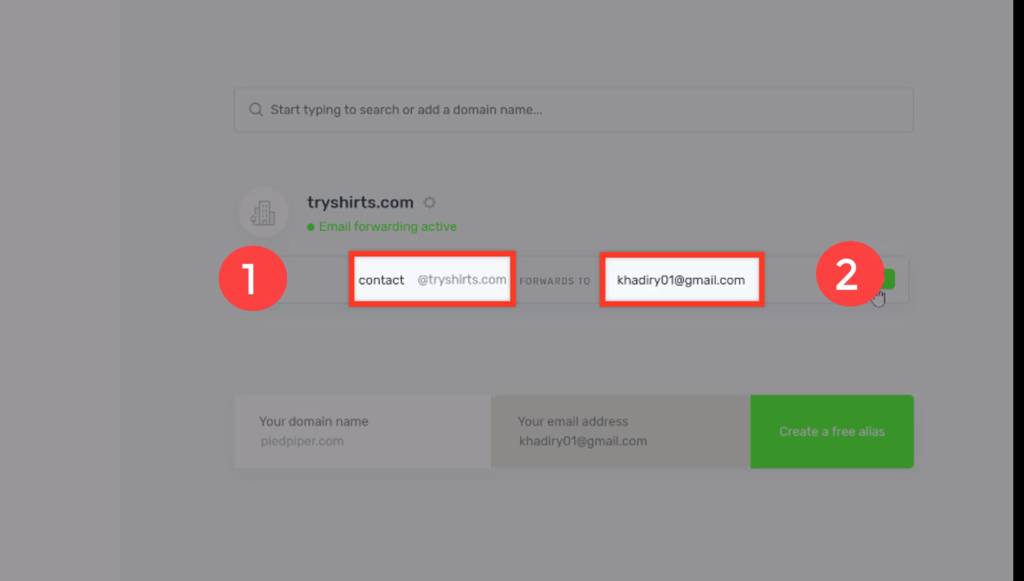
Now all emails coming to this business email address will be forwarded to my Gmail inbox.

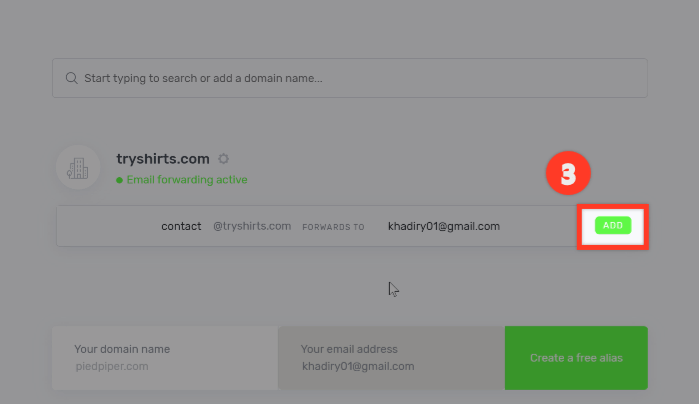
And that’s it! Your email forward will have been created.
Now it’s time to test if this forward is working.
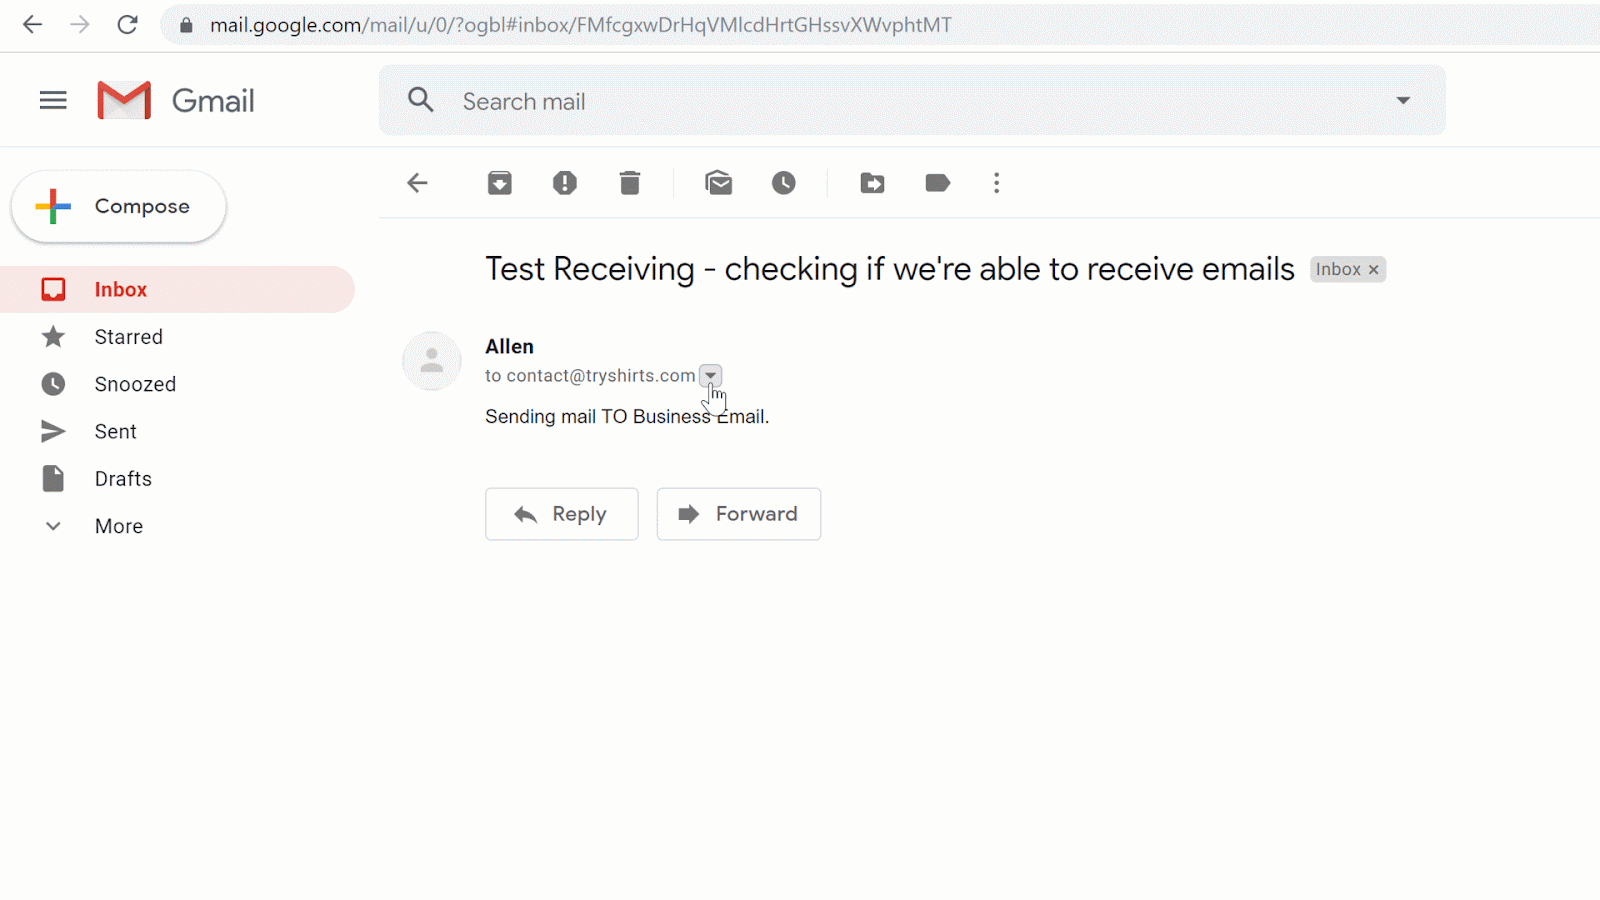
DEMO: Let’s send a test mail as a pretend customer to the business email we created, to see if we can receive it.
To send the email, let’s use a random Gmail account to compose a test email, before sending it to [email protected]
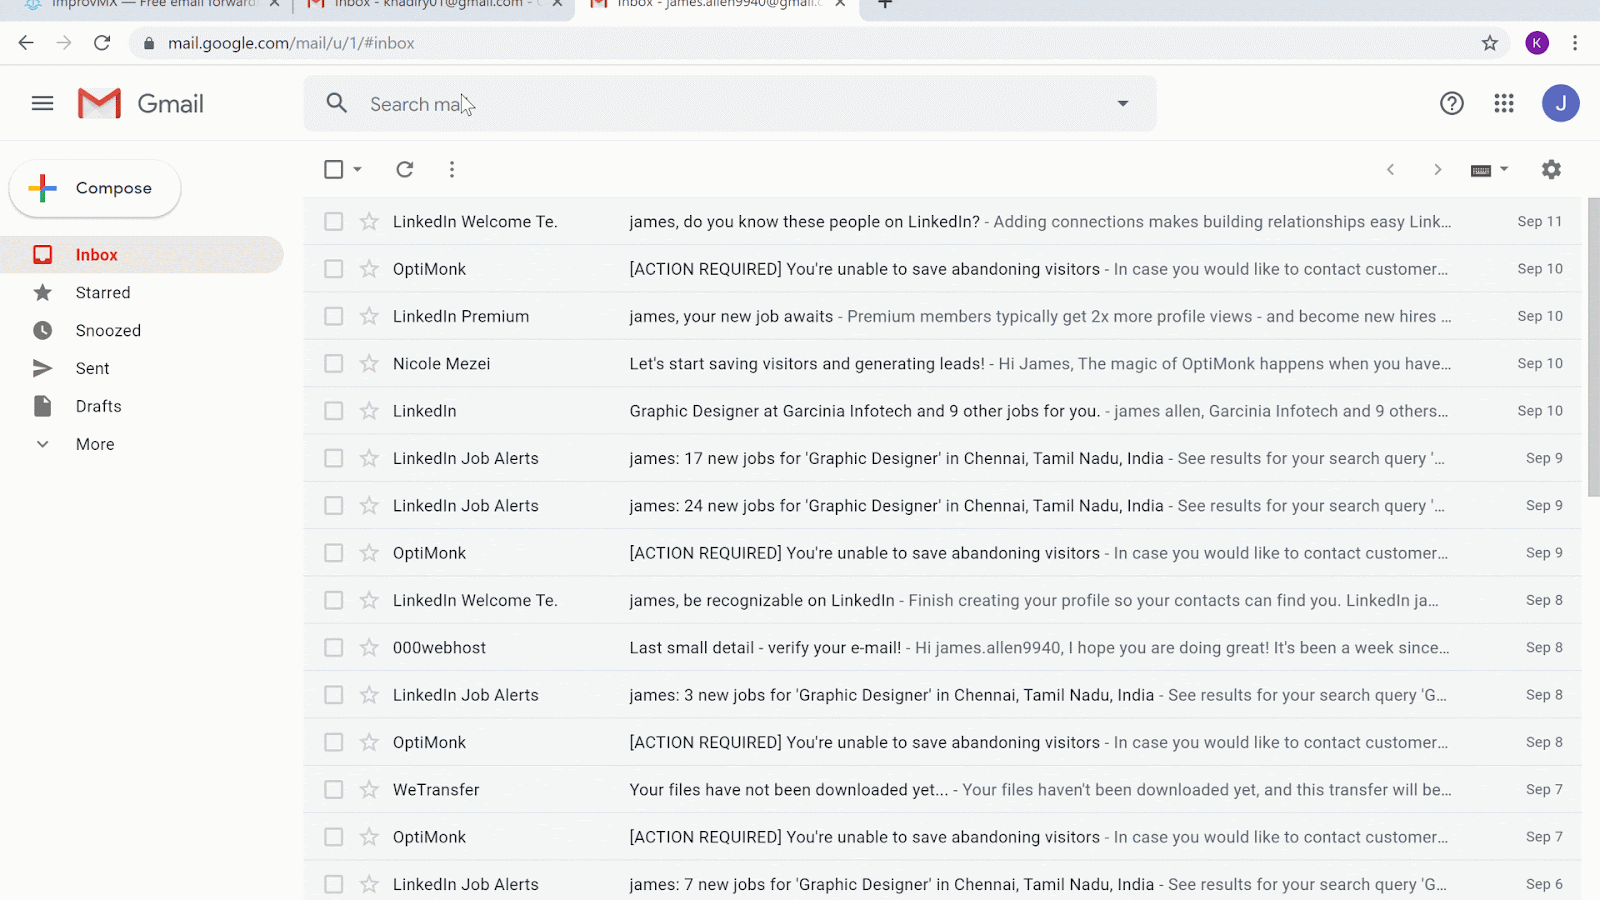
Now, if we head to our inbox and click refresh, you can see that we’ve received the email!
If we open it and click on the small down arrow (as shown below), you can see that the mail was sent to ‘[email protected]’, which is our business email. At this point, we can confirm that we’ve successfully received it in our Gmail inbox.
As you can see, with the help of ImprovMX, we’re able to receive emails to our business email.
Okay! Now we’ve taken care of receiving emails,
Next, we need to review sending them from our business email account.
If we try to reply to this mail as shown below, it will still go from our Gmail address. However, we want our email to be sent from our business email which is “[email protected]”
So, now we’re heading into the next part of this tutorial where you will see how to send emails from your business email.
So to send emails we’re going to use Gmail’s free SMTP service, which allows you to send 3000 free emails per month.
So let’s find out how you can do that!
To send emails from your business email (using Gmail), we’re going to carry out two steps,
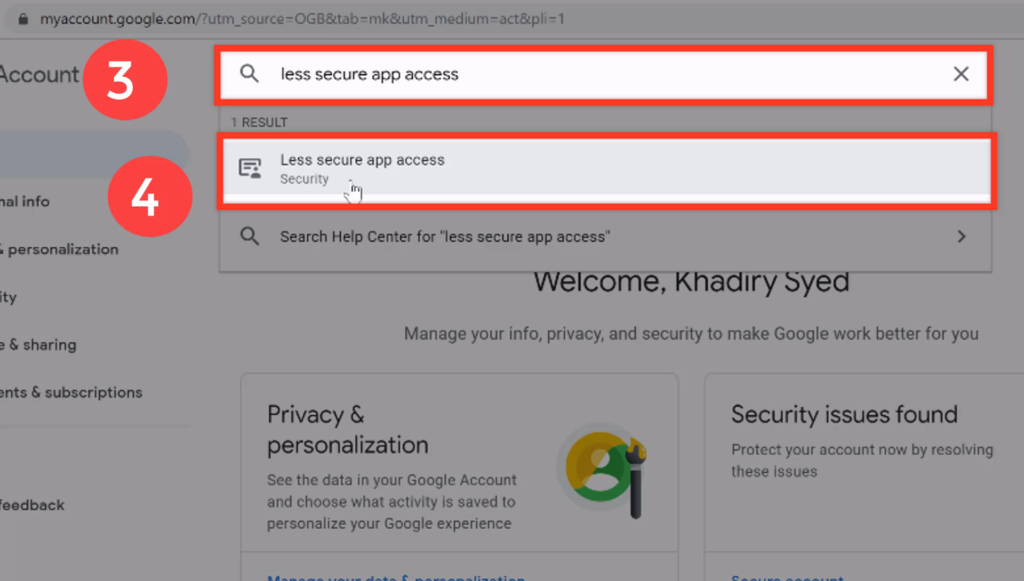
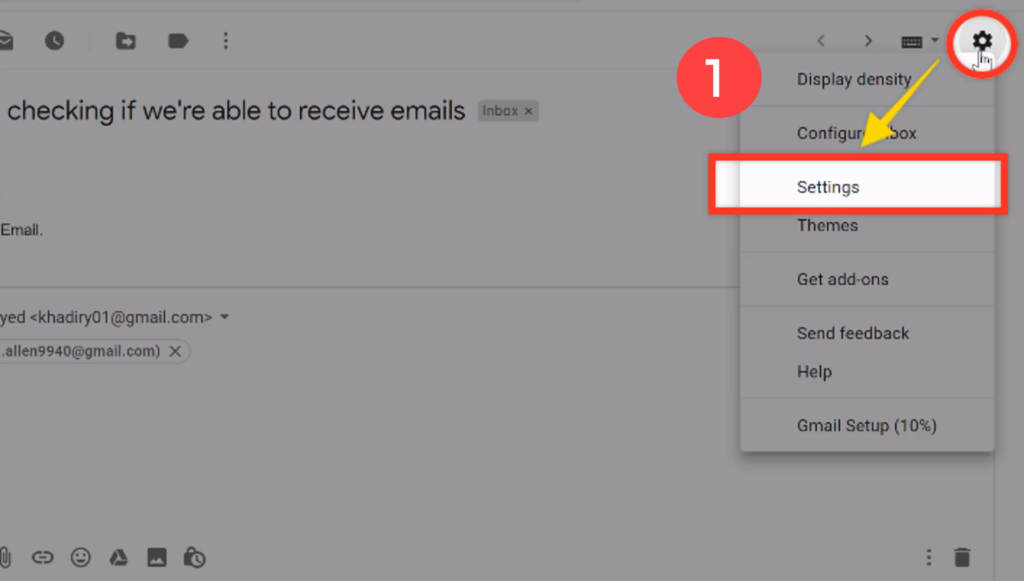
So to change the settings,
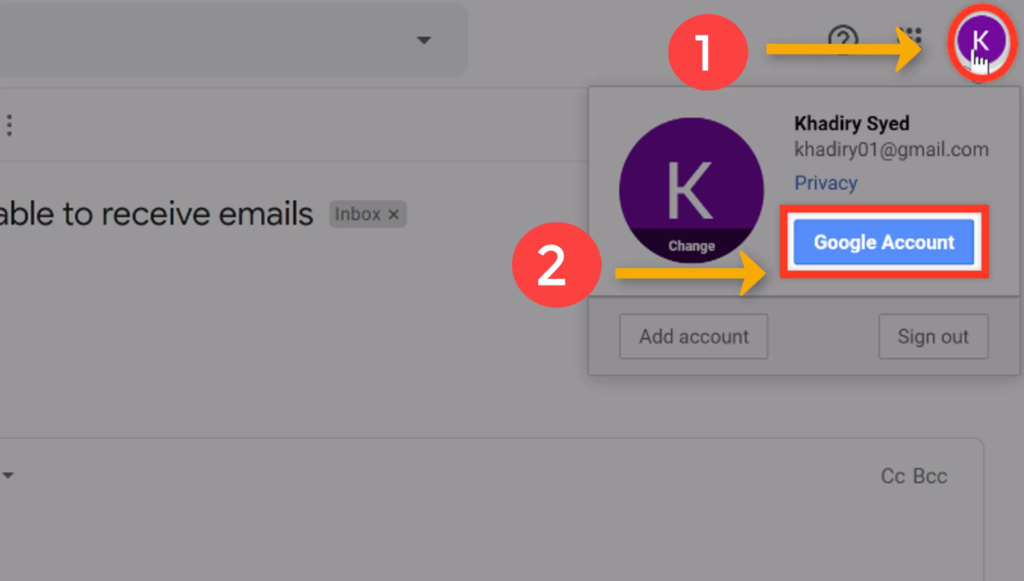
Now it will take you to this page.

Okay, now we have changed the settings within our Google account.
If you have enabled two-factor authentication on your Google account, you will not get this option.
Putting that aside, let’s continue with this tutorial.
Once you have changed the settings on your Google account, you can now go to the last step.
Once you’ve added your business email to Gmail, you can start sending business emails from your Gmail account.
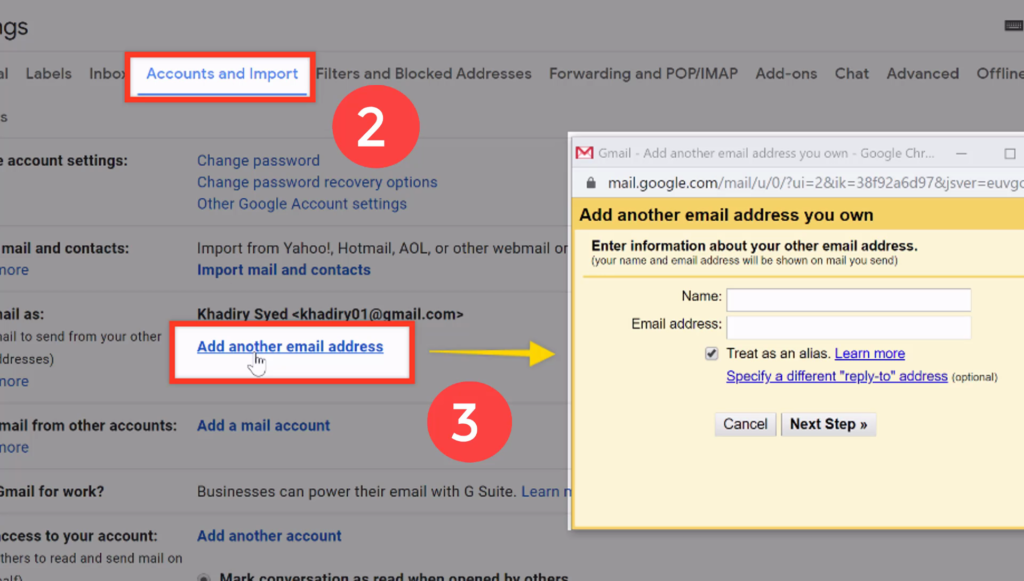
To add your business email to Gmail, go to your Gmail inbox where we’ve been forwarding the mail (via improvmx).
Since we want to send emails from our business email,
And you’ll get this window as shown below:
This name will subsequently appear when someone receives an email from you.
For this example, I’m going to type ‘TryShirts.’
Again for our example purposes, I’m going to enter ‘[email protected].’

Now you need to enter the details of your Gmail account.
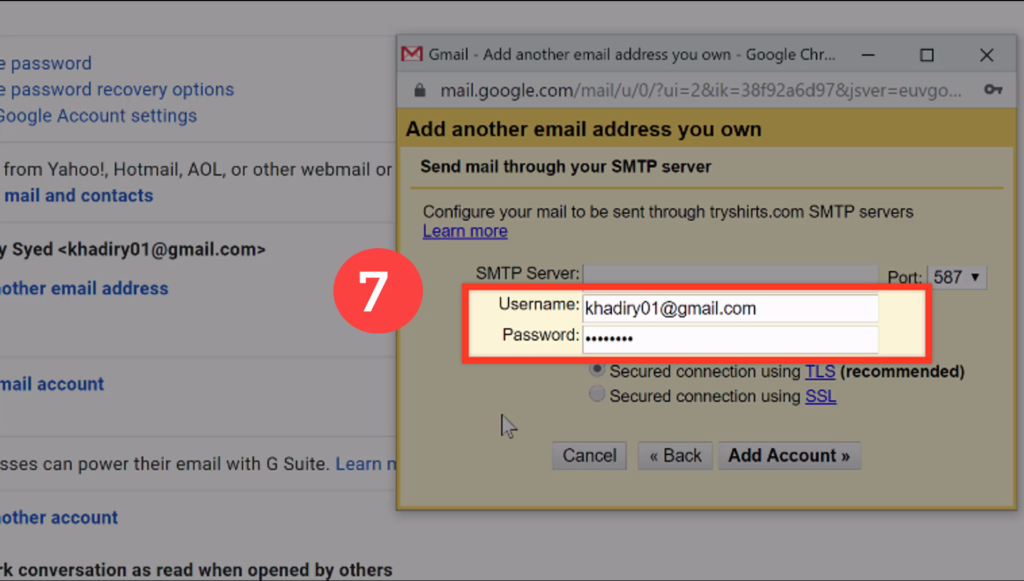
This is Gmail’s free SMTP server.
Once you have added those details,
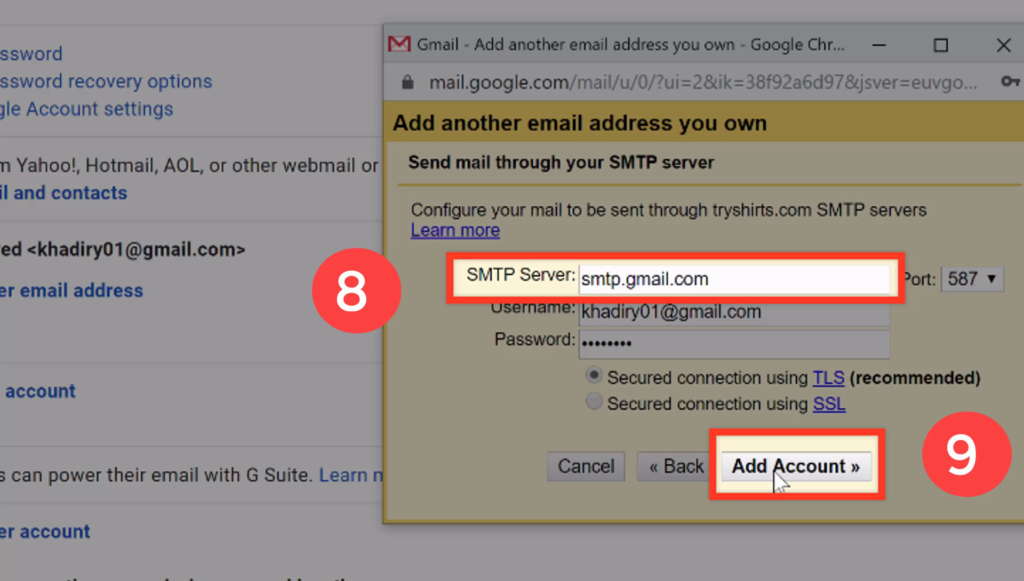
Gmail will then send a confirmation code to your business email.
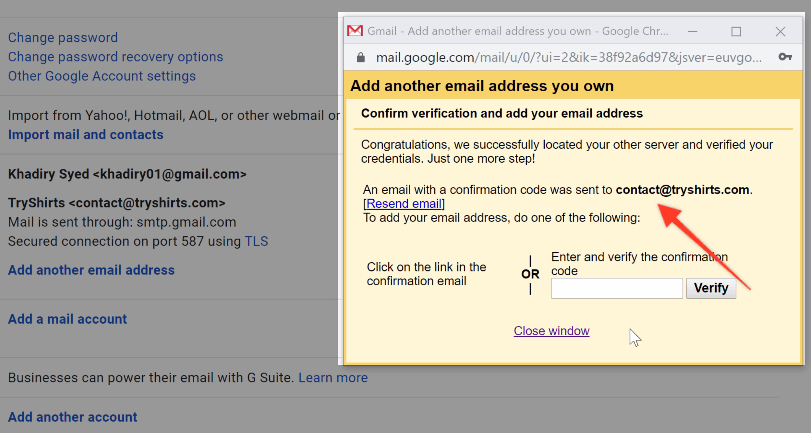
To get the code,
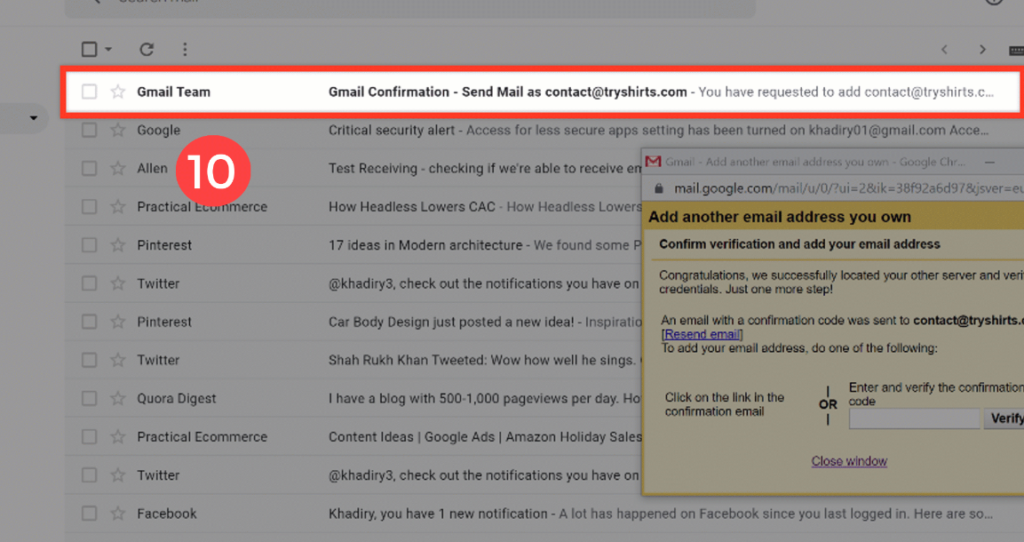

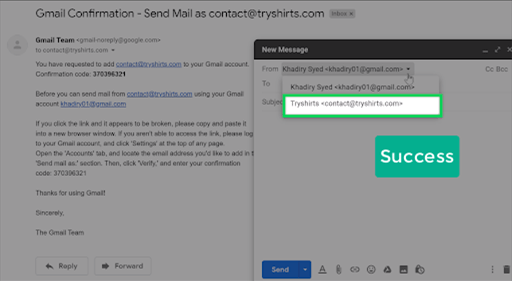
As soon as you click verify, your business email will be added to Gmail.
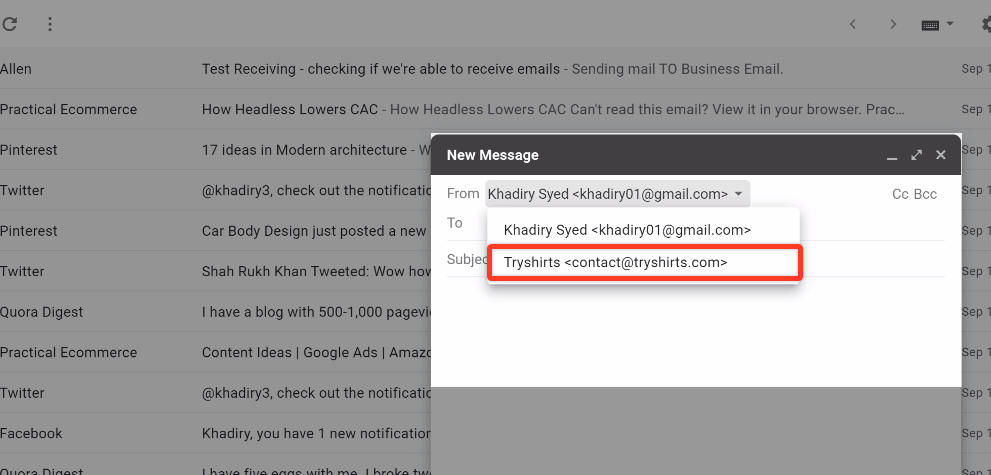
Now, if we click ‘Compose’ and click on the ‘From Mail ID,’ you can see that our business email has now been added.
Now you can start sending emails from your business email account.
So, let’s test out sending an email as shown in the demo below to check everything has been set up correctly.
DEMO: Let’s perform a check by sending a test mail to a random Gmail address.
To send a test mail, just select the business email and draft a test mail. Next, enter a random Gmail address in the ‘To’ address and click ‘Send.’ Once you hit send, your mail will be sent to the random Gmail address.

Now, if you go to that random Gmail inbox and click refresh you can see that we’ve received the mail!
Let’s open it!
If you click the small down arrow as shown below, you can see that the mail was sent from ‘[email protected],’ which is our business email.

So now we are able to send and receive emails from our business email.
This means we’ve successfully created our business email, and you can start using it.
Start by returning to your Gmail inbox.
Here, in this example, we are setting this business email (as shown below), as the default ‘From’ address.
To set your business email as your default ‘From’ address,
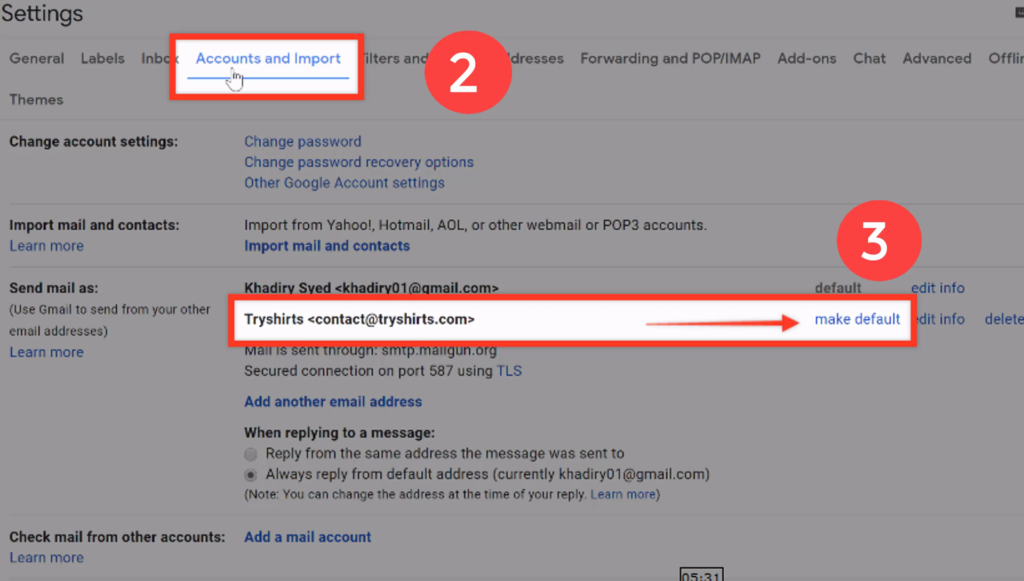
Now we have set our business email as the default ‘From’ address.
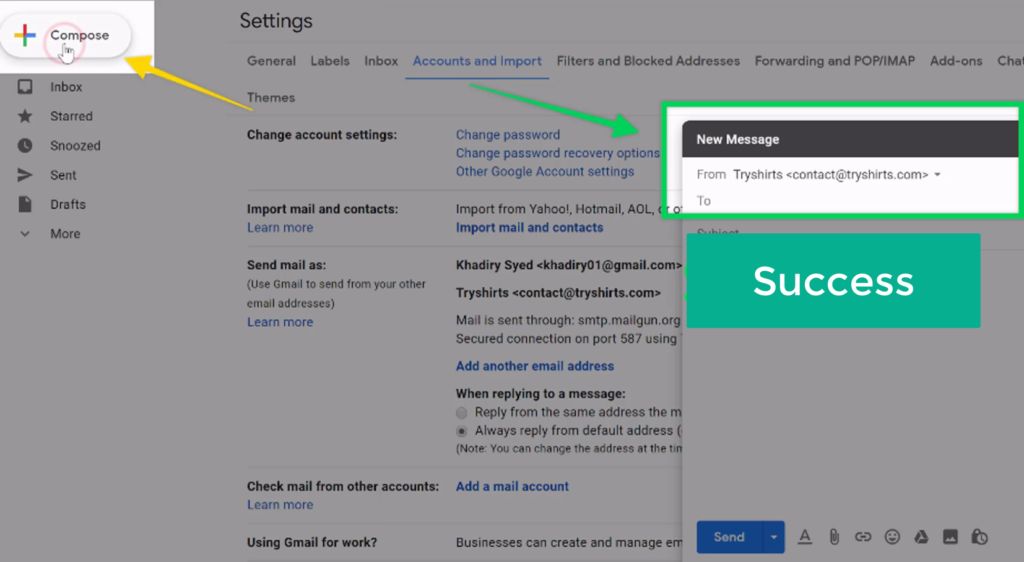
Afterwards, if we click ‘Compose,’ you can see that our business email is now selected by default.
Which means, by default, the email is sent from our business email.
Okay guys, so now you know how to create a business email using your domain.
But what if you want to create more email addresses on the same domain?
So let’s say you want to create further email addresses such as: ‘[email protected]’ or ‘[email protected].’
Fortunately, that’s very easy to accomplish.
To create another business email on the same domain, first create another email forward in improvMX.
Start by heading over to improvMX.
Here, you can see the business email that we’ve already created, as shown below:
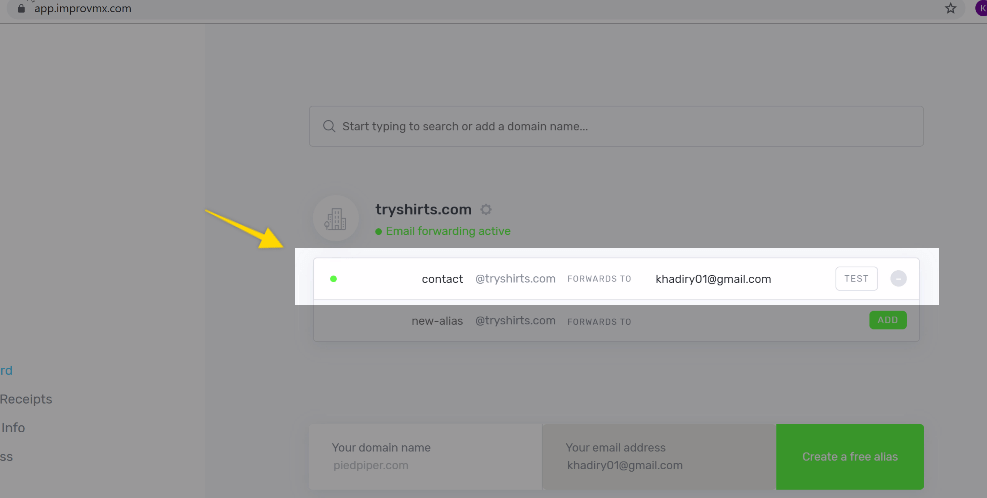
To create your new business email, just type in the new business email address you want to use.
Here, I have created a new business email called ‘[email protected].’
Again, you need to enter the Gmail address that you want to associate with your business email.
For this example, I have entered a different Gmail address. Once you click ‘ADD,’ your new email forward will be created. As we saw before, if someone sends an email to your business email address, it will now automatically get forwarded to your Gmail inbox.

Once you have created the email forward, just retrace the steps in Part 2 of this tutorial to change the relevant Google settings.
You can use this method to create any number of business emails!
So that’s it, guys! This is how you can create a business email using your own domain name.
Now if you don’t have a website for your business, you can easily create one by following this easy 10-minute tutorial video.
And for more such tutorials on WordPress website creation, subscribe to our YouTube channel.
A business email is simply an email address that contains your business name.
For example, let’s consider the name of your business as “TeachyLeaf”. If your email is ‘[email protected]’ which has your website name instead of Gmail, Yahoo or some other email provider then it’s a business email address.
A business email helps you to build your business.
It makes your communication more professional and it helps customers trust your website and branding.
If you’re a business owner, then you should use your business email address whenever you’re communicating with clients.
Buying a domain name for your business is a quick and simple process.
Simply head over to Godaddy to get one for your business.
Yes, you can create a business email address without making a website. However, you still have to buy your domain name.
Do you want to learn WordPress to build any kind of website you want? Then this is the only course you need to take.
View CourseSEO isn't as difficult as you might think. Learn how to start growing organic traffic to your website with our easy to follow video .
Watch VideoSign up for our WordPress Course today!
18 Comments
Leave a CommentBernie
It’s an amazing post in favor of all the web viewers;
they will get advantage from it I am sure.
Karthik Tatikonda
We are glad that this blog helped you, Bernie. 😁
Leonel Eagle
Thanks. I read it with interest. Blog added to favourites
Karthik Tatikonda
We are glad that this blog helped you, Leonel. 😁
jeri
can I take away the “via gmail”
Russ Santisteban
kep Up the Gratee work mate.
Karthik Tatikonda
We are glad that this blog helped you, Russ Santisteban. 😁
mayank sahu
sir i tried to make but , everytime i fail . Please help me i want to make my own busness email for this domain
hindimessages.in
Karthik Tatikonda
Hi Mayank, We request you to send a mail to [email protected], our support team will guide you. 😁
Perfect lusa
Thanks very much I am gonna try this if is working I will be back to give thanks
Hellen Sagendorf
Thanks for sharing this information.
Karthik Tatikonda
We are glad that this blog helped you, Hellen. 😁
Keith Ten
Thanks for sharing this information.have shared this link with others keep posting such information..
Karthik Tatikonda
We are glad that this blog helped you, Keith Ten. 😁
advanced systemcare 10.1 key
Hey there, You’ve done a great job. I will definitely digg it and personally recommend to my friends. I’m sure they’ll be benefited from this web site.
salit dangol
These are some quite useful information. As a beginner in Gmail, I was struck on creating a google account for business. This information taught me a lot. Thanks a tone mate.
Karthik Tatikonda
We are glad that this blog helped you, Salit dangol. 😁
Ripan Gada
Hi, I have seen your video of how to create business email and use it with gmail for free. Many Thanks. This is useful. I can access Business email in gmail. Just wanted to check whether after doing all the steps for setup of business email in Gmail, Can we setup this business email (your [email protected]) in outlook ? Also if I setup gmail account (the one in which i have linked business email account) in outlook can I send mails from outlook using business account email i.e. whether email received in business account will be delivered in outlook & if is send emails from Outlook whether it will be sent as sent from business email id ?
Thanks,
Ripan Gada