How To Add Paypal To WooCommerce Website
Posted on
July 6, 2020
by

in
Web Development
Are you wondering how to accept PayPal payments on your eCommerce website?
Then, you’re in the right place!
PayPal is one of the best and most widely used payment systems in the world. In this article, we will look at how you can add PayPal to WooCommerce website.
So, we are going to add Paypal to your website in three parts:
Go to Paypal and click on ‘Sign Up’ as shown below.
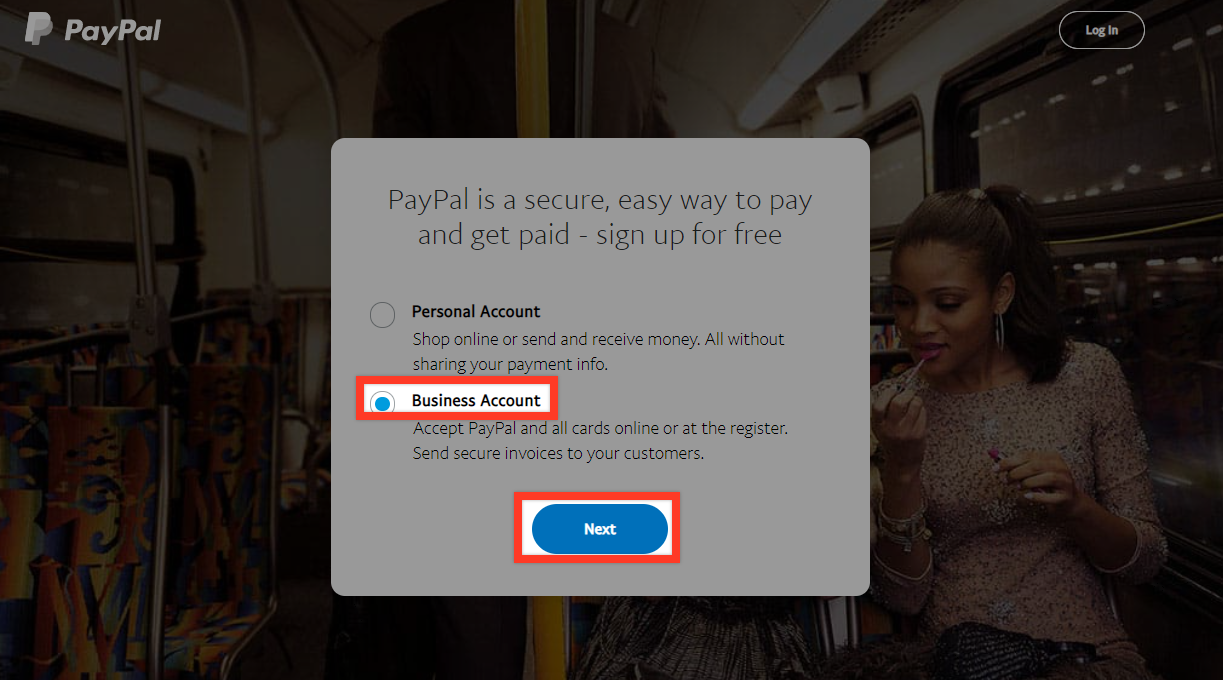
Since we are creating an account for your business, select ‘Business Account’ and click on next as shown below.
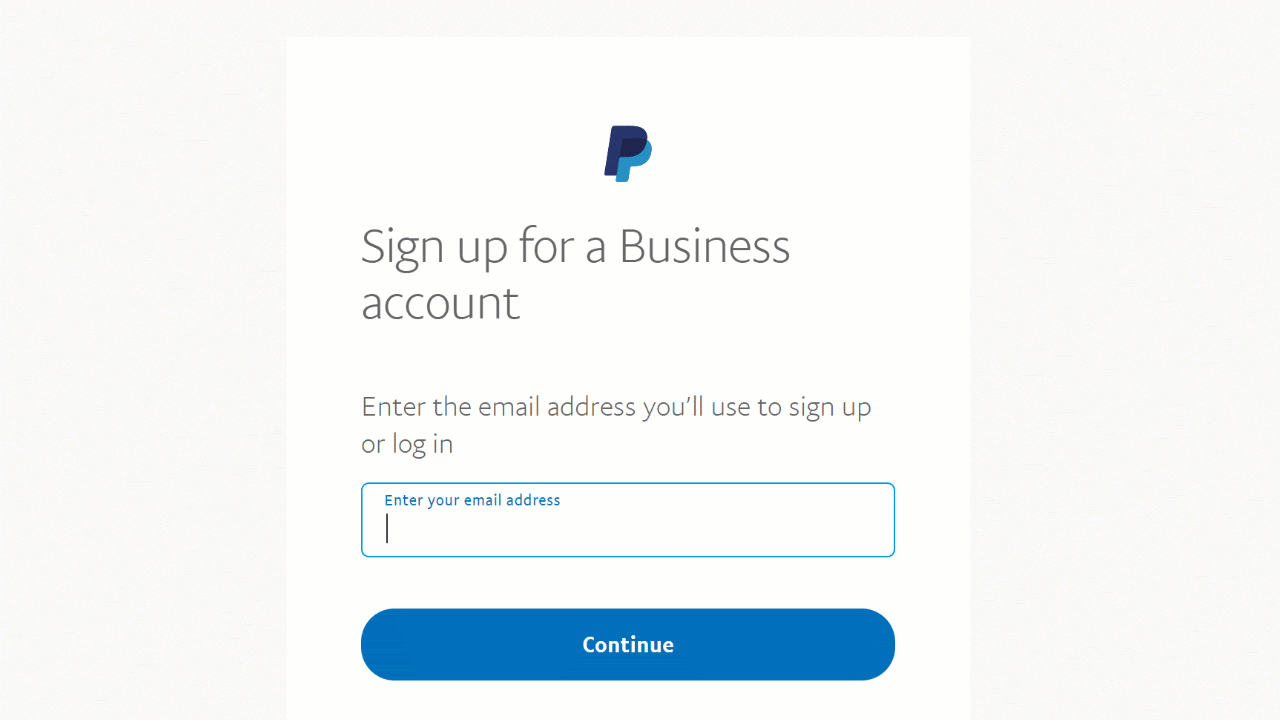
Now, enter your email address and set a password for your paypal account.
In the next step, fill in your business details and then click on ‘Agree and Continue.’
On this page, select your business type, your product or service keywords, When you’ve finished filling those details out, click on ‘Continue.’

You should now have access to your PayPal account and be ready for accepting payments through PayPal.
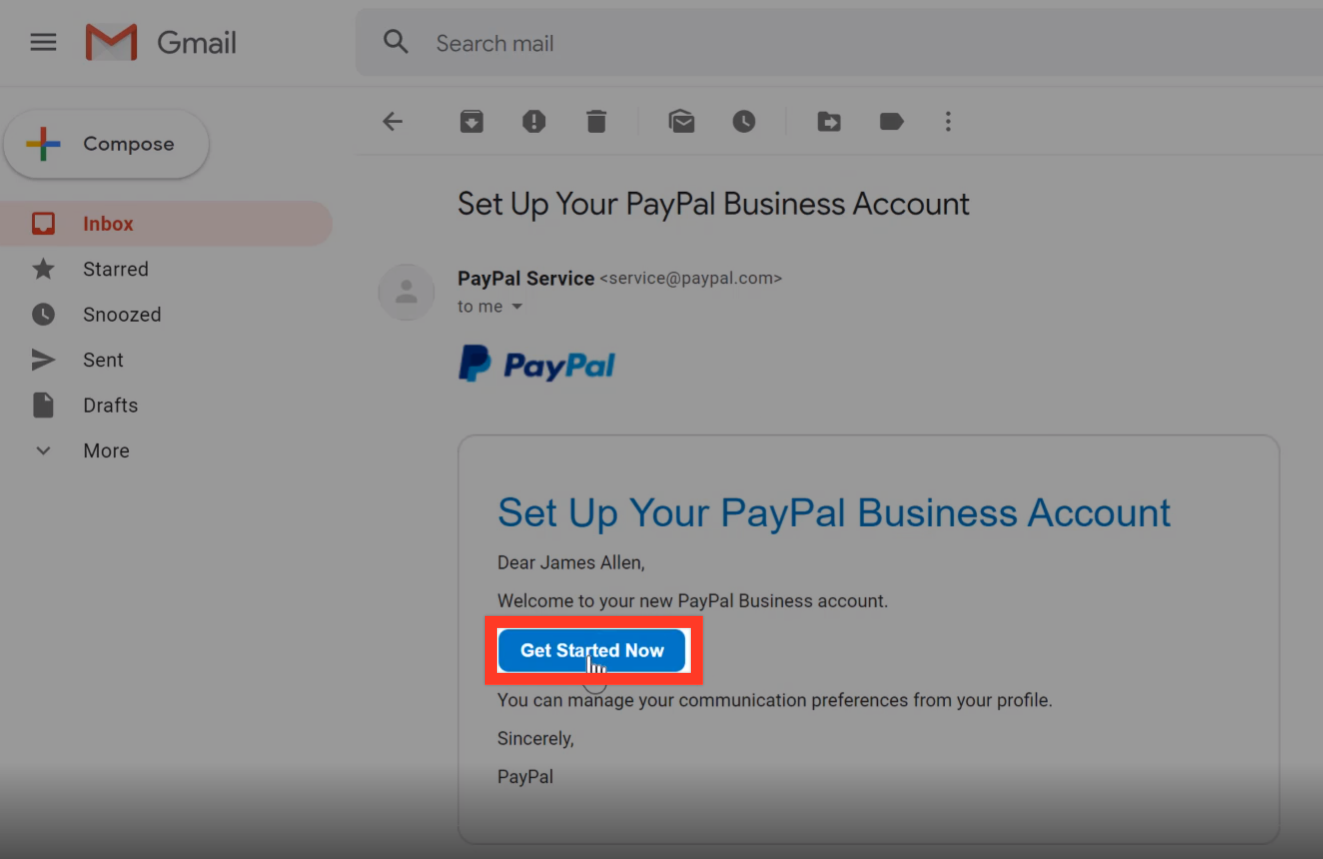
You will receive an email from PayPal. Open the email and click on ‘Get Started Now.’
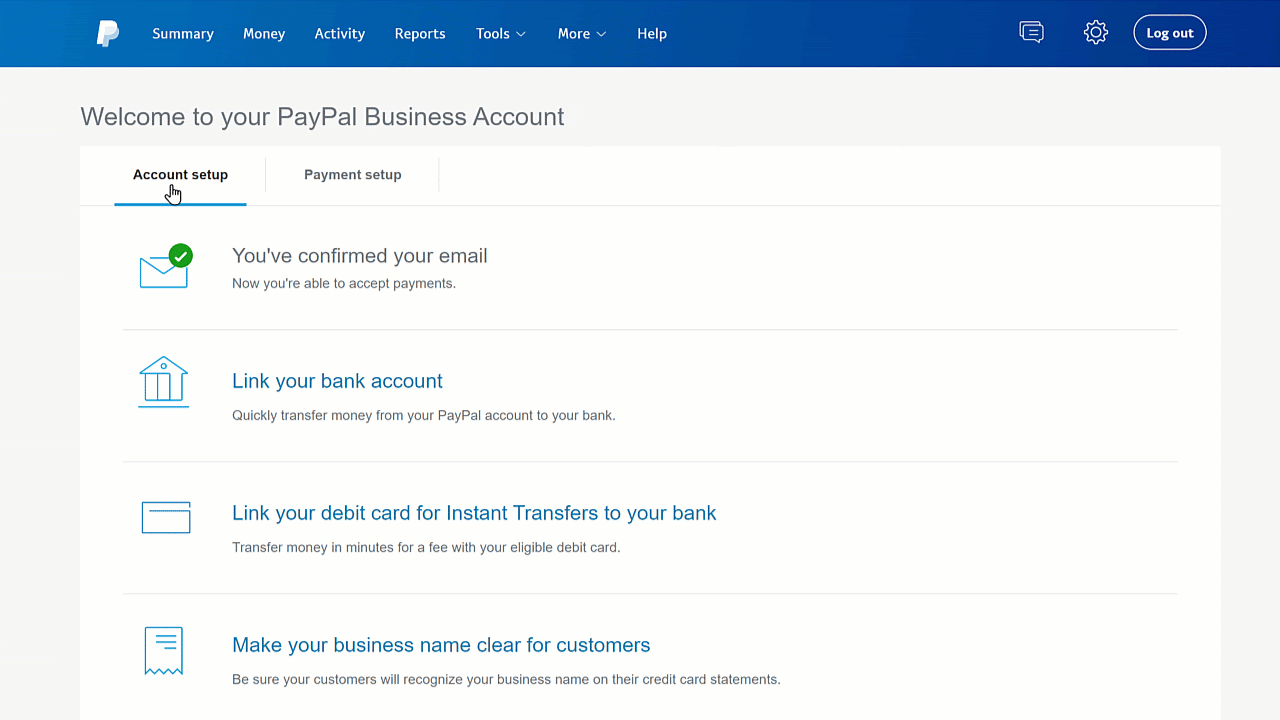
To receive payments, you will need to add your bank account details in Paypal.
To do that, open your PayPal account and click on ‘Account setup’. In this page, click on ‘Link your bank account’ and select your bank account from the list as shown below.
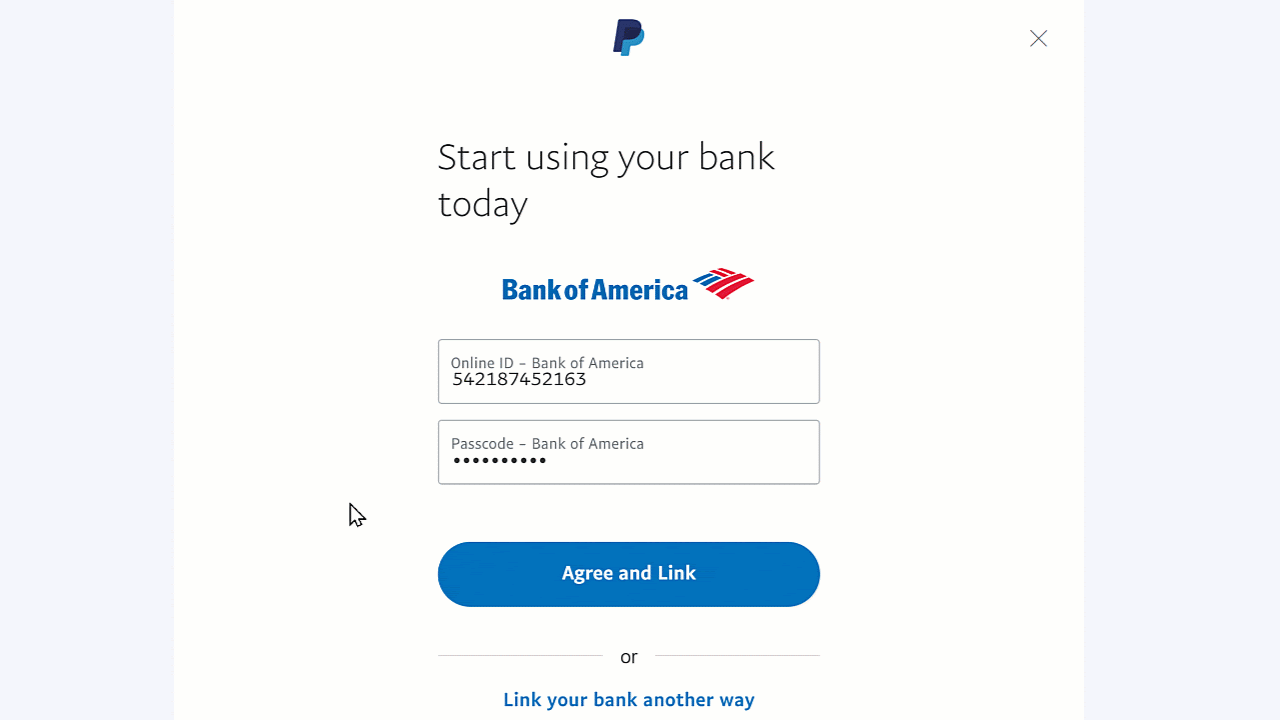
Enter your online banking details and click on ‘Agree and Link.’ You will then get a confirmation message as shown below that you have added your bank account successfully. Click on ‘Done.’
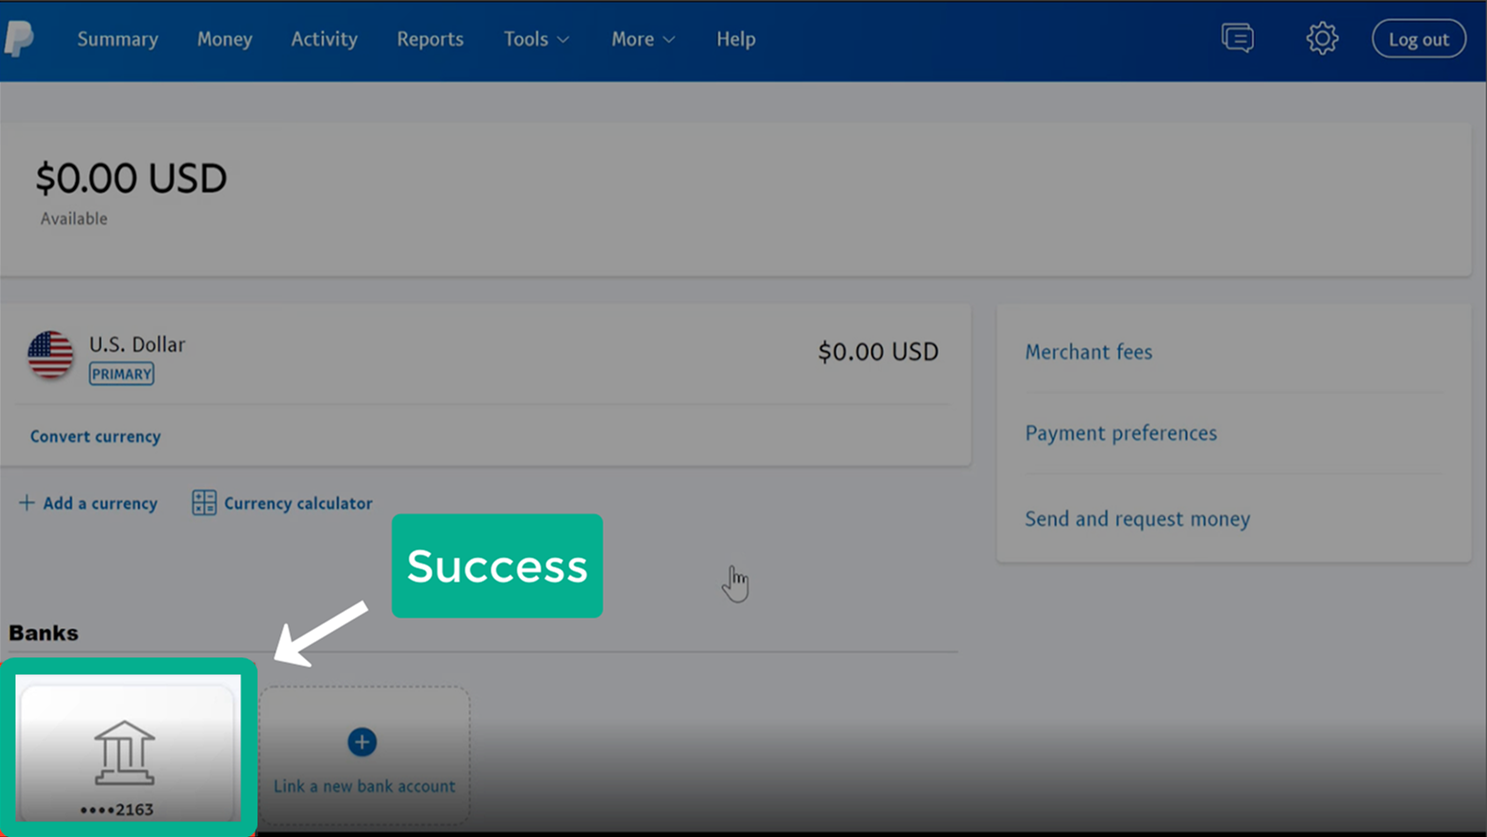
You can see that the bank account has been linked to PayPal.
To allow customers to make payments on your website with PayPal, we need to connect your account to the website. Let’s have a look at how to set up your Paypal account in WooCommerce
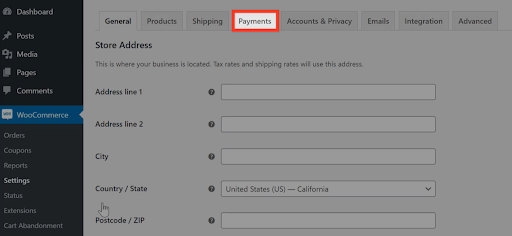
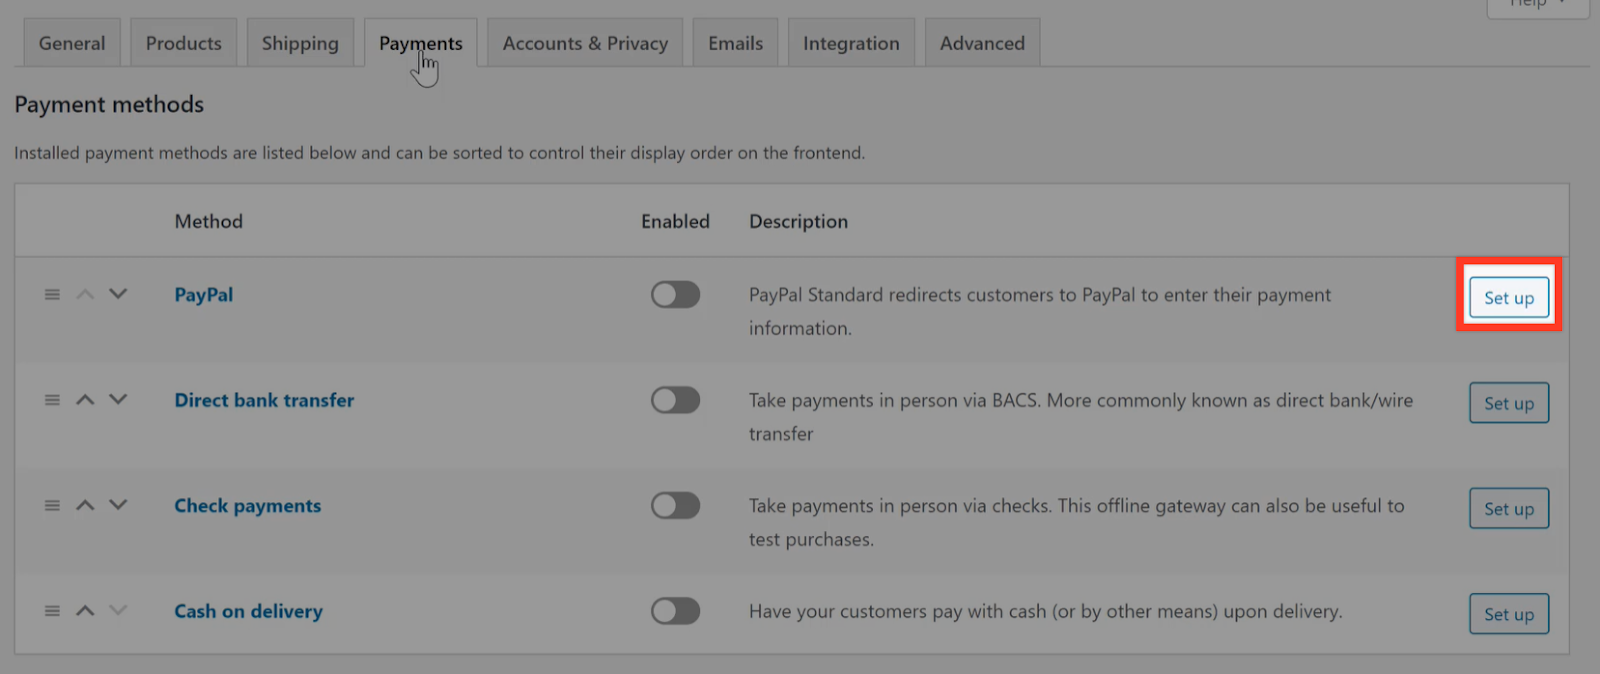
Open your WordPress dashboard and under the WooCommerce menu click on ‘Settings.’

Click on ‘Payments’ to open the payments settings page.
You will notice that WooCommerce already has a PayPal payment gateway for WordPress.
Click on ‘Set up’ to open the PayPal settings
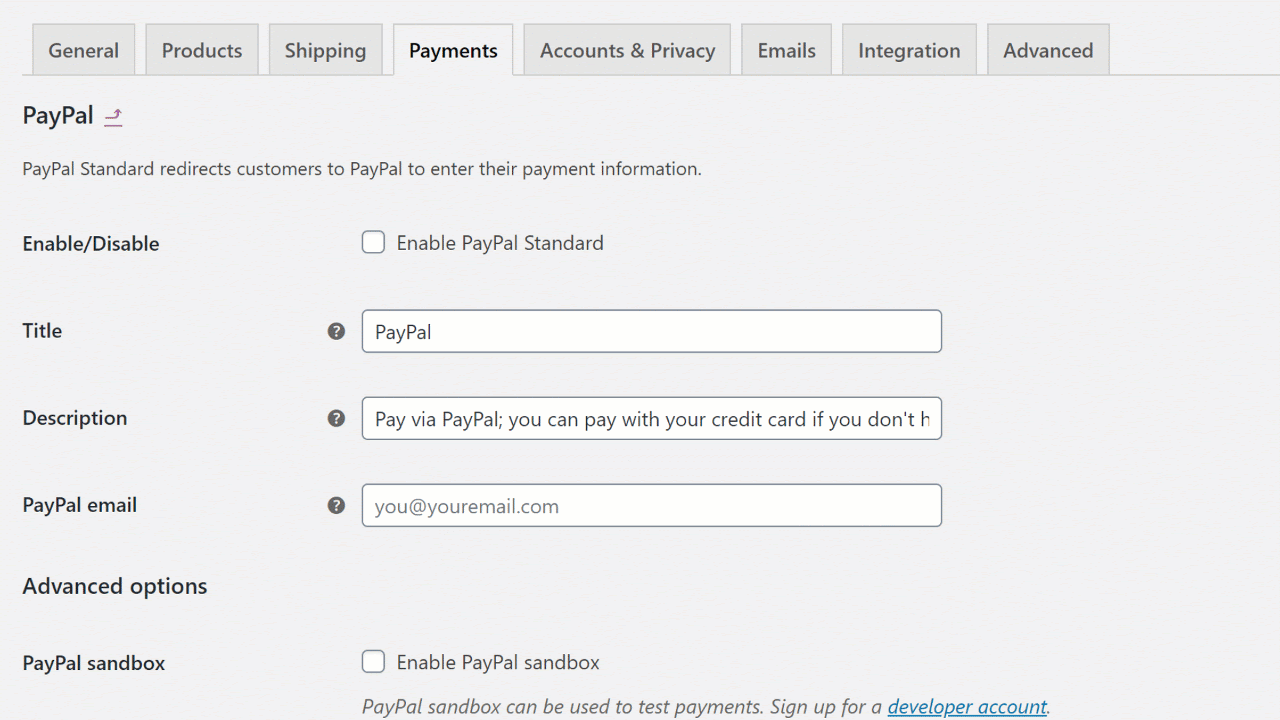
Click on ‘Enable PayPal Standard’ and enter your email address. This will be the email address that you used to sign up for PayPal.
Scroll to the bottom of the page and click on ‘Save changes.’
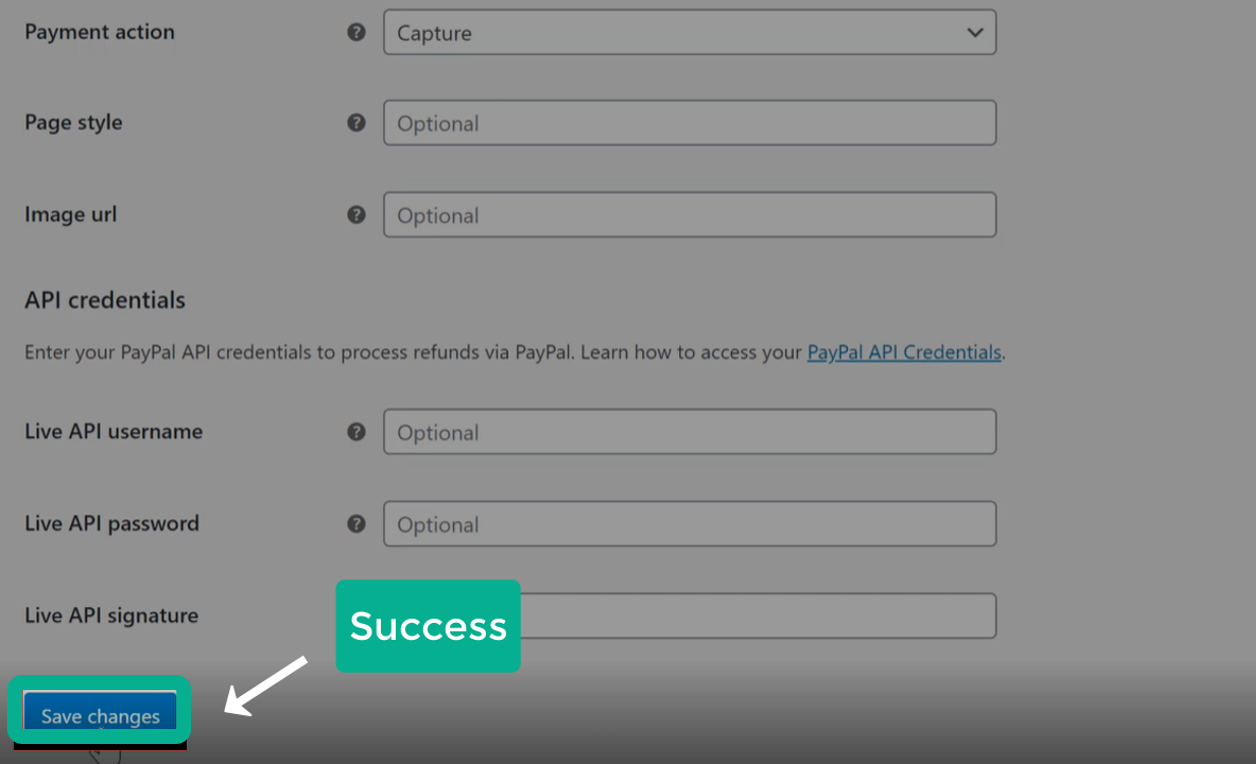
SUCCESS! You have successfully connected your PayPal account to your website. You will now be able to receive online payments on your website.
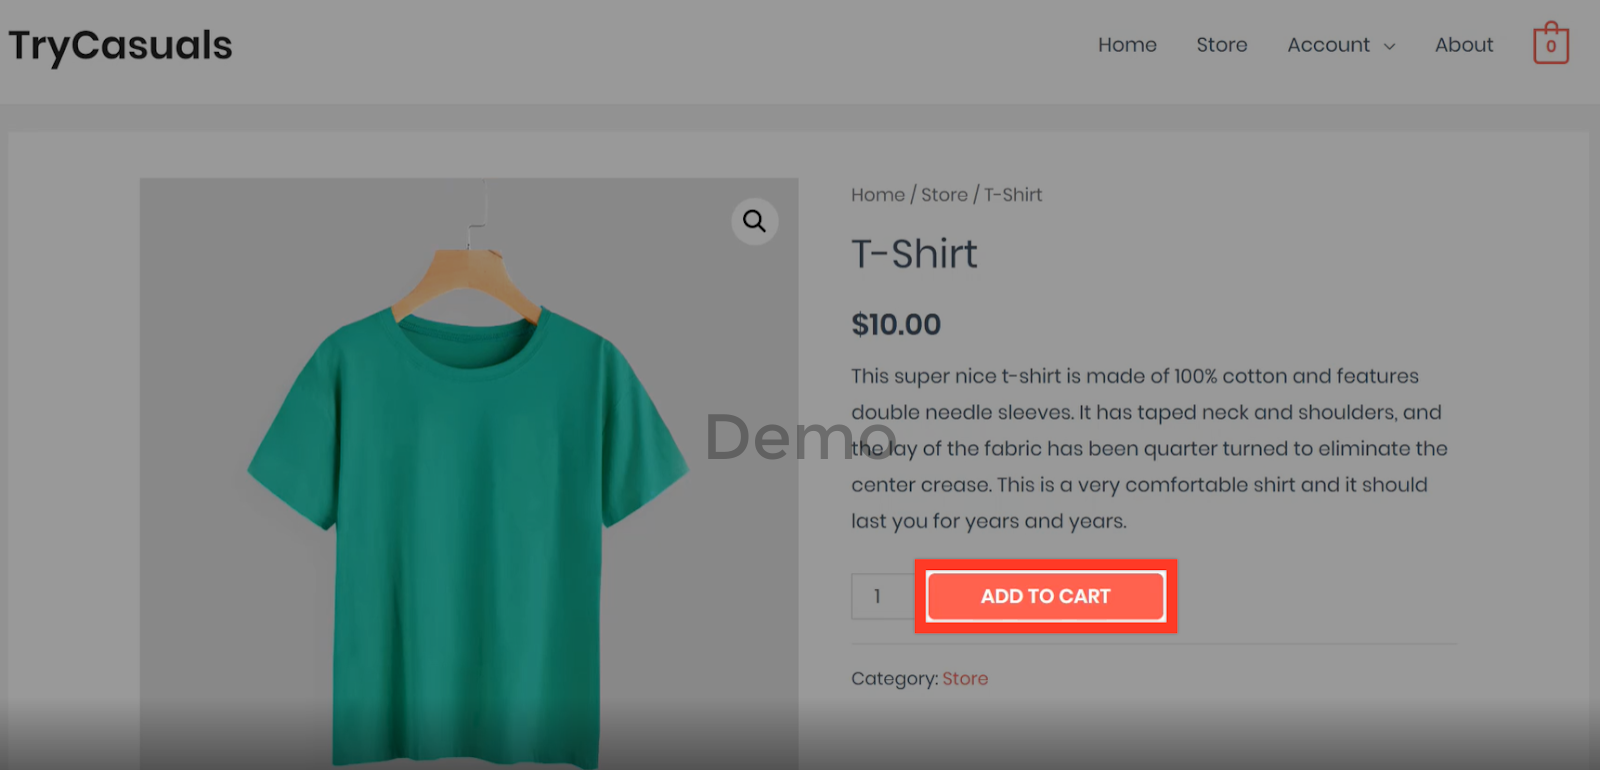
Now let’s do a test to see if PayPal is successfully integrated to your site.
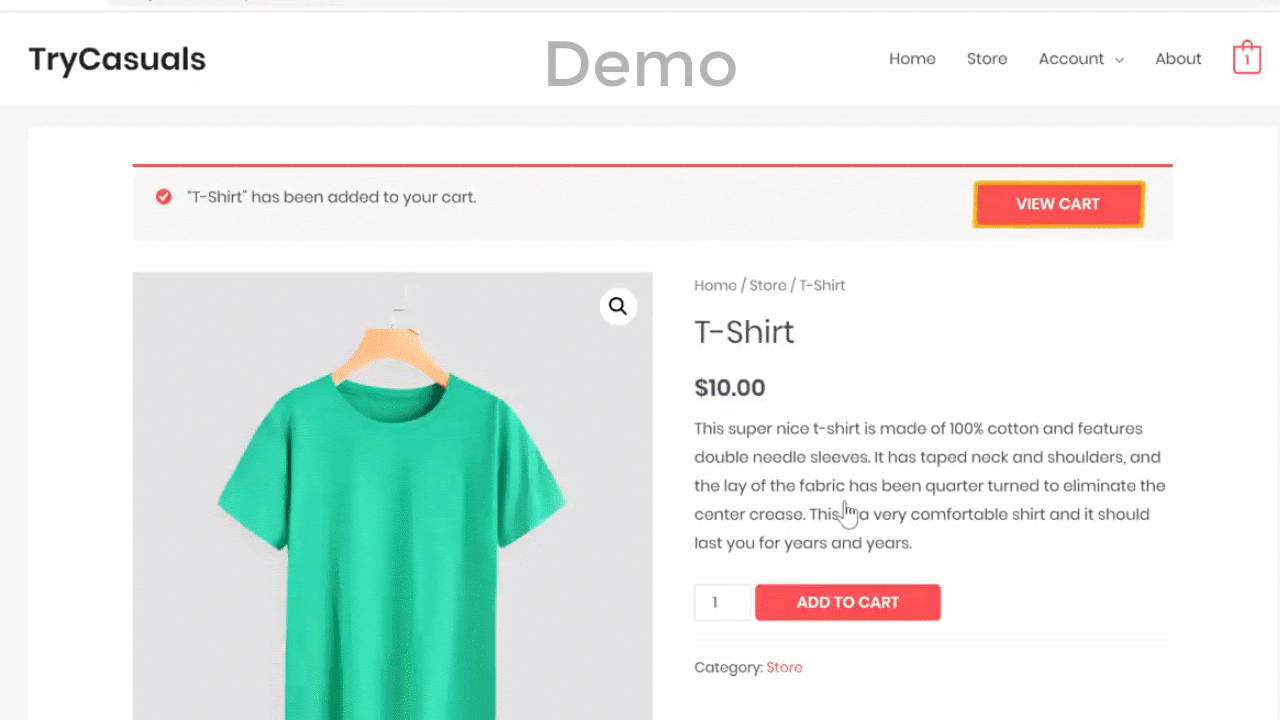
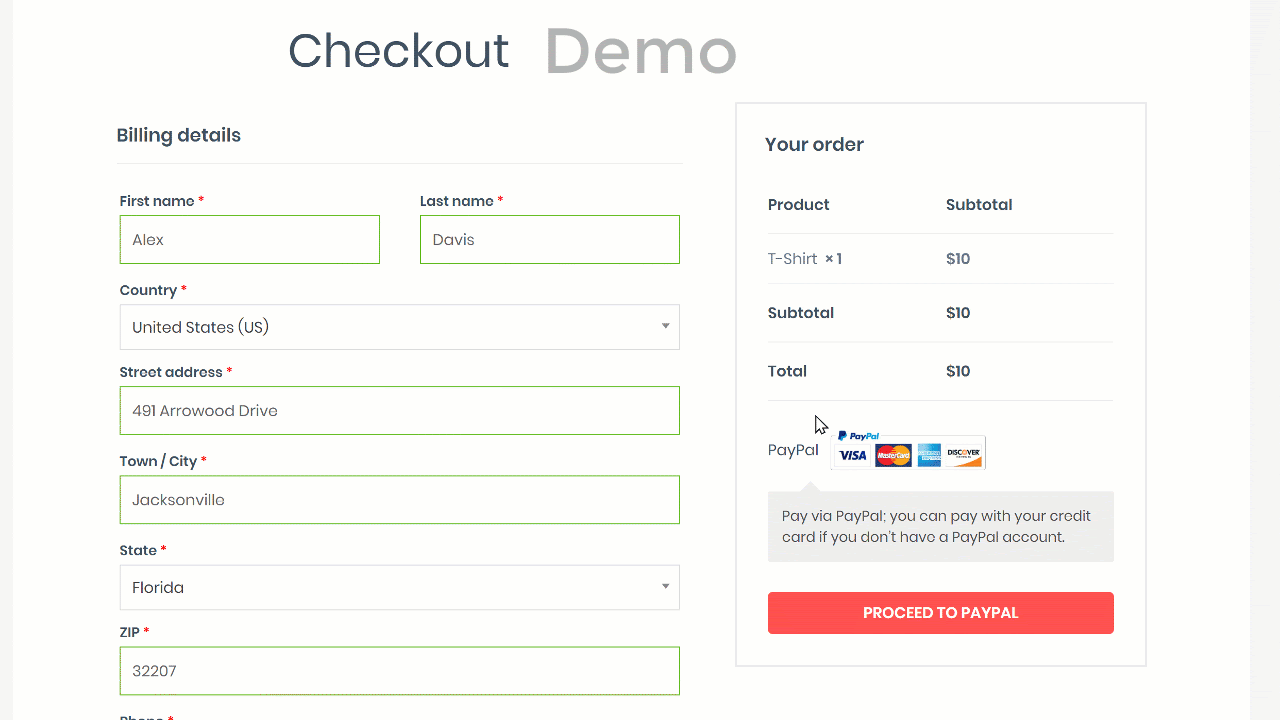
Open your website and choose a product that you would like to test. On the product page click on ‘ADD TO CART.’
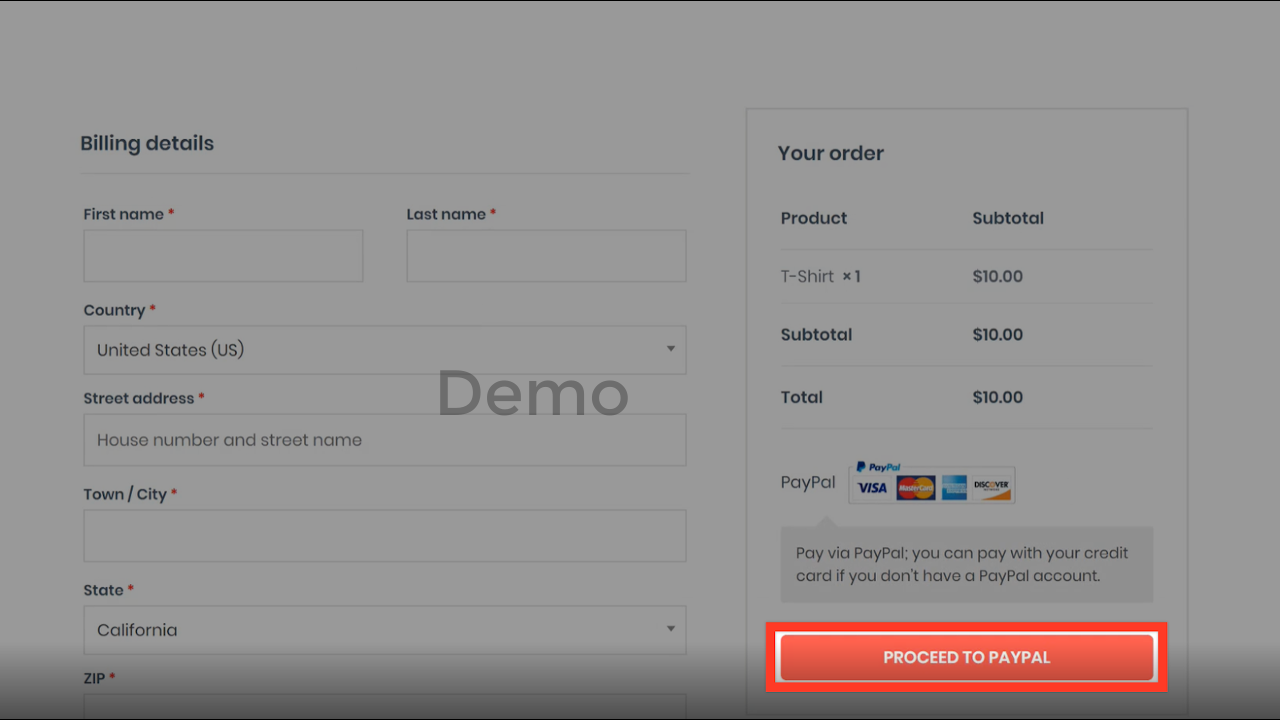
Once the product is added to the cart, click on ‘VIEW CART,’ and then click on ‘PROCEED TO CHECKOUT.’
Your customers will need to fill in their details and then click on ‘PROCEED TO PAYPAL.’
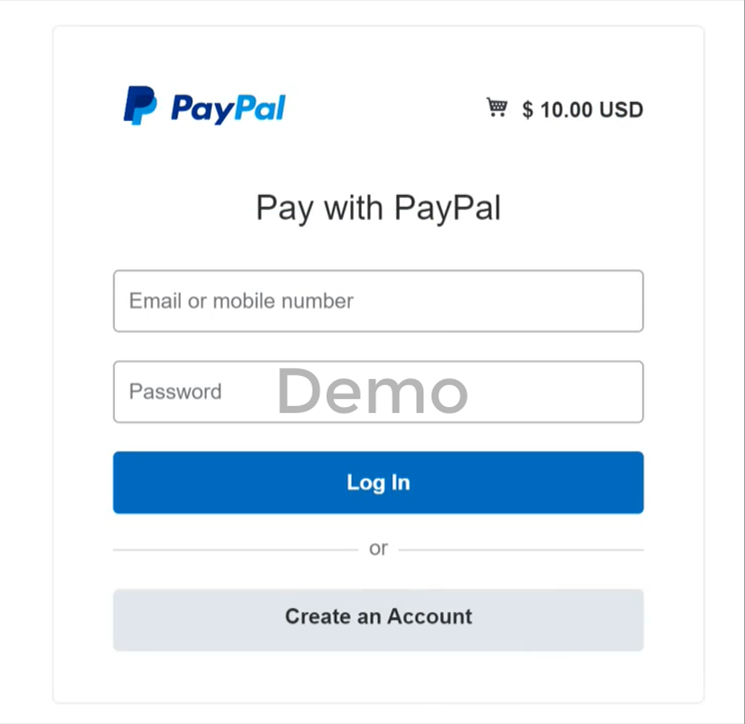
Your customers will then be redirected to PayPal as shown. They can log in to their PayPal account and make the payment.
So, this is how you can accept payments through PayPal from your customers.
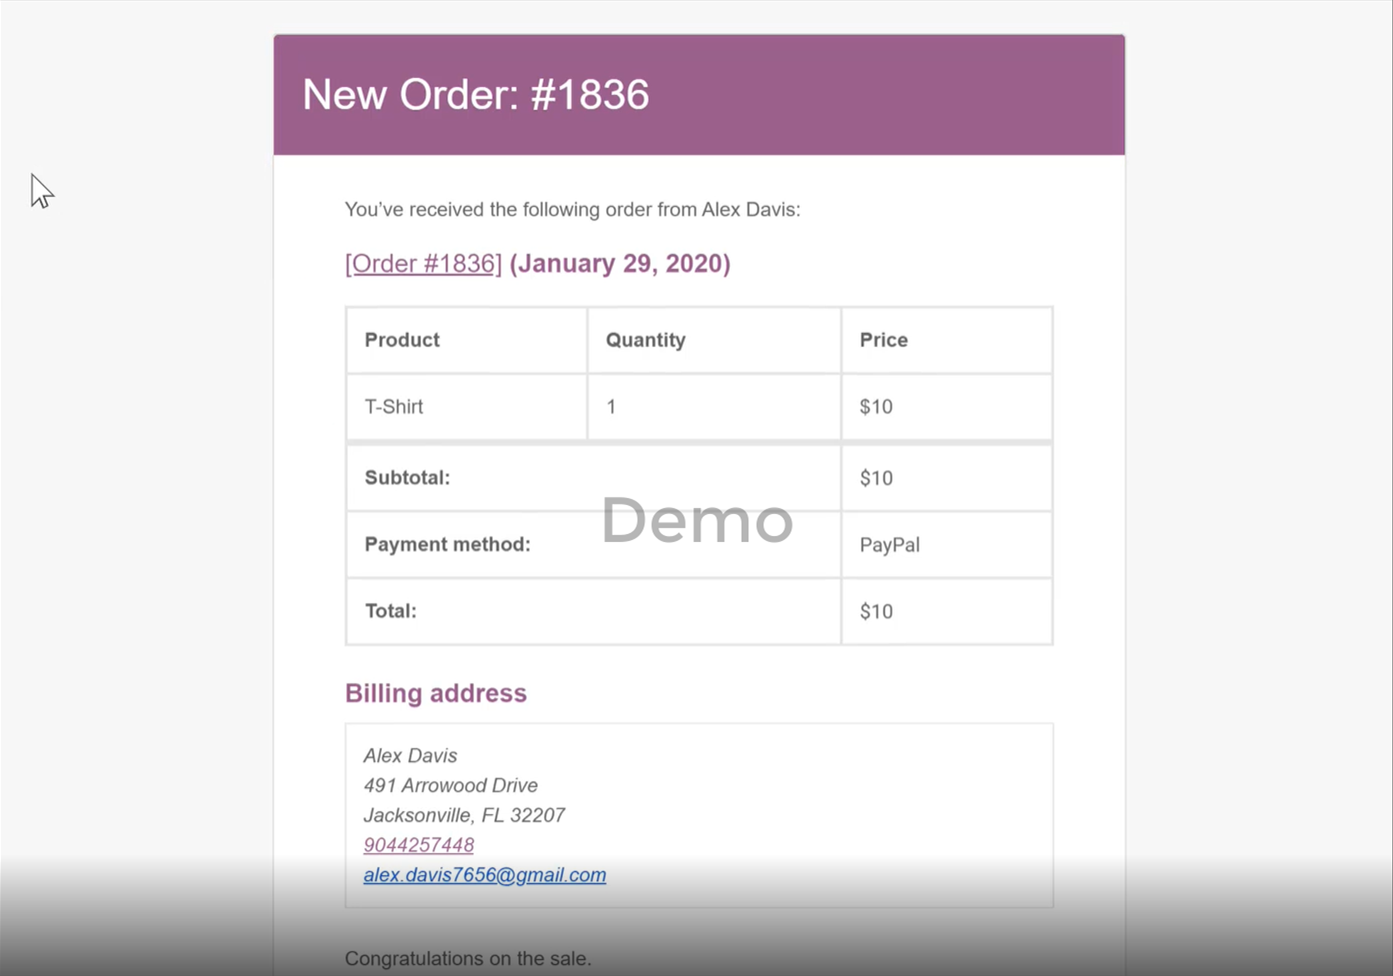
Well, it’s easy. Simply log in to your email account which you used to create your website. You would have received two emails.,The first one would be from your WordPress website. The second one would be from PayPal.
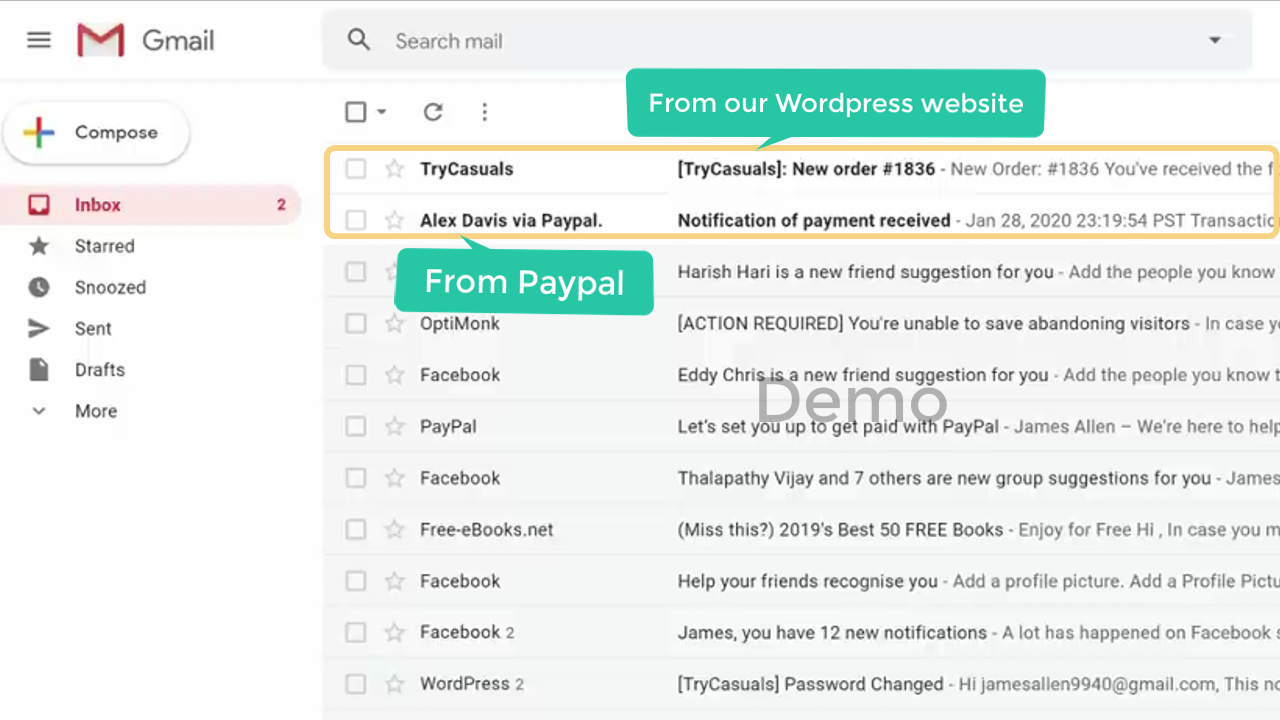
If you open the email from your WordPress website, you would find the details of the order, as shown below.
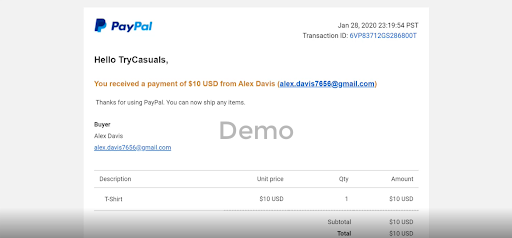
An example of the PayPal confirmation email is also shown below.
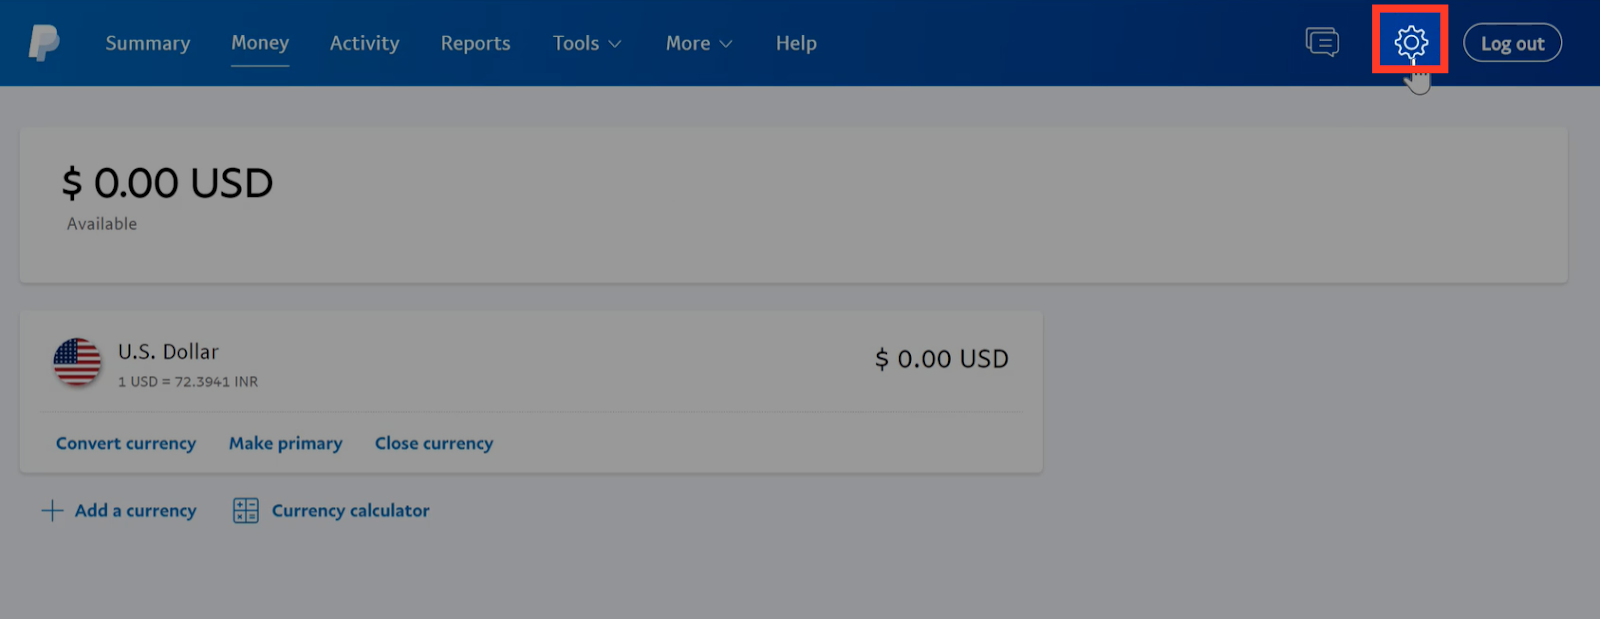
Not all customers will have a PayPal account, and not all of them will want to create one. Therefore, if you want, you can allow them to pay using a debit card or credit card. For that, we have to enable the WordPress credit card payment option in Paypal.
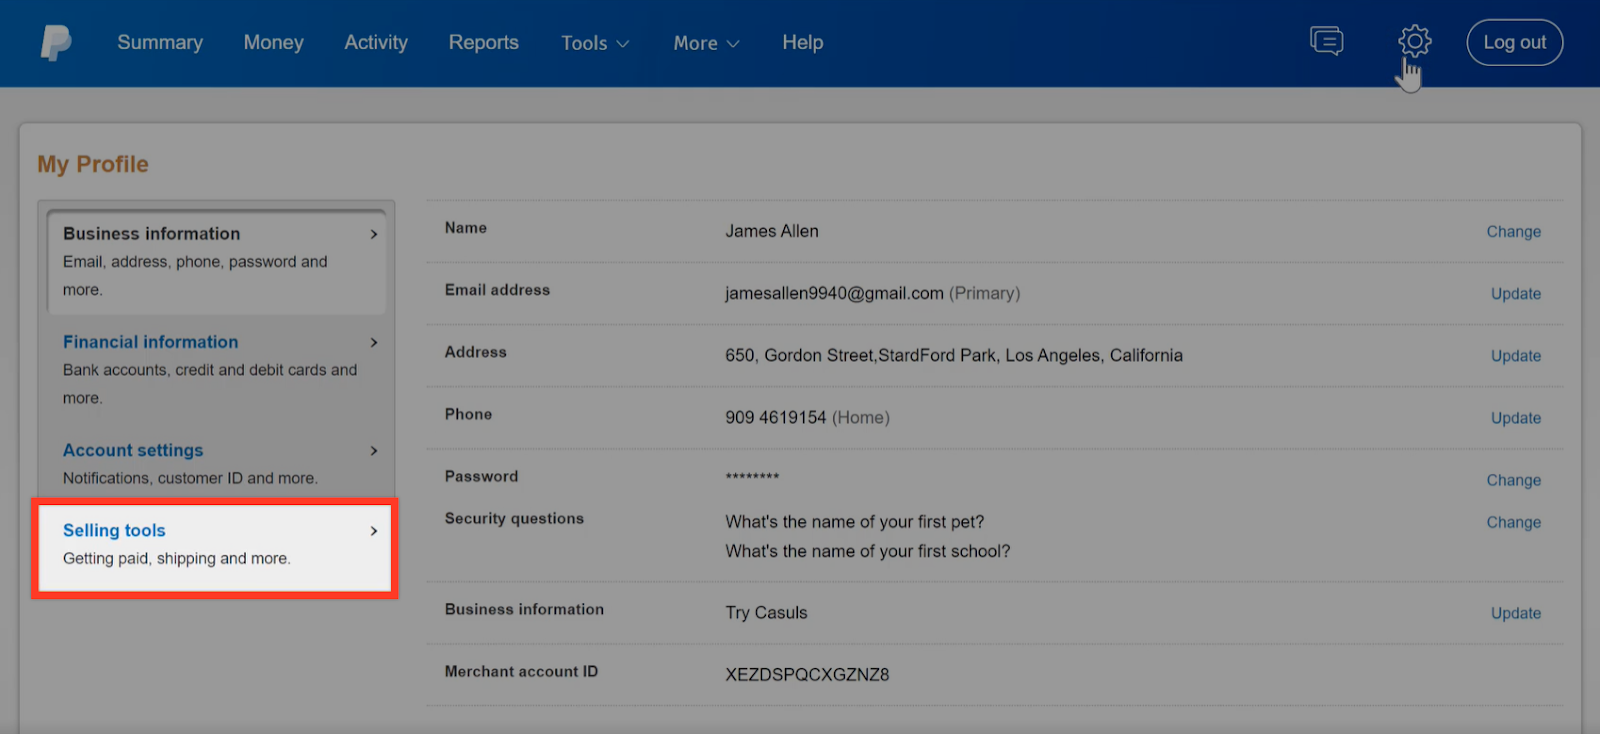
In your PayPal account, click on the settings icon
Open the selling tools tab by clicking on ‘Selling tools.’
Under the website, preferences click on ‘Update.’
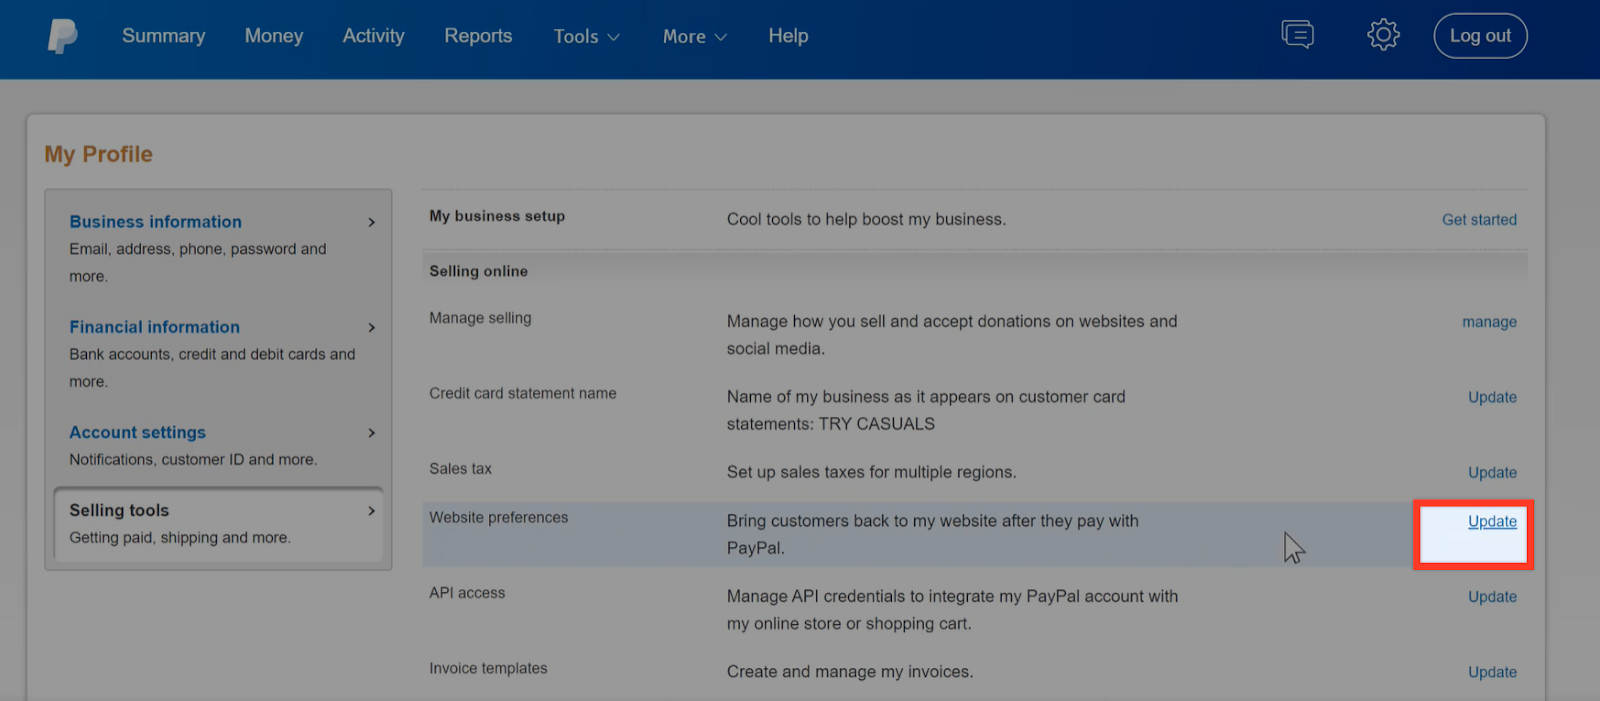
On the next page, you will find several settings that you can configure for PayPal website payments.
Scroll down to the ‘PayPal account optional’ section and enable it.
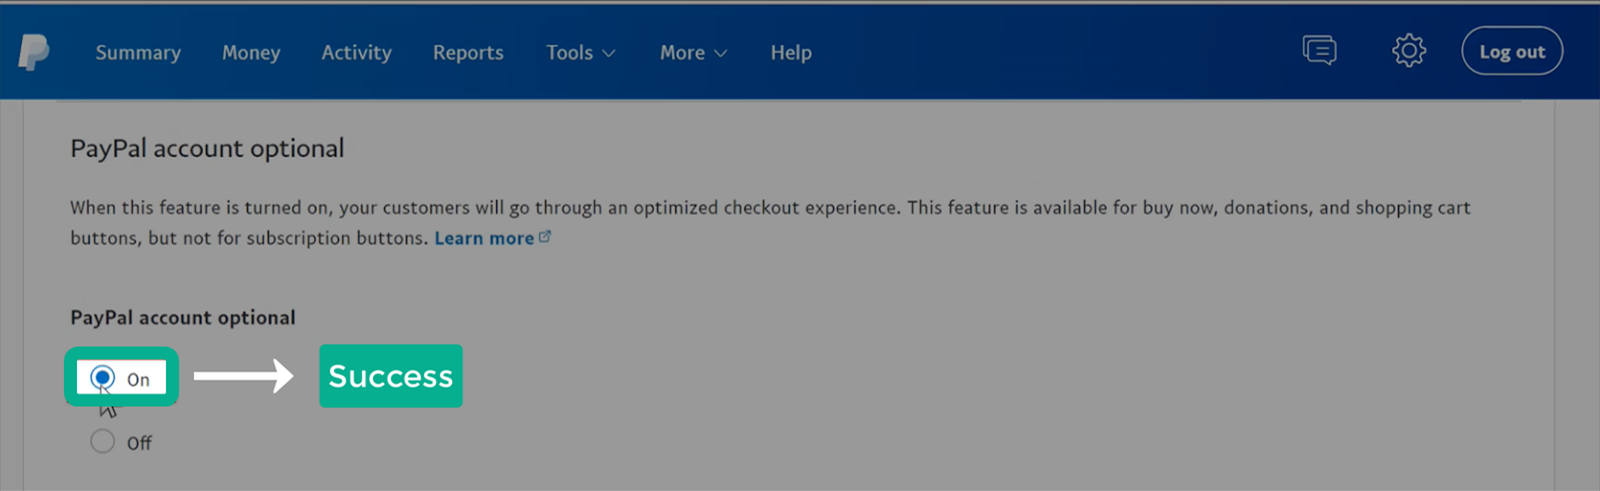
This new setting will be saved automatically.
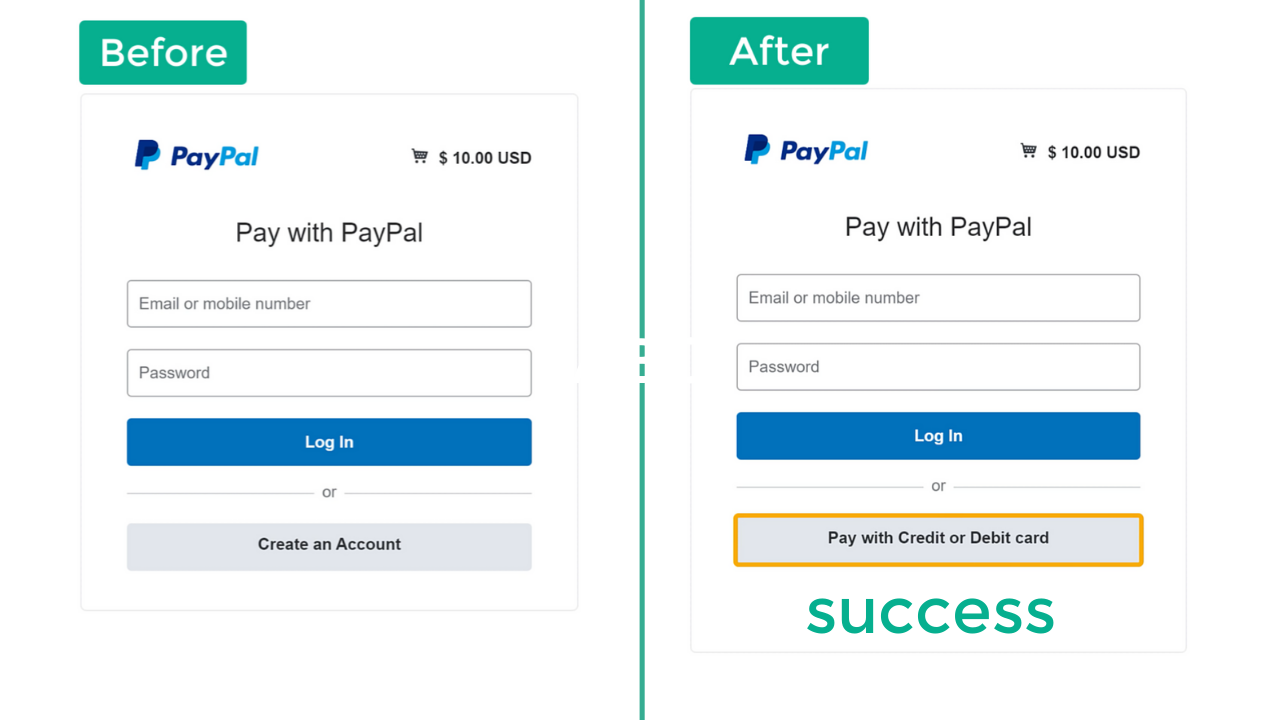
Now we’ve enabled the credit card payment option.
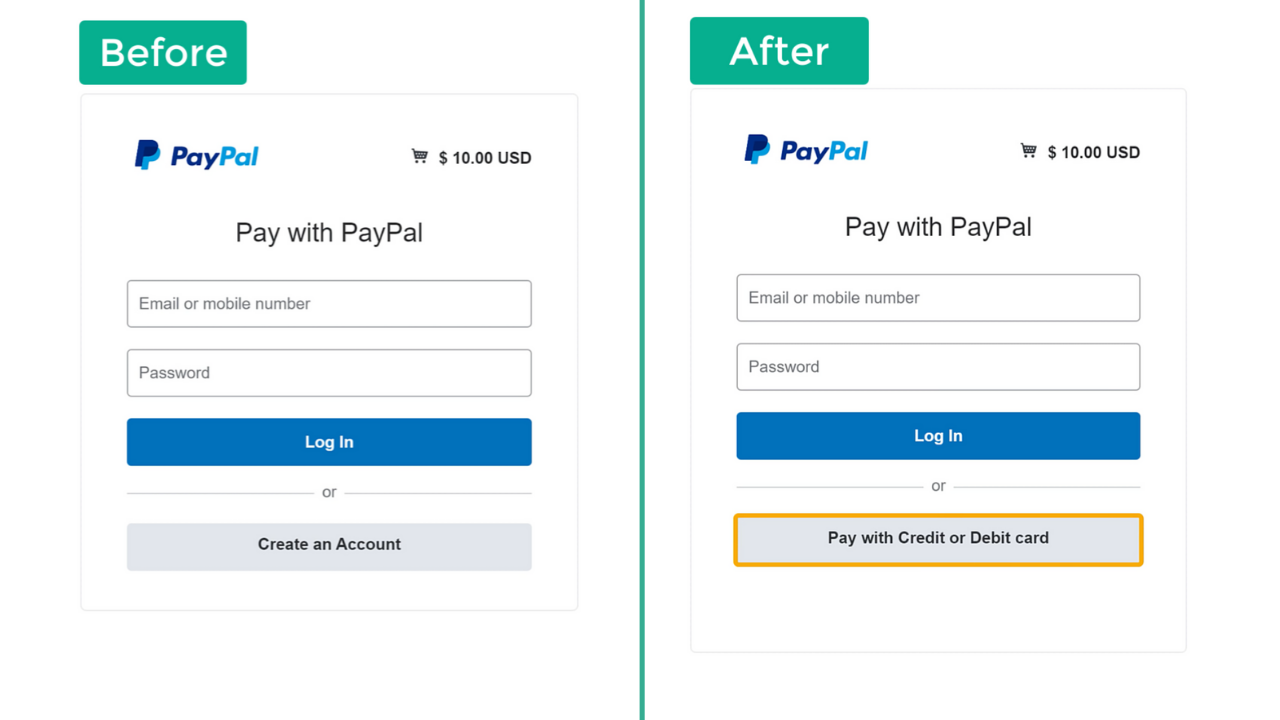
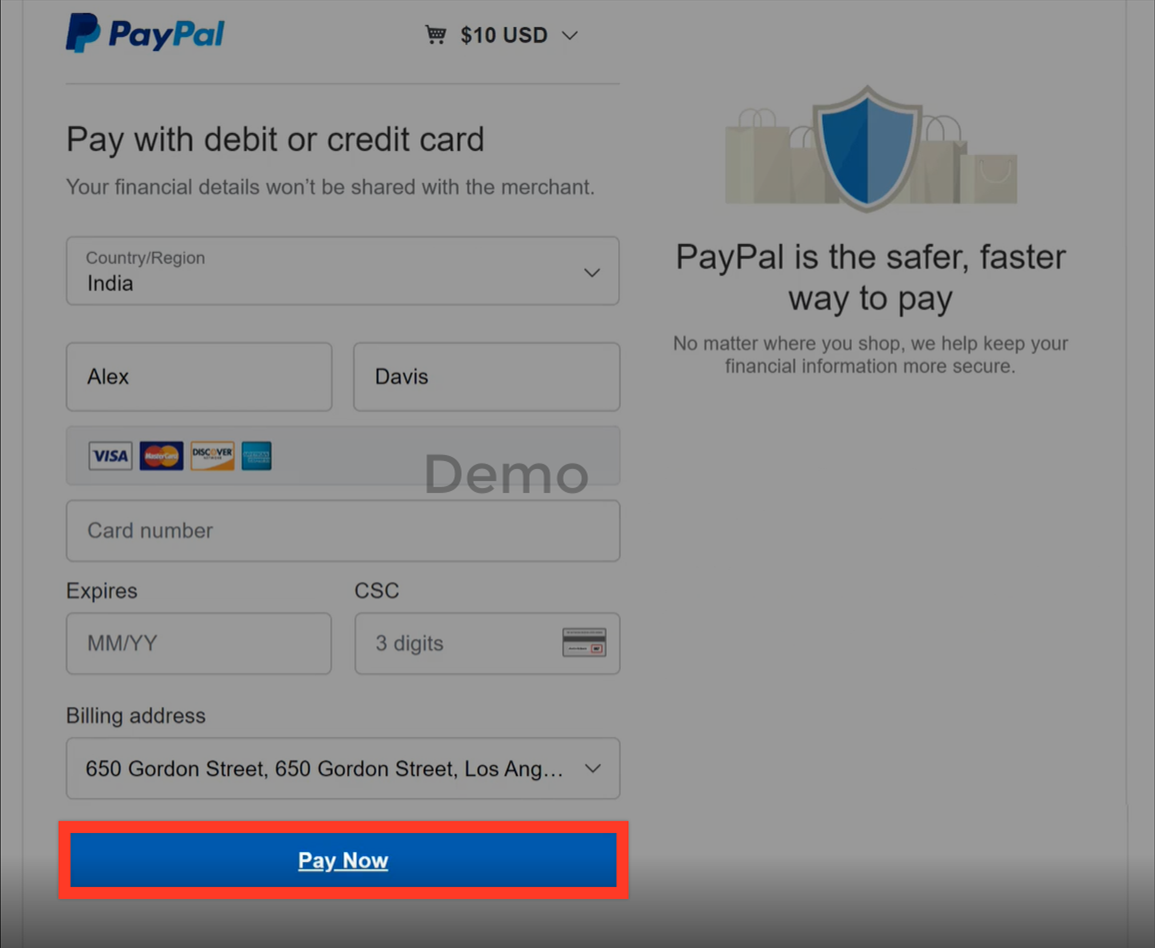
So let’s go back and test how it works. Add a product to the cart and click on “Check Out”. Please fill in the details and “Proceed to Paypal”. When you reach the PayPal payment page, you will now find a ‘Pay with Credit or Debit Card’ option, as is shown in the example below.
Once your customers click on ‘Pay with Credit or Debit card,’ PayPal will ask them to enter their card details. After entering the card details click, they can click on ‘Pay Now.’
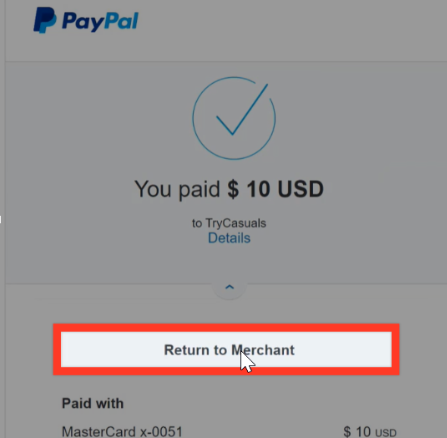
You should now be able to pay for the items in your cart. Once the order has been placed, you will receive a confirmation similar to the one shown below. Your customers will then need to click on ‘Return to Merchant’ to go back to your website.
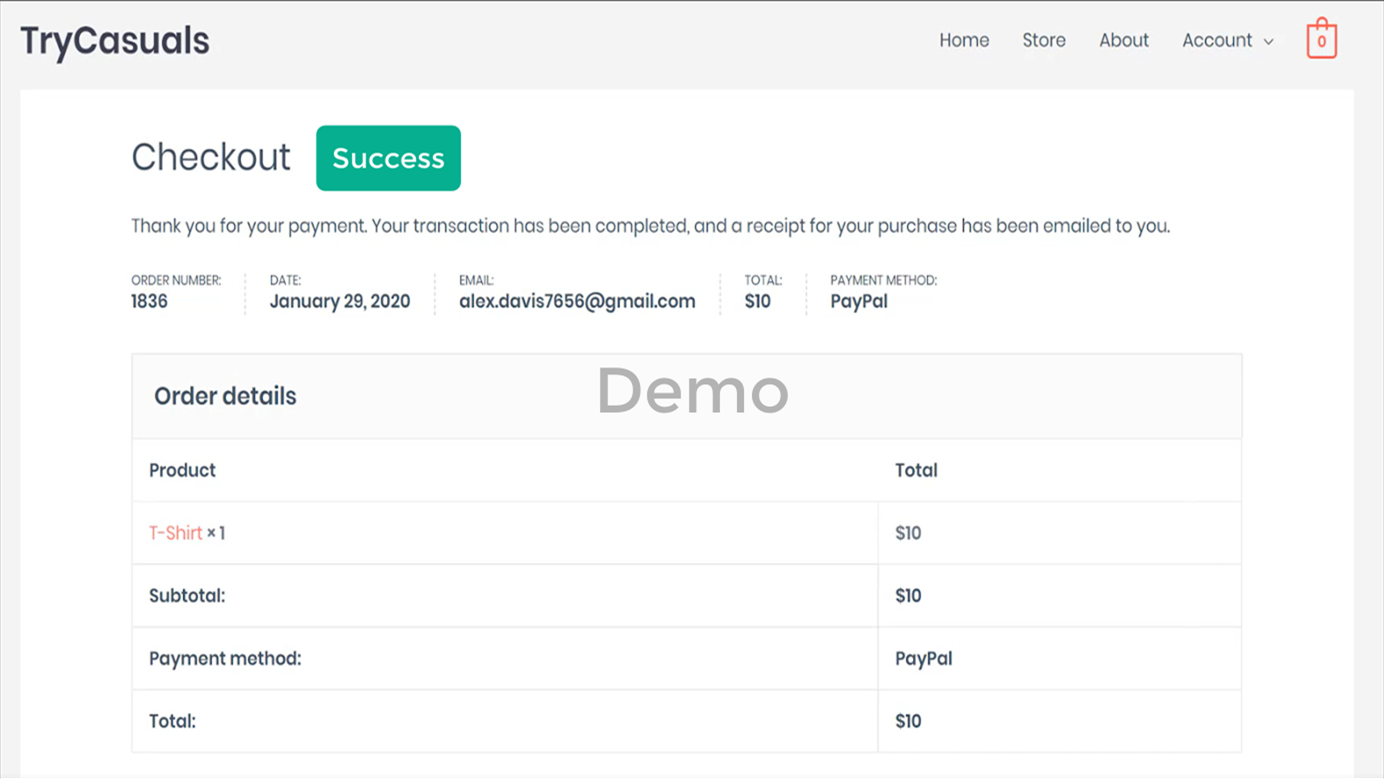
After your customers return to your website, they will see that the order has been placed. An example is shown below.
Have you noticed that, after your customers have made the payment through PayPal, they have to click on the ‘Return to Merchant’ button to get back to your website?
Well, there’s a way to bring back the customers to your website automatically after payment. Please follow the steps.
[ Note: You will not be able to use this feature if you’ve enabled the ‘account optional’ setting within Paypal ]
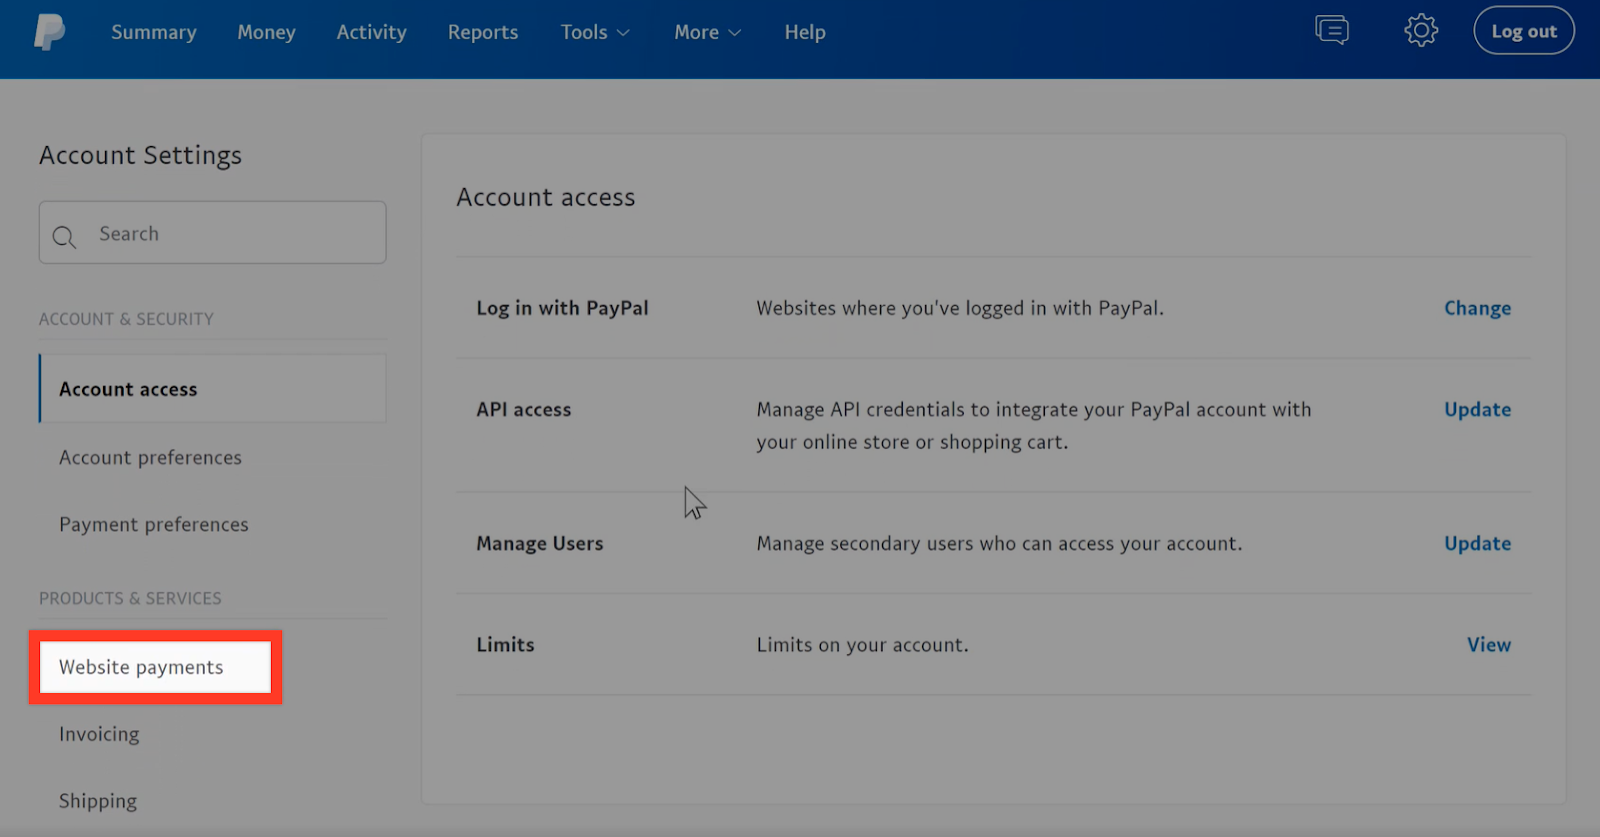
In your PayPal account, hover over the settings icon in the top right-hand corner and click on ‘Account Settings.’
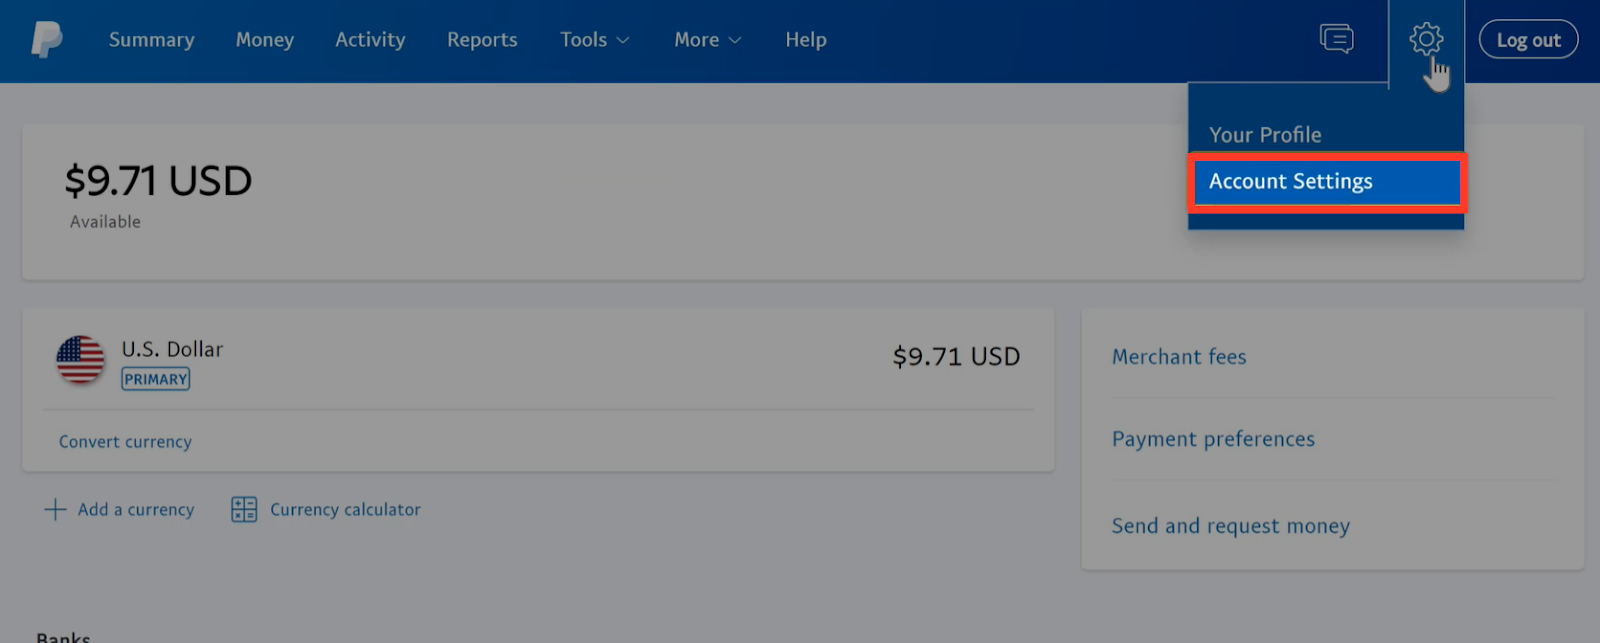
Click on ‘Website payments.’
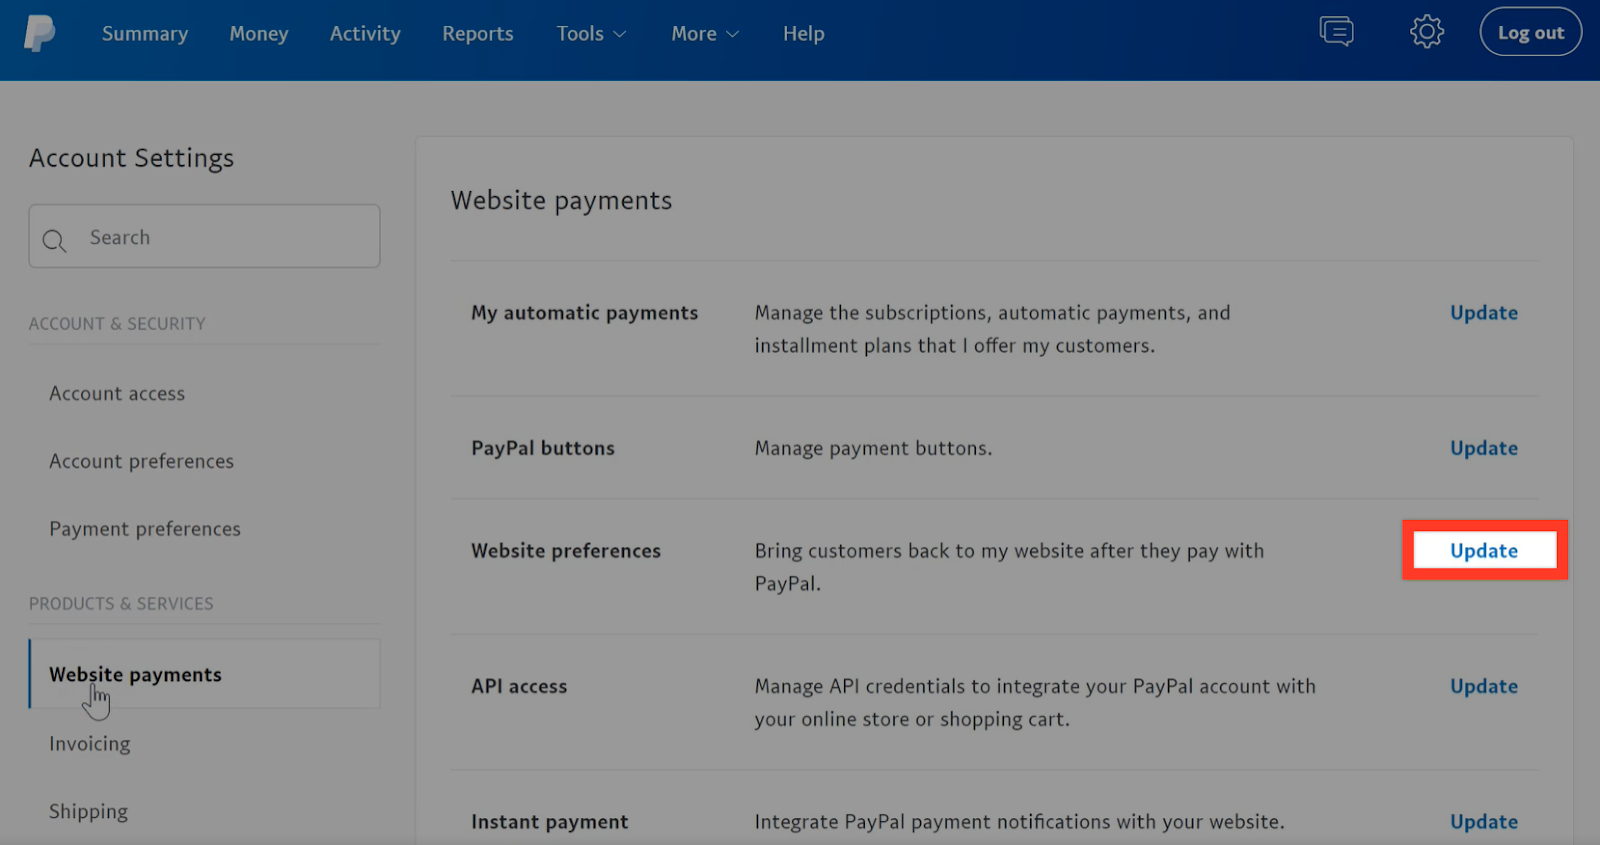
Under website preferences, click on ‘Update.’
Under the auto-return settings click ‘On,’ enter your website’s link, and click ‘Save.’
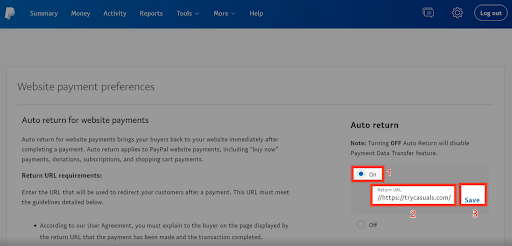
Now if a customer makes a payment using PayPal, they will be automatically redirected back to your website. They will not need to click ‘Return to Merchant.’ An example is shown below.
Now you know how to add PayPal to your WooCommerce website.
Have you tried adding it to your website? If you have any queries or doubts, Please post them in our Facebook Group, we would be very happy to resolve them.
Do you want to increase your chances of customers buying from your website?
Then you may have to consider adding coupons to your website. Read our free guide on How to use coupon codes & increase store conversions.
Also, providing your customers with more payment options like UPI may positively impact the sales on your website. Check our video tutorial on How to Add UPI Payment Gateway to an eCommerce website.
As eCommerce business owners, we know how much difficult it is to improve overall sales. But as you use WordPress, the plugins help you to increase sales and improve customer experience. So, we’ve made a list of 15 must-needed plugins for every ecommerce website that helps you in boosting sales & revenue.
And for more video tutorials on customizing your eCommerce website, subscribe to our YouTube channel.
Yes. You need a paypal business account to be able to connect it with your woocommerce website & start collecting payments.
You don’t need to pay any money to create a paypal business account and connect it with your woocommerce website. It is totally free.
Paypal only charges a small transaction fee when you receive payments for the products or services you sell on your website.
1) In your PayPal account, click on the settings icon
2) Open the selling tools tab by clicking on ‘Selling tools’
3) Under the website preferences, click on ‘Update’
4) Enable “Paypal account optional”
Do you want to learn WordPress to build any kind of website you want? Then this is the only course you need to take.
View CourseSEO isn't as difficult as you might think. Learn how to start growing organic traffic to your website with our easy to follow video .
Watch VideoSign up for our WordPress Course today!
Add a Comment
Leave a Comment