How to Add a Chatbot to your Website in 3 Easy Steps
Posted on
September 7, 2021
by

in
Guides
Let’s say you have a website,
How would you like your visitors to have their queries automatically answered?
Sounds cool, right?
Well, you can do that easily by adding a chatbot to your website.
In this article, we will see how you can add a Chatbot to your WordPress website with a step-by-step procedure,
And anyone who is visiting your website can interact with the chatbot just by clicking a small icon on the website.
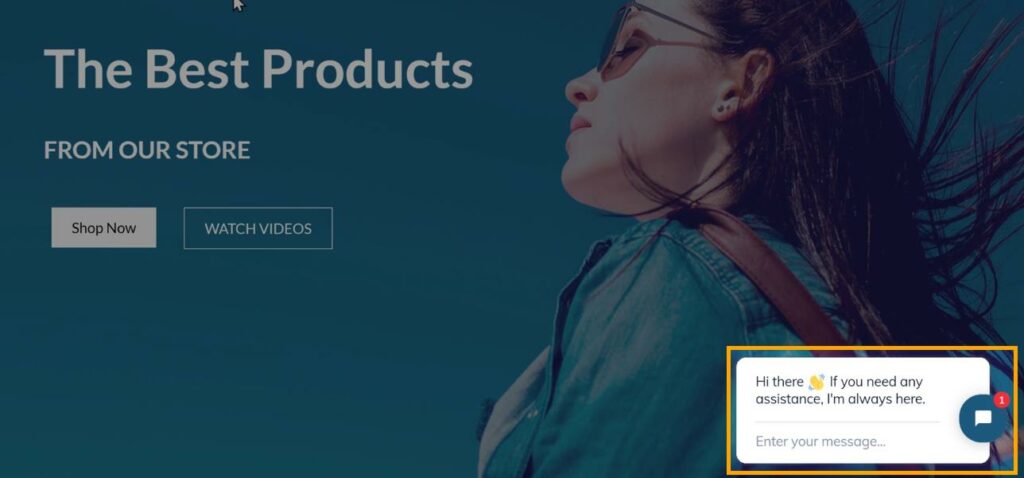
A chatbot asks a question to your visitors where they can select their reply, and based on the response, they will get suitable answers from the bot.

Now, if a visitor wishes to chat with you directly, they can do that too by clicking the ‘Need support’ option.
Be it a direct human interaction or not, the chatbot with its automated messages will itself sound exactly like a real person, thus saving lots of time and manpower.
In this article, after we add a chatbot, we will also see how you can customize your chatbot to suit your website’s style.
Okay! So let’s get started.
To add a chatbot to our website, we’ll follow a step-by-step procedure,
Tidio is the communication tool we will use to create our website’s chatbot. To start with, Create a Tidio account.

In Tidio’s homepage, click ‘Go to app’, and you will get different options to create your account.
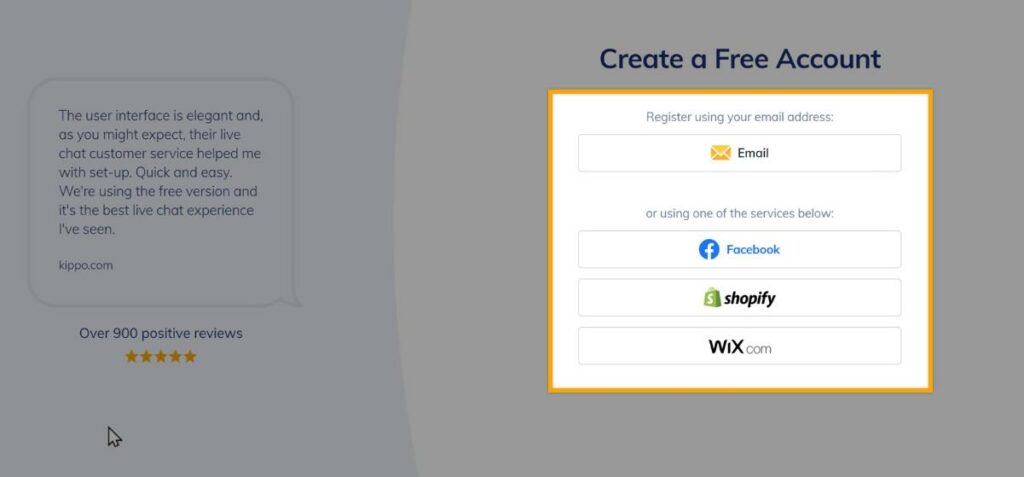
To create your account via Email, click ‘Email’.
And fill up your Email address, the password for your account, and your website’s URL.
Once you have filled up all the details, click ‘Create a Free Account.’

This will take you to the next page where you can get a preview of the chatbot.

So let’s say you want to change the name of your chatbot.
All you have to do is just select the name and then enter the name you want.
You can also change the colour of your chatbot with a click.

Once you are done, click ‘continue.’

To complete the account creation, fill up details like company size, industry, etc.
And once you are done, click ‘Continue.’

Next, you need to set up the welcome message, and this message will appear when a visitor visits your website.
So you can select any message of your choice. And it will show you the preview of your welcome message.

Once you have selected, click ‘Continue’.

And then again click ‘Continue,’ which will take you to your Tidio dashboard.

Now the Tidio dashboard will be displayed, which means you have successfully created an account on Tidio.

Once you’ve created your account, we can now go to the next step which is to connect your Tidio account to your website.
The chatbot will be added to your site once you connect the Tidio account with your WordPress website.
To connect your WordPress website with our Tidio account we are required to follow two steps,
To install the plugin, go to your WordPress dashboard. Now, go to ‘plugins’ and click ‘Add new.’

In the Add Plugins section, search for the plugin called ‘Tidio.’
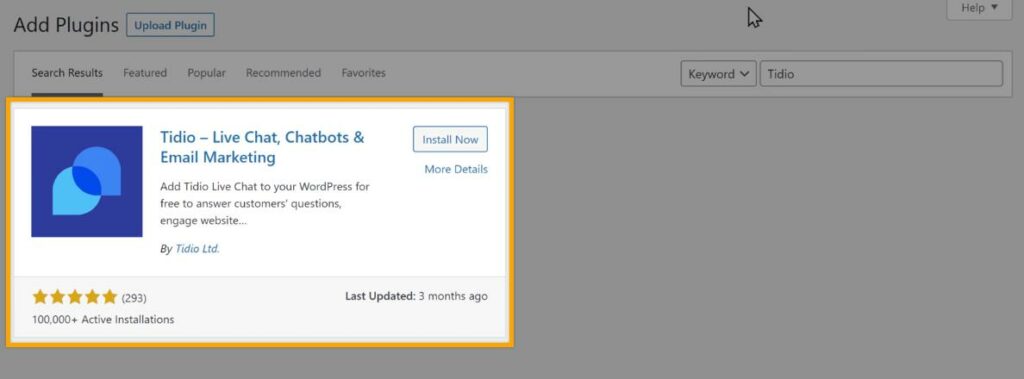
Click ‘Install Now’ to install the plugin, and then click ‘Activate.’

Once you’ve installed the plugin, it’s time to connect the Tidio account with your website.
To connect your account, click on ‘Tidio Chat’ from the dashboard.
Here, enter the email address you entered while creating your account, and enter the password.
Once you’ve entered these details, click on ‘Go to Tidio Panel.’

You will now reach your Tidio dashboard, which means you have successfully connected the Tidio account with your website.

Thus, the chatbot has been added to your website.
To check that, go to your site and click ‘Refresh.’
You will see that you have got your chatbot with the welcome message that you had entered.

And if your visitors want to ask you something, they can type their message there.

So now, we have successfully added the chatbot to our WordPress website.
Let’s say, instead of letting your visitors type their message, what if you want to ask a question to your visitors?

With a question, they can quickly choose their response and solve their queries and doubts.
So, let’s see how you can set up your chatbot to ask questions to your visitors.
We will set up the chatbot in five steps,
To set up your chatbot, go to the ‘chatbot’ option in your Tidio account.
Now you will see your live chatbot we just created.

So to set up this live chatbot, click ‘Edit,’ and you’ll get a page where you can set up your chatbot.

If you click the message icon as shown here, you will see the welcome message we selected.

To create a question, click ‘actions’ present at the right bottom of the screen in the blue icon.

Now you will get different types of actions that can be added to your chatbot.

Now to create a question, just drag the decision action and drop it on the main screen.

Now click on the decision action and enter the question you want to ask your visitors, as shown here.

And now, to give reply options to your visitors like this, click on ‘Type in the button name,’ and enter the suitable reply for the question.

To add another option/reply to this question, click on the ‘Add button’ and enter the second option.

So now, we have created the first question.
Now, we need to connect these two actions to let our visitors get this question after the welcome message.

To connect it, click the dot below the ‘welcome message’ icon and connect it to the dot above the ‘Decision’ icon as shown here.

And as you will see that these actions are connected.
Now, in the same way, you can create as many questions as necessary and connect them.
Suppose a visitor clicks on a specific response, and you want to display another question as a follow-up, you can easily do that too.

To do so, drag the decision button again and drop it in the main screen.

Now click on the action and enter your question and the options here.

And like we did before, to connect these two actions, click the dot, then drag and connect it to another option.

As the previous question has two responses, it will ask you to select the particular option that triggers the next question.

Let’s say you select the first option.
Thus if a visitor clicks the first option from this question, they will get another question as the response.

Next, let’s say, a visitor selects one of the options in this question.
But instead of another question, this time you want to display a message asking your visitors to enter their email addresses.
So once they enter their Email, you can contact them for further information to solve their queries directly.
So now, let’s see how you can add a message like this.
To accept the Email ID from visitors, let’s drag the action ‘Ask a Question’ and drop it on the main screen.

Now click on the action and enter your message.
As we ask for an email address from our visitors, click on the Validation dropdown button and select the ‘email’ option.

And you can also set up an error message that appears when a visitor enters a wrong email address.

Once they provide their email, let’s say you want to send a thank you message. You can easily do that too!
Just drag the first action ‘Send a chat message’ and drop it on the main screen.
Now click on the action, and enter the message you want.

Now close this, and connect the actions.
Now you’ll see that it’s asking us to select one of two options, Success or Fail.

Now to let our visitors get this message, select ‘Success’.
So now our visitors will get this message once they provide their Email address.
Once you are done, make sure all the actions are connected and click ‘Save’.

So now, we have successfully set up our chatbot. But how can we respond to the visitor’s Email address via Email?
To send an email go back to our ‘Tidio’ dashboard.
Now if a visitor enters his/her email address, then you’ll receive a notification as shown here.

If we open it, you’ll see the visitor who has chatted with our bot.

Click ‘Start chat’ to see the particular visitor’s chat.

Now to send an email, click ‘Join the conversation’ and then click ‘Email.’

This opens up a pop up where you want to compose the Email.

Here, enter the subject and the message for the email.
Once you are done, click ‘Send.’

Now the entered message will be sent to that visitor’s email address.

So this is how you can send an email to your visitors.
Now, instead of chatting with our bot, let’s say a visitor wants to chat with you, a human expert to solve their queries.
So how can you let the visitors chat directly with you?
Simple, by adding a need support option.
A ‘Need support’ option means that the visitor wants expert assistance and would prefer a direct interaction instead of a bot.
And you can provide such a ‘Need support’ option in no time.

So if a visitor clicks this option, you will get a notification, and you can start chatting with your visitor.

So now, let’s see how you can add this option.
To add the option, go to ‘chatbot’ and click ‘edit’.

Here, click on the particular decision action.

And click ‘Add button’ and then enter ‘Need support.’

When a visitor clicks the ‘Need support’, you want them to get a message like this.

To do so, drag the ‘Send a chat message’ action and drop it on the main screen.

Now click on the action and enter the message you want to be displayed.

And then connect the two actions.

So now we’ve added the need support option.
We still need to get notifications when a visitor clicks the ‘need support’ option.
To do that, just drag the ‘notify operator’ action and drop it on the main screen.

Now click on the action and enter the message you want to receive when your visitors click the ‘need support’ option and connect these actions.

Once you are done, click ‘save.’

So now you will get a notification whenever a visitor clicks the ‘need support’ option.

Now, if we open it, you can see the visitor who wants to chat with you.

If you want to reply to your visitor, just enter the message you want and click ‘reply.’
And the visitor will receive your message, and can directly chat with you to solve their queries.

So this is how you can get notifications when a visitor clicks the ‘need support’ option.
Next, let’s see how you can add a profile picture to your chatbot.
Right now, you can see that we don’t have a profile picture.
So to add a profile picture, go back to Tidio dashboard and click on the Profile icon at the top right corner.

Here, click on the profile image and you will get the profile picture upload page.

To add a profile picture, just click on ‘Choose your file’ and select your image and then click ‘Ok.’

And now, the image will be added to our chatbot.
When you go to your site and click ‘Refresh,’ you’ll see that the image has been added to our chatbot.

So this is how you can add a profile picture to your chatbot.
With the free version of Tidio, you can chat with a maximum of 100 visitors per month. To increase the limit of your visitors, you need to upgrade to a premium plan on tidio.
To upgrade the plan, go back to the Tidio account and click ‘upgrade’.

Here, you will find the different types of plans you can choose.
For example, you can upgrade using the Chatbots option to increase the visitors limit from 100 to 1000 per month.

Or if you want to remove the Tidio Branding from the chatbot, you can purchase the Remove Tidio Branding feature.

Likewise, if you want to stay a step ahead and want to see Live Typing, the pages visited by users, etc., you can purchase a Communicator plan.

So, you can select the features based on your need and then upgrade the plan accordingly.
With that, we have successfully set up the chatbot on your WordPress website to solve the visitors’ queries.
So, this is how you can add a chatbot to your WordPress website using Tidio.
In this fast-moving world, visitors expect to get their queries resolved quickly, in a matter of a few clicks. That’s where a Chatbot comes into play!
A chatbot enhances the user experience and drastically reduces the time and effort that is spent on traditional customer support. It cuts down the need for direct human interaction and answers the frequently asked questions automatically.
By being available 24x7x365 and responding to users’ queries in no time, a chatbot not only cuts downtime and cost but also acts as a marketing and sales tool, thanks to satisfied visitors!
So, it is high time you add a chatbot to your WordPress website and boost your website’s user experience.
For more such video tutorials on website design and websites in general, subscribe to our YouTube channel.
Do you want to learn WordPress to build any kind of website you want? Then this is the only course you need to take.
View CourseSEO isn't as difficult as you might think. Learn how to start growing organic traffic to your website with our easy to follow video .
Watch VideoSign up for our WordPress Course today!
Add a Comment
Leave a Comment