How to Create a Website Using HTML and CSS
Posted on
July 12, 2023
by

in
Web Development
Do you want to learn how to design a website using HTML and CSS?
If yes, you’ve come to the right site, then. This lesson will teach you how to create a website using HTML and CSS and the essentials in web development. Additionally, you will learn everything you need to transform your website from a blank page into a fully working, eye-catching masterpiece.
Let’s begin by providing a brief review of HTML and CSS.
Since the design and feel of a website ultimately rely on the code that creates the page, you can’t have one without the other.
So, even before using HTML and CSS to build a website, you’ll need a web server (hosting). You can purchase a straightforward hosting service on the servers of several web hosting businesses.
Just type “the best web hosting provider” into Google and choose a reasonably priced option, and You can find “WebSpaceKit” and check the reviews from different customers. You can link a domain name and a server together after you have both.
The following is a step-by-step process that will walk you through the process of building a website with HTML and CSS.
An HTML tag is the fundamental building block of an HTML document.
This is an example of a tag:

That’s a <b> tag we’re dealing with now. Any text between the starting tag (<b>) and the ending tag (</b>) will be bolded. That text, in this instance, is Hello, World!
Still, here are a few examples of additional labels:
| HTML Tags | Descriptions |
| <p> | Used to define a paragraph. |
| <i> | Used to make the text appear in italics. |
| <u> | Used to highlight the text within the tag. |
| <h1> to <h6> | HTML headers are defined. |
| <br> | Used to add a line break to a text. |
| <div> | used to create content sections on a website. |
| <hr> | Used to separate paragraphs into categories. |
| <li> | Used to indicate a list item. |
| <ol> | An ordered list is defined. It may be alphabetical or numeric. |
| <ul> | Represents a group of elements in an unordered list, usually shown as a list of bullets. |
| <img> | Used to show an image on a website. |
| <video> | Used for video file broadcasting. |
| <nav> | Used in HTML texts to declare the navigational section. |
| <table> | Used to present data in a table. |
| <tbody> | Used to create a collection of body elements with similar content in a table. |
| <td> | Used to define HTML table data cells. |
| <tr> | Used to specify rows in tables. |
Alternatively, if you’d want to provide a link to a different page, like this one:
Here is a link to our pricing page.
Here’s a snippet of code that will let you do just that:

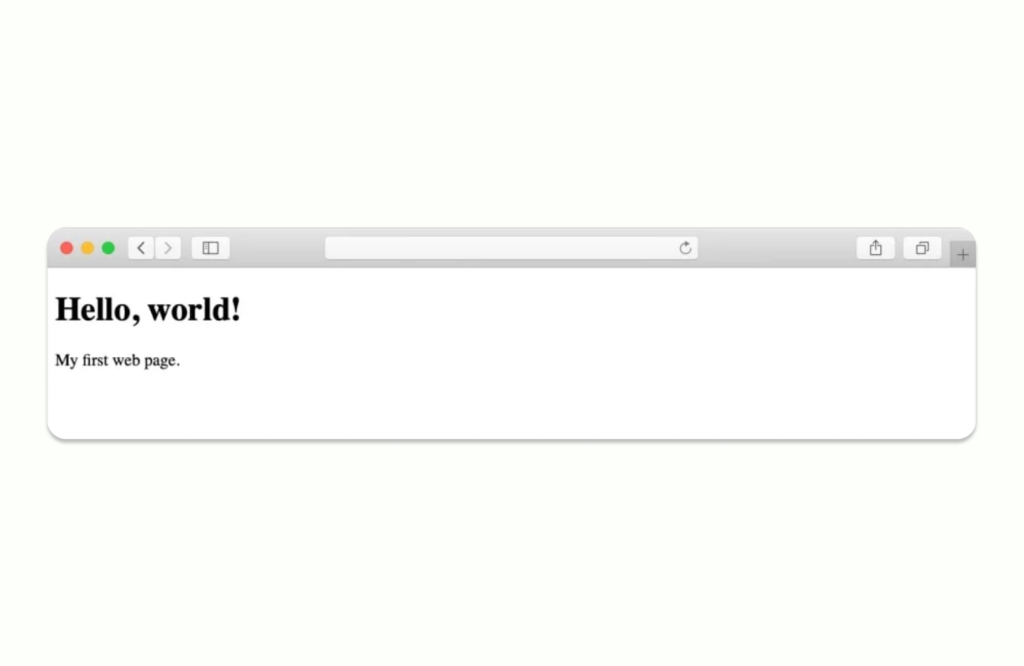
The fundamental HTML document structure is as follows:

The above code is valid HTML, so copy and paste it into a new file and save it as index.html.
Let’s go down each component of this code in more detail:
| <!doctype html> | Document’s first declaration |
| <html lang=”en”> | Another declaration that specifies the next HTML page will be written in English. |
| <head> | Indicates the beginning of the heading section |
| <meta charset=”utf-8″> | Specifies the character set that is used to create the document |
| <title>Hello, world!</title> | The page title will appear in the browser’s title bar. |
| <body> | The text that is planned to show on the page should be included in this area, |
| <h1>Hello, world!</h1> | The page’s primary header |
| <p>My first web page.</p> | Regular text in paragraph |
| </html> | HTML document’s concluding tag |
You can copy your new index.html file to the root directory of the web server and see it in a browser. Don’t get too excited—this page will be bad (see below).
Note: Working on an HTML file with simple text software like MS Word is unpleasant. Install Sublime Text to simplify HTML editing. Mac and PC versions are free.
Selectors in CSS are a lot like tags in HTML. An element’s visual behaviour could be defined via a selector. Consider this case of a CSS selector:

This option specifies a font size of 18px for all <p> elements inside the content of the HTML document.
Below are a few more basics about CSS properties:
| CSS Properties | Description |
| background | Configures an element’s background. |
| background-color | sets the element’s background colour. |
| border | Defines an element’s border. |
| border-color | Establishes the border’s colour. |
| border-left | Creates the element’s left boundary |
| border-right | Sets the element’s right boundary. |
| border-top | Establishes the element’s top boundary. |
| border-bottom | Defines an element’s bottom boundary. |
| color | Sets the text colour for an element. |
| font | Specifies the font family, variation, weight, height, and size for a given element. |
| font-family | Defines the element’s font family. |
| font-size | Specifies a font’s size for an element. |
| font-style | Specifies a regular, italic, or oblique font style. |
| font-weight | Adjusts the font’s weight. |
| height | Specifies an element’s height. |
| margin | Determines an element’s margin (outside spacing). |
| padding | Determines the space between an element’s border and its content. |
| text-align | sets the text within an element’s alignment. |
| text-shadow | Creates a text-shadow effect. |
| width | Determines an element’s width. |
While this is one way to use CSS selectors, a more practical option is to create several “classes” and then apply them specifically to tags.
In CSS, a class selector looks like this:

Every element in an HTML document has a location, and their arrangement affects the web page’s structure and look. CSS documents aren’t.
Stylesheets are CSS files. A CSS stylesheet lists all class definitions in the HTML text. Class definition order is usually not important for basic designs. How you build a CSS stylesheet defines each class and evaluates the website design.
It’s tedious… right? We’ll simplify HTML and CSS design for you. Instead of starting from scratch, we’ll examine a live thing.
Bootstrap helps here…
Bootstrap is a free HTML/CSS toolkit. Bootstrap simplifies HTML and CSS document structure. It provides a framework that optimizes your website’s core structure for development.
Bootstrap lets you get straight to the exciting part. It skips the tedious HTML and CSS steps of website creation.
There are two choices:
Choice (b) is our recommendation for many reasons:
Starting using a template makes it easier to understand the HTML document basics. This allows you to concentrate on fun things like content layout and design.
This way, you’ll learn faster and get a better outcome.
Website using HTML and CSS may use any Bootstrap template. They ought to function similarly. This guide makes use of a Start Bootstrap template. They provide free templates that are well-designed, optimized, and trouble-free.
Selecting the Free Download button on the right may save the zip file to your desktop. Transfer the package’s contents to the root directory of your local web server or web hosting account after unzipping it.
Launch the website in your browser. Here is the template’s default form:

Although it’s already attractive, you can alter it if you know HTML and CSS.
First, design the homepage. This will teach us how to change visuals and words, and adjust everything.
We briefly discussed the HTML document heads above. Let’s dig deeper.
In Sublime Text, your Bootstrap site’s index.html file has a head section like this (we deleted the non-essential items for clarity *):
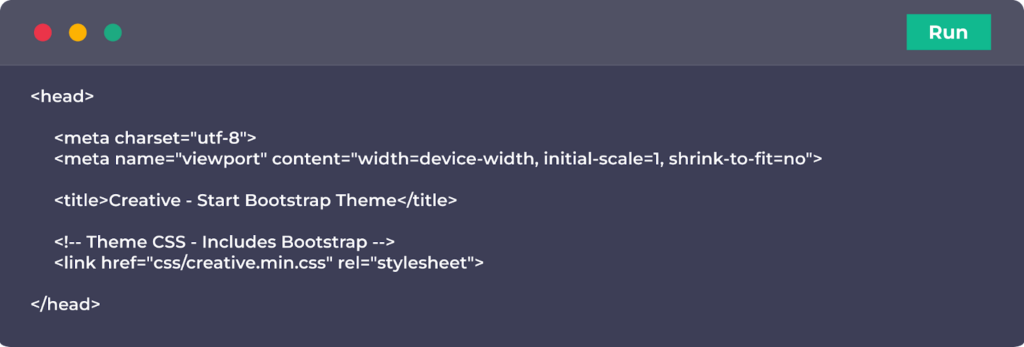
Some of these declarations are new:
| <!– … –> | HTML comments are between the brackets. It doesn’t appear on the latest page. |
| <meta name=”viewport” content=”width=device-width, initial-scale=1, shrink-to-fit=no”> | Bootstrap’s declaration tag. It determines webpage viewport size. |
| <link href=”css/creative.min.css” rel=”stylesheet”> | It loads the Creative template’s CSS stylesheet and Bootstrap’s default stylesheet. |
Let’s simplify that final statement, which loads the CSS. Replace that line:

The non-shortened CSS sheet will load. Changing this version is merely simpler.
Scroll to the bottom of index.html. The following lines precede the closing body tag:
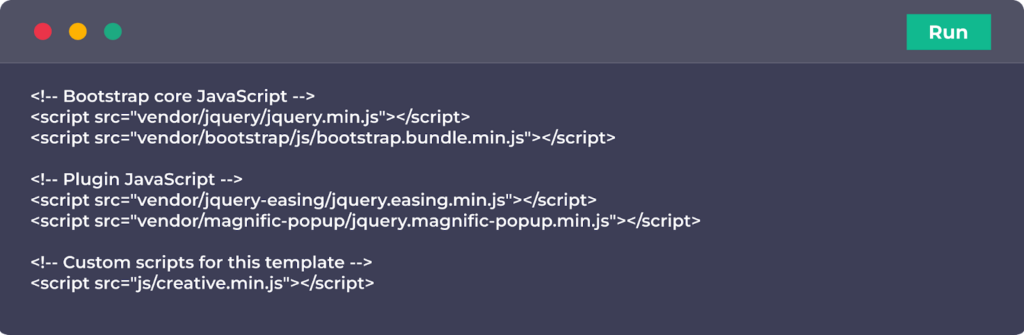
They load JavaScript files for design visual interactions. JavaScript allows the About link in the top menu to easily move you to the About block on the same page. We can ignore this code for now. Let’s wait.
Instead, let’s add content:
1. Change the Page Title: Replace the text between the title tag in the head section with your own:

2. Customise Hero Section: The hero portion is this block:

Our own stuff would be fantastic. Return to index.html and locate this section to edit this block:
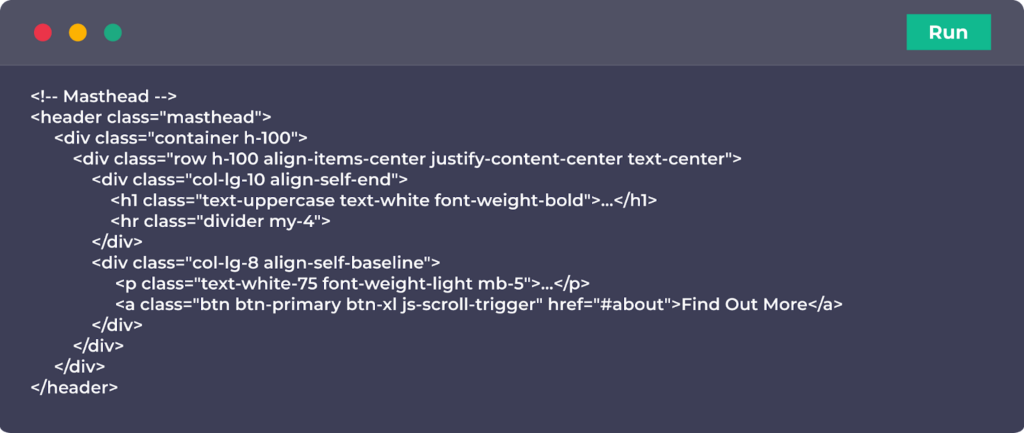
This code controls hero content.
Some of the other tags, which we already know, have many CSS classes. Learning all these subjects is simpler than it seems. Modifying index.html default texts is easy. Find the tag you wish to alter and update what’s between the opening and closing tags.
You may freely add paragraphs. We can copy the content on the website and post it below.
3. Customise Other Page Blocks: The index.html file has several parts. The navigation, services, portfolio, call to action, contact block, and footer are in a block.
Sections have distinct material but are structured similarly. They share HTML tags but have separate CSS classes. Go through each block and explore to customize the page.
You can change texts and rearrange sections (the pieces between the <section> tags). Though you must cut and paste pieces by hand, it’s easy. However, we haven’t covered two simple changes. Next, these:
In HTML and CSS, changing colours and fonts is simple. Assigning in-line style to an HTML element is the easiest. For instance:

HTML uses hex values to represent colours. “#FF0000” represents red.
Colours are best assigned using CSS stylesheets. We could add this in our CSS stylesheet to obtain the same effect as the code above:

To alter the colour of any text on the website, first, identify the element that styles it, then go to the stylesheet and adjust or create the matching class.
First, check the CSS code for classes that may already give alternate sizes or colours before altering your Bootstrap template’s colours or fonts. If available, use those.
After customizing the homepage, start adding pages and linking them to it. HTML and CSS allow you to connect any number of sub-pages.
Websites often require the pages like a contact page, about page, privacy policy pages, portfolio, and more…
Another thing we’re going to do is include a picture here on the page.
HTML image tags look like this:

Easy, right? Image path is only one parameter. Add your picture to the image directory to organize.
After creating the pages, connect them from the homepage (index.html). This link belongs in the navigation menu (below <!– Navigation –>).
Find this line:

We’ll alter it:

The HTML <a> element is a link tag. It links to any web page by specifying its address in the href argument. The clickable link text is between the <a></a> elements.
Your new About link will appear when you reload the homepage.
All done! Your website is awesome now…
If you believe that completing this task will be too challenging for you, our team suggests that you either design a website using WordPress or use one of the readymade websites from platforms like MakeYourWP!
For more updates, stay tuned with Website Learners!
HTML has four fundamental tags:
<html></html>
<head></head>
<title></title>
<body></body>
CSS (Cascading Style Sheets) styles and layouts web pages, changing font, colour, size, and spacing, splitting text into columns, and adding animations and other aesthetic elements.
CSS, or Cascading Style Sheets, beautifies your website with fonts, colours, and layouts. HTML builds your website’s framework, while CSS brings it to life.
HTML and CSS are best learned through supervised practice. In-person or online boot camps or guided courses are options. Video, lectures, and guided practice comprise a course. Some have tests after each class.
Notepad ++, Atom, Sublime Text, Adobe Dreamweaver CC, etc., are the top free HTML editors.
Do you want to learn WordPress to build any kind of website you want? Then this is the only course you need to take.
View CourseSEO isn't as difficult as you might think. Learn how to start growing organic traffic to your website with our easy to follow video .
Watch VideoSign up for our WordPress Course today!
Add a Comment
Leave a Comment