How to Make a Free Website on WordPress
Posted on
May 14, 2020
by

in
Web Development
It can get quite overwhelming for beginners to create websites on their own. But, trust me, it’s not hard at all!
With the advent of technology, anyone can make a free website on WordPress, without having to spend any money or time.
So, to help you get started here is a complete step-by-step guide on how you can make a free website on WordPress and make it live on the internet.
Let’s get started, shall we?
We are going to make a free website on WordPress in just two parts,
In Part 1, we will first set up our account with the hosting provider and then make our website live on the Internet. So, we are going to do this in 3 steps,
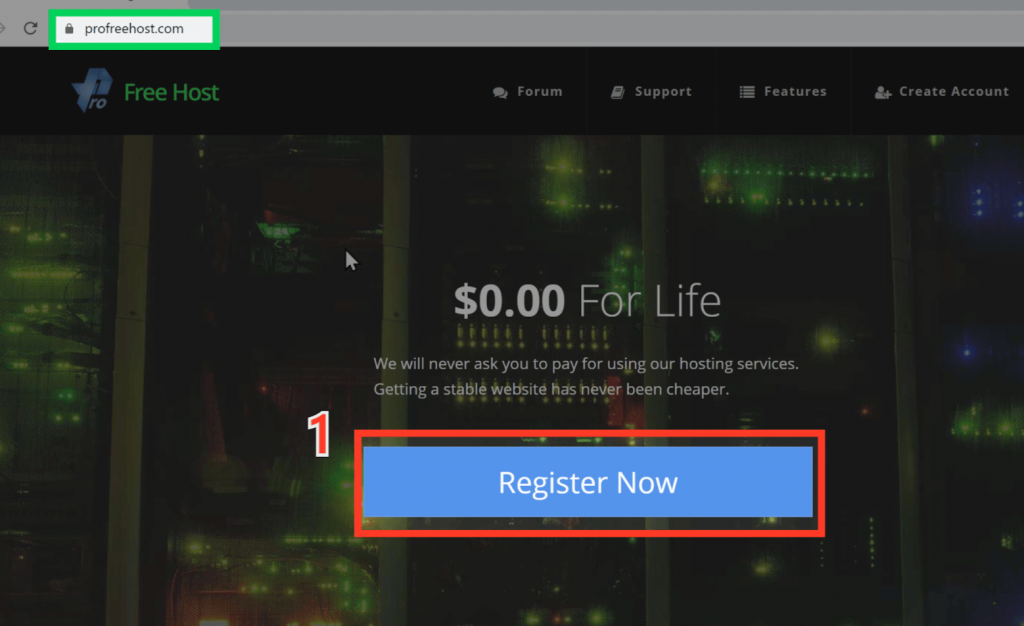
Profreehost is the hosting provider that is going to help us make a free website on WordPress. So, to create an account, go to profreehost.com.
So to create the account go to profreehost.com.
In the home page, click ‘Register Now’.
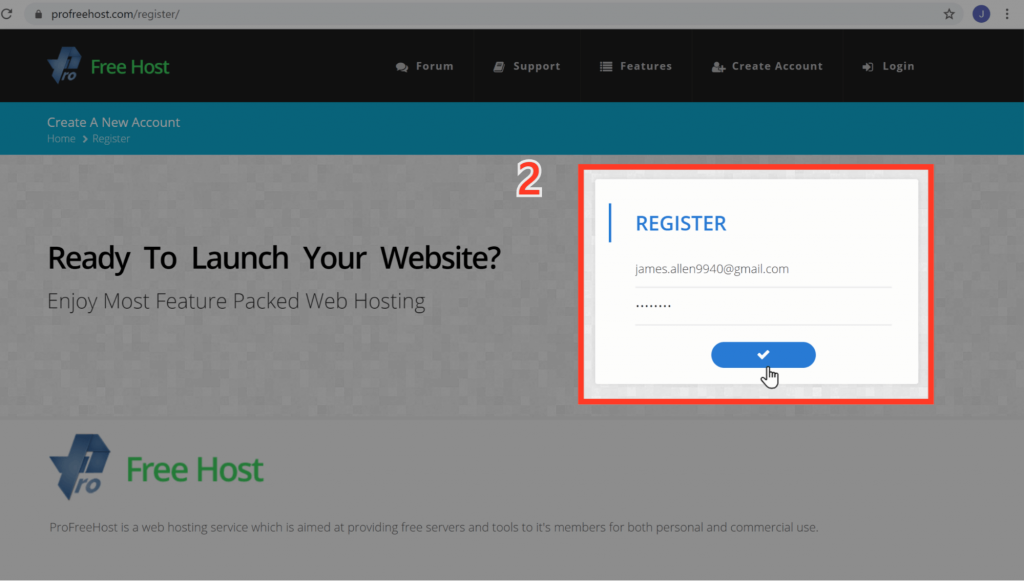
Now you will be taken to a page where you can register for a new account.
Here, enter the Email address and password to register for an account. Then, click the button with a tick.
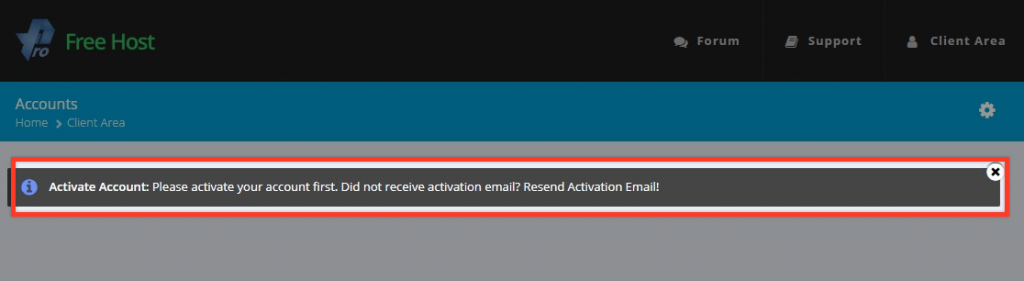
You should get the following notification after you fill out your details. It means you need to activate your account. The link to activate your profreehost account will be sent to your email.
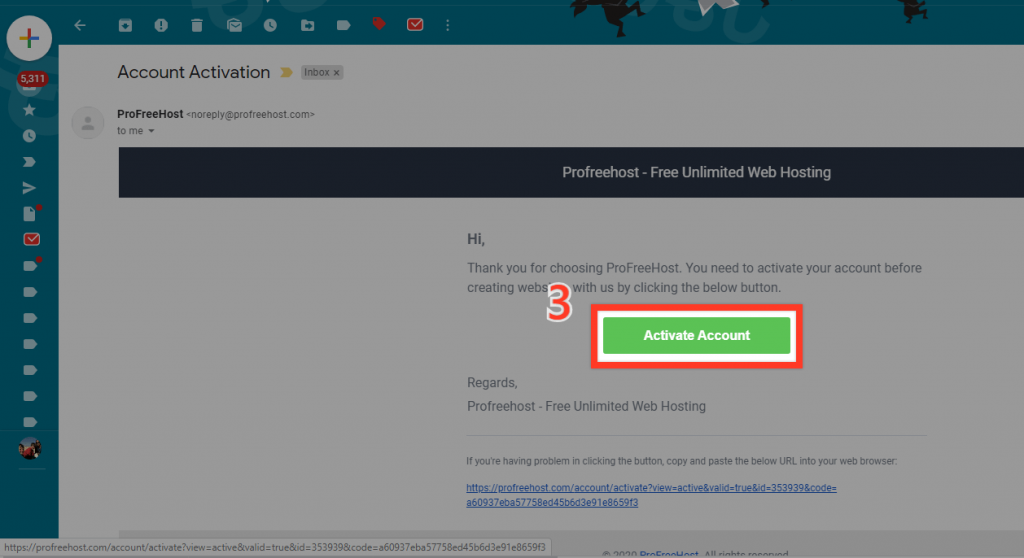
Check your email for a message from Free Host with an activation link.
Click on the Activate Account button to activate your account.
After you have clicked on Activate Account, you will be redirected to your account on Profreehost as shown below.
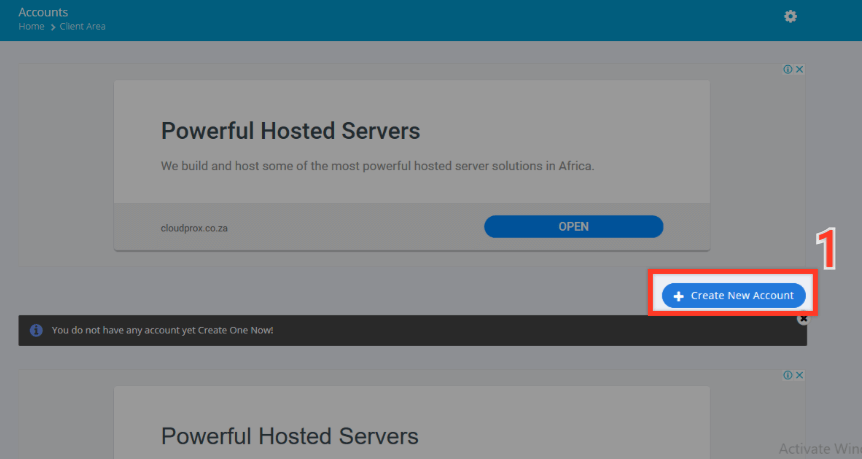
A domain is the name of your website. This is the name that a visitor enters into the browser to visit your website.
So to get your domain name,
Click ‘Create New Account’.
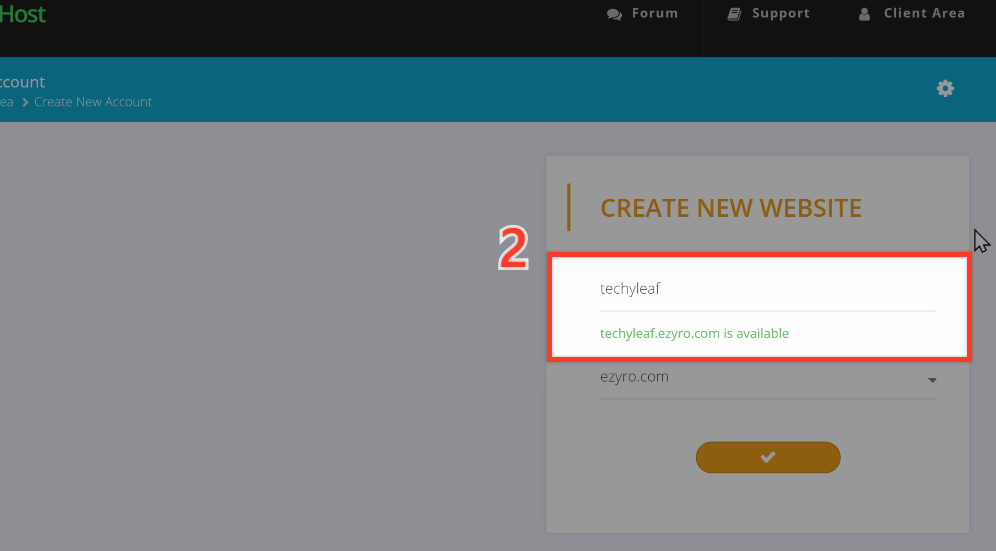
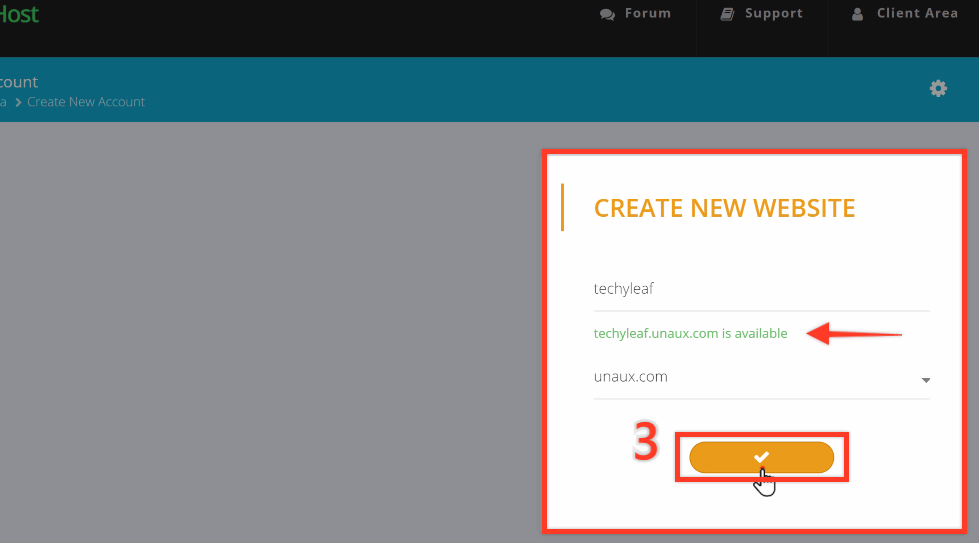
Now you will need to choose a name for your website. We have chosen “techyleaf.”
This will be the domain name of your website that your visitors will need to access your website.
Now enter the chosen domain name to check if it’s available or not.
You can see that the domain we chose is available and can be used to make a free website on WordPress.
You can also change the last part of your domain to unaux.com as shown below.
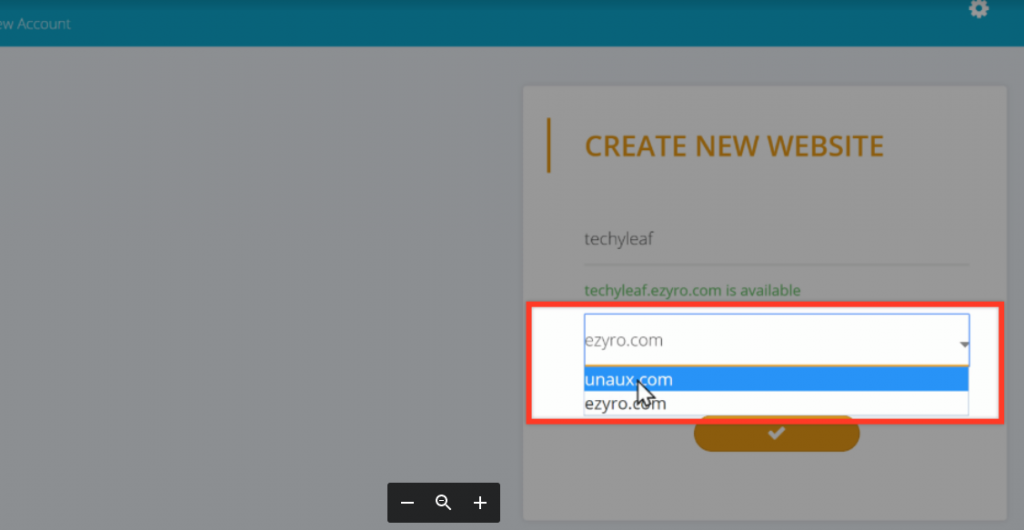
Now to get this domain,
Click the button with the tick on it to continue.
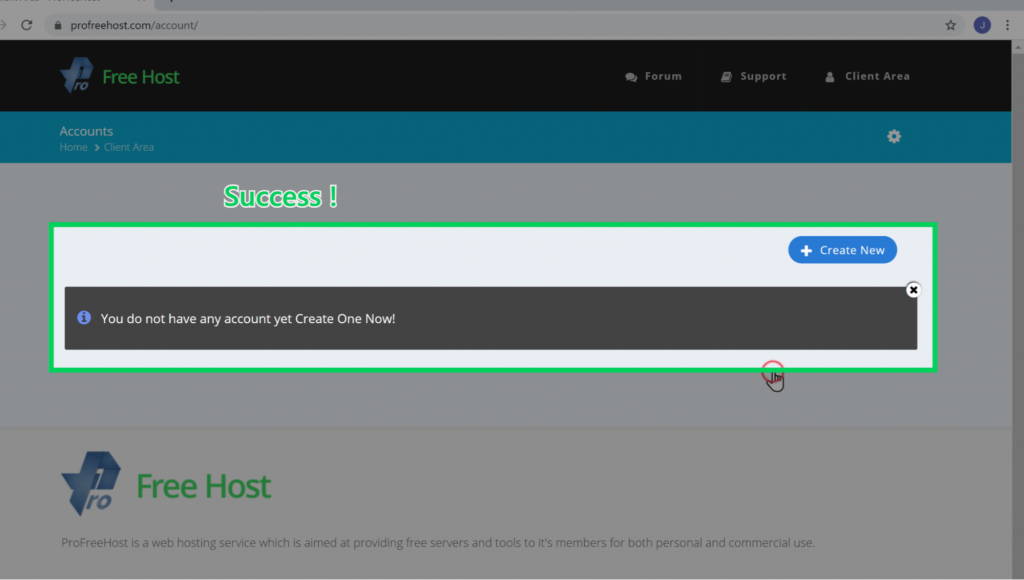
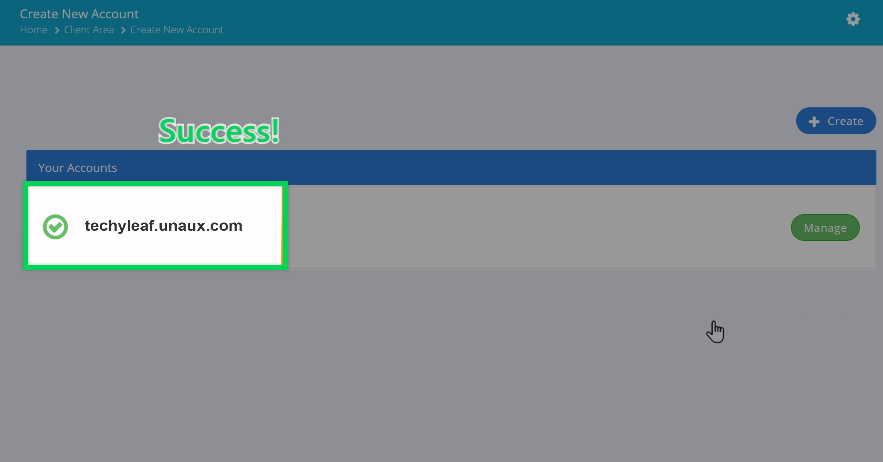
Now you should get a confirmation message as shown below.
As it says, ‘Success!’. We have got our free domain.
Now that we have got our free domain, it’s time to make a free website. WordPress is the platform that going to help us make a free website. But, why WordPress?
Well, WordPress is the world’s most popular Content Management System that lets you build websites without any coding. So, once we install WordPress, our website will be live on the Internet.
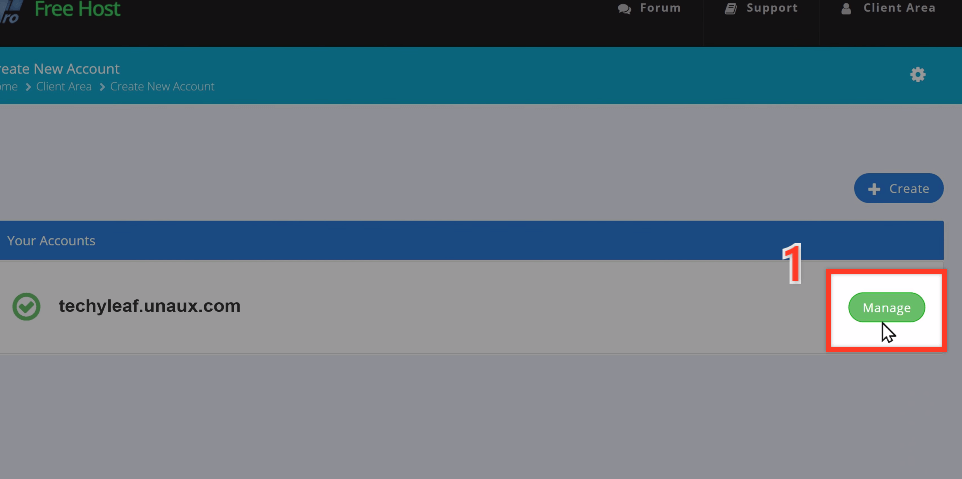
To install WordPress,
Click the ‘Manage’ button.
Once you click manage, it will take you to this page shown below
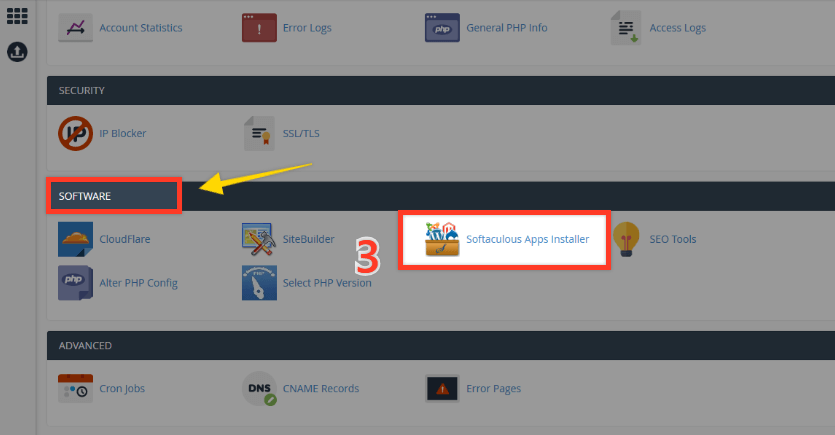
Now click ‘Control Panel’.

From the control panel, under the software tab
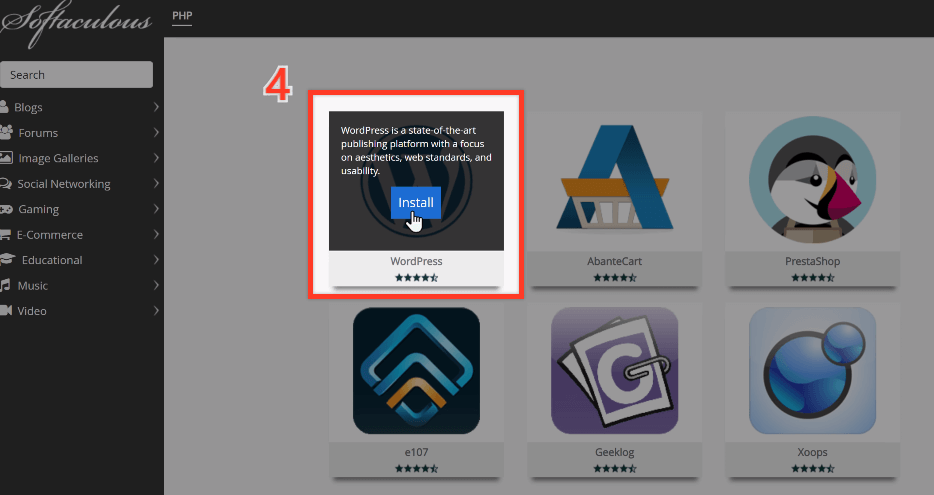
Click on the ‘Softaculous Apps Installer’.
It will take you to the page with various softwares that can be installed on a website.
Here, Select WordPress and Click ‘Install’.
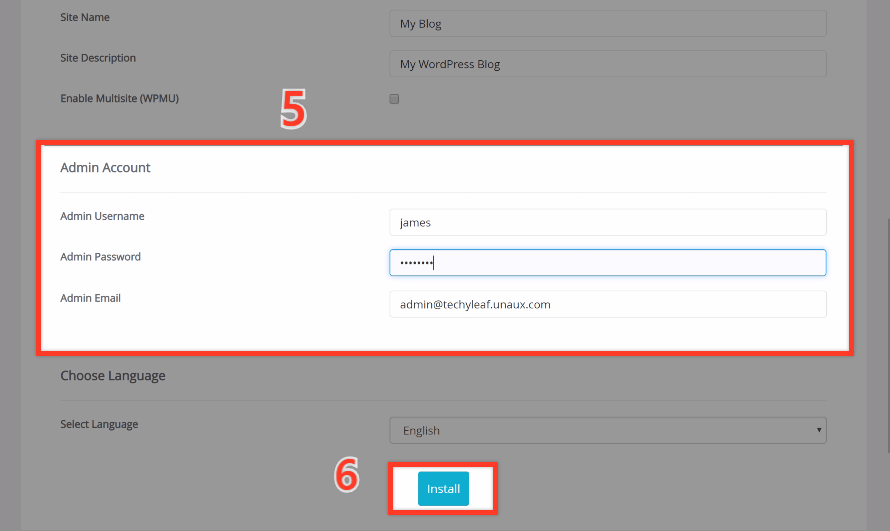
Now you will get to this page, and go to Admin Account.
Here you will need to enter a username and password for your WordPress installation.
This will be used to log in to your website later on.
Once you have entered these details, click Install.
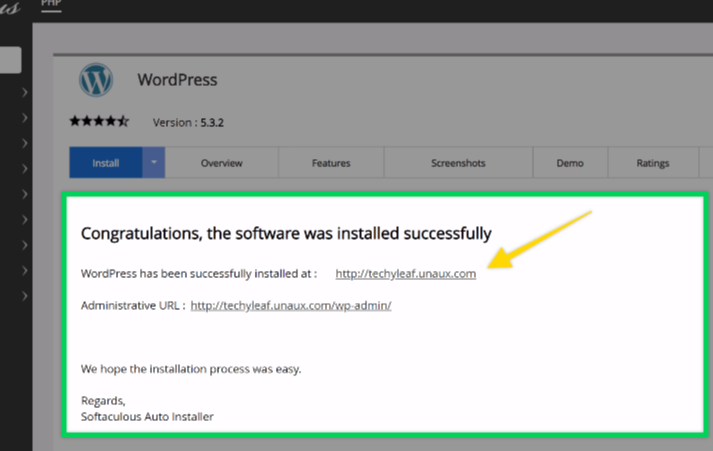
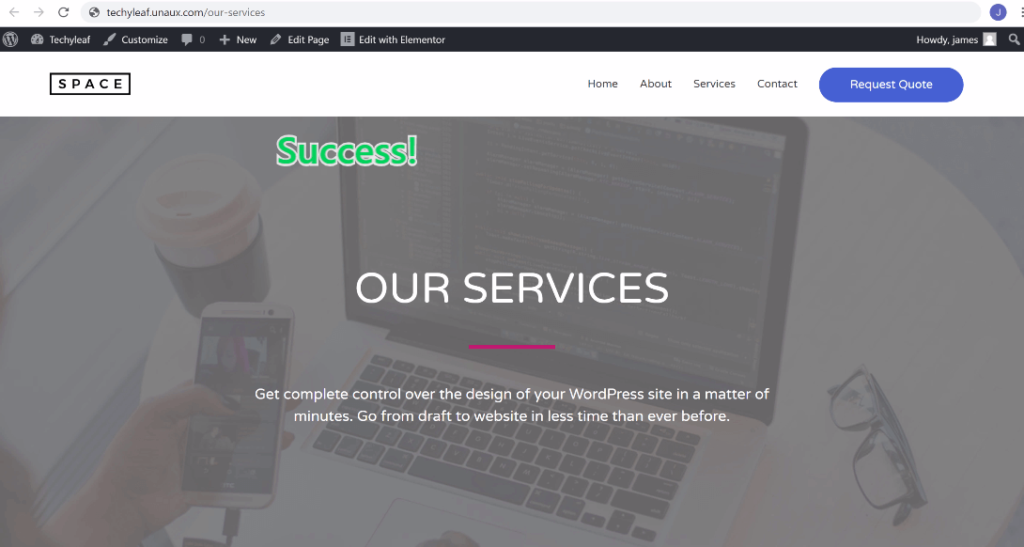
As you can see, WordPress is successfully installed.
Now you can click on the link to your website as shown in the image below and your website should be live on the internet.
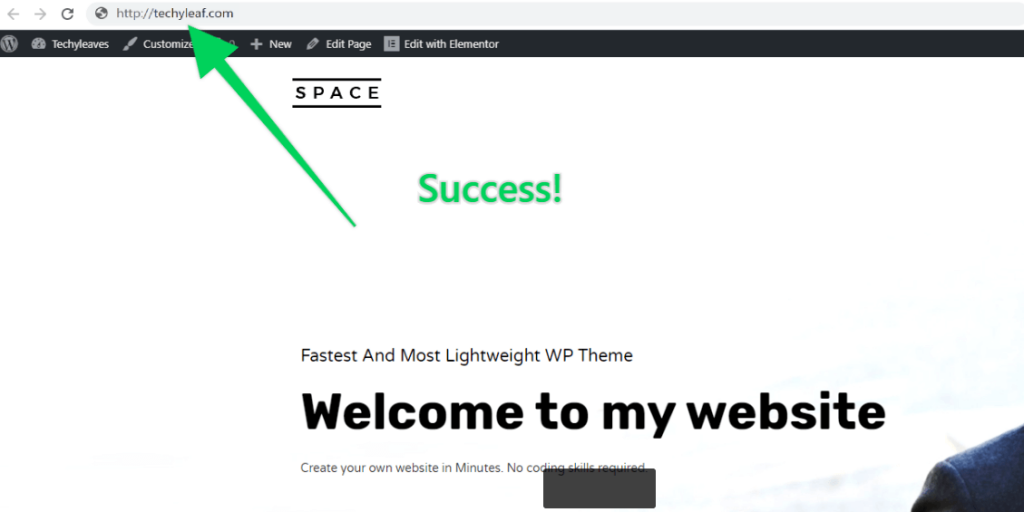
Success! Your brand-new website is live.
Now that you have successfully launched your website, it is time to start building it. It’s time to customize and build your dream website.
So, let’s go to the second part of this tutorial.
Building your website includes customizing the design of the website, adding relevant pages, and adding our content to the website.
So we are going to do this in 4 Steps,
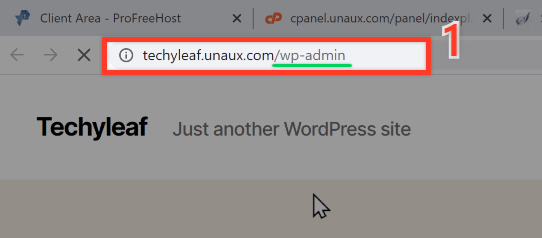
To log into your site, just type ‘/wp-admin’ after your site’s address and press enter.
It will take you to the login page of your website. For example ‘techyleaf.unaux.com/wp-admin’.
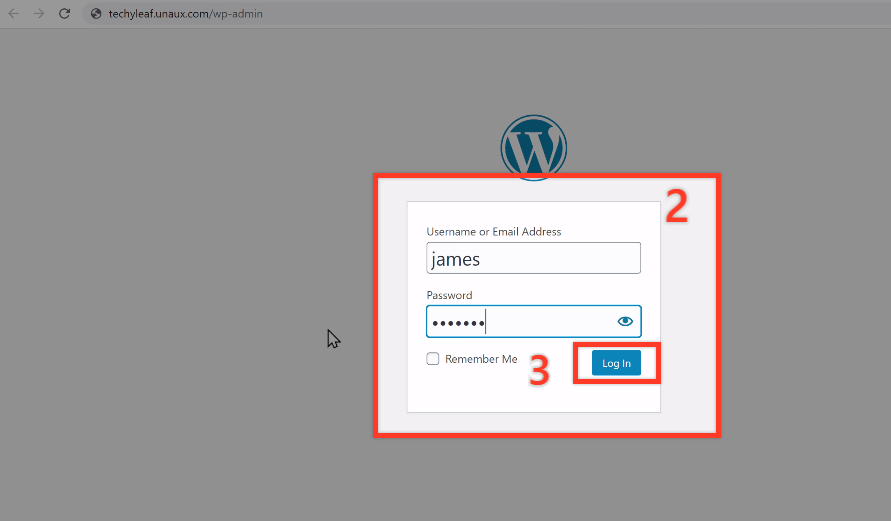
It will take you to the login page of your website.
Now enter the login details which you created for your WordPress. And click Login.
You will be taken to your WordPress Dashboard, which is where you can control your entire website.
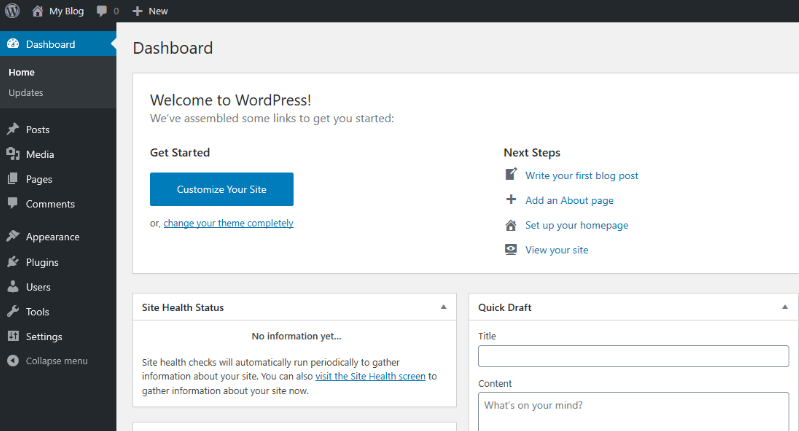
Once you have logged in, we can now go to the next step.
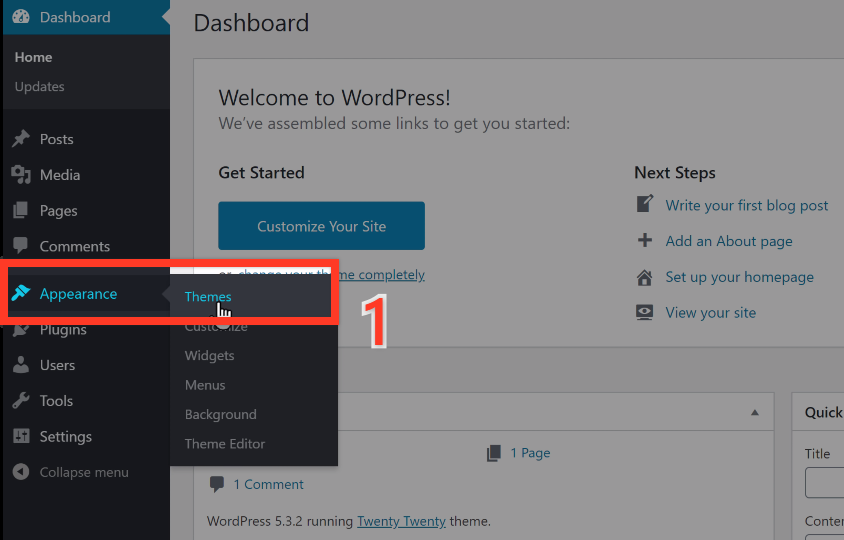
Instead of building your site from scratch, you are going to choose a design and then customize it to make your dream website. To select your website design, you need to install a theme called Astra in WordPress.
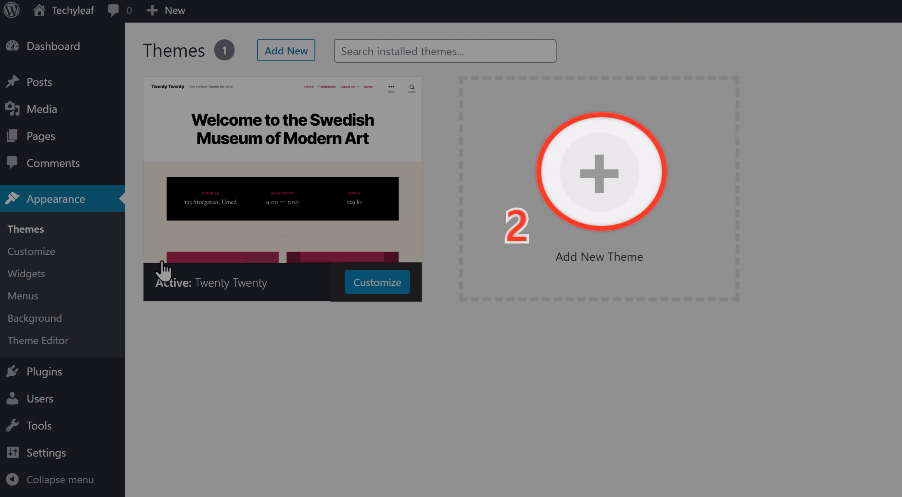
So to install the theme, go to ‘Appearance’ And click ‘Themes’.
In the Themes section, click Add New Theme to add a theme.
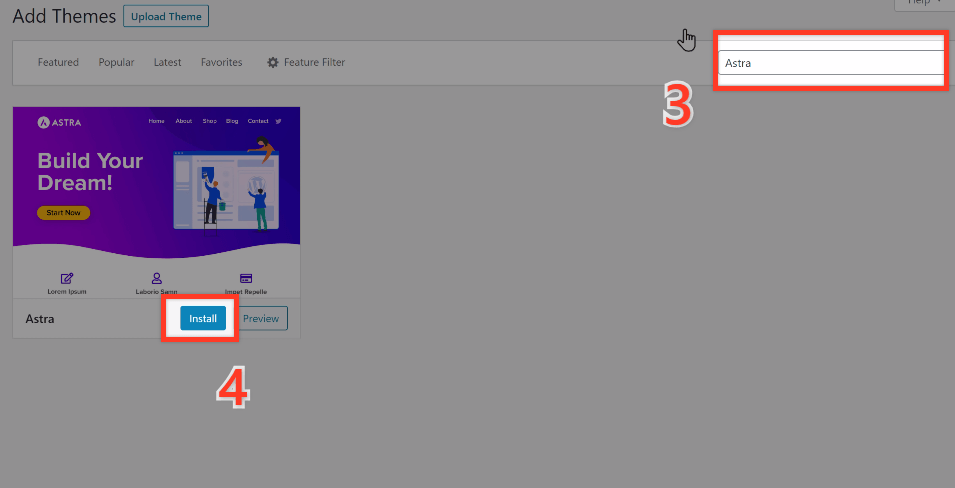
You will be taken to a library of themes. here, search for a theme called Astra.
Now select the Astra theme and click Install.
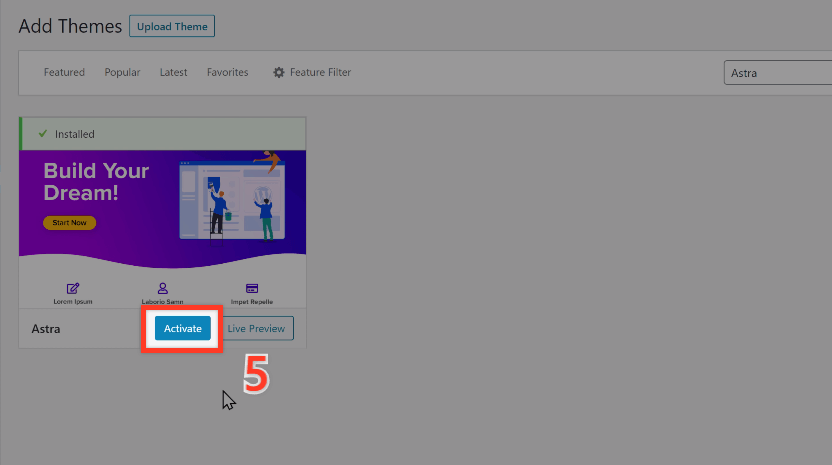
Once you have installed this theme, you will be able to choose from a wide range of website designs.
After the installation is complete, click on Activate to start using the theme.
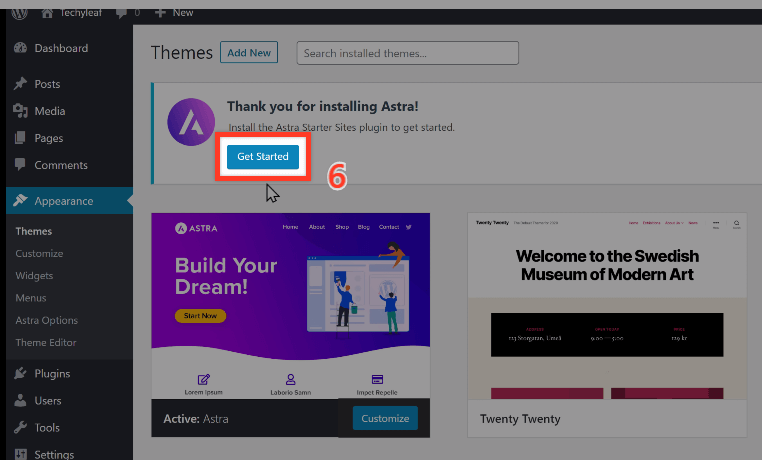
Now that the theme is installed and activated, let’s choose a design for your website,
Click Get Started.
On the next page, you will find a set of different Page Builders you can use to build your dream website. of all the page builders, we recommend using Elementor, as it is a beginner-friendly drag-and-drop website builder that has lots of built-in blocks that can help you add any feature on the website.
So, click on Elementor.

And here you will find different website designs which you can apply to your site. You can choose any design that you like.
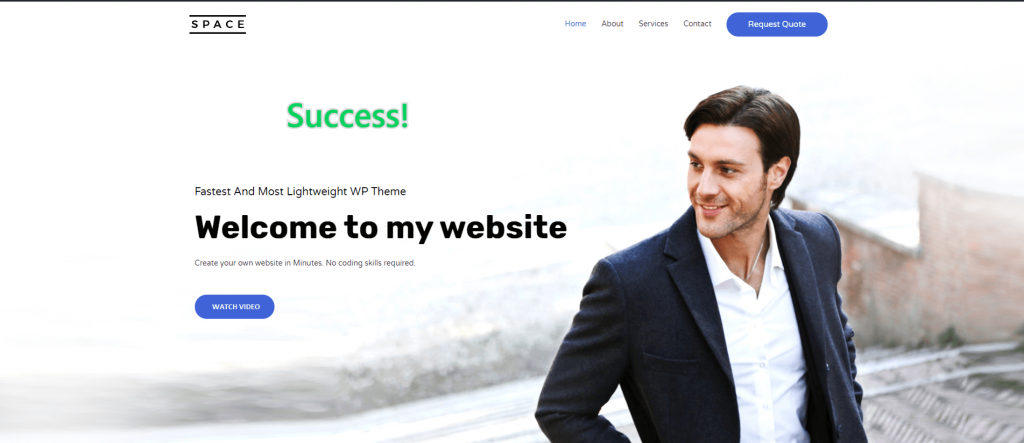
We are choosing ‘Digital Agency’ design.
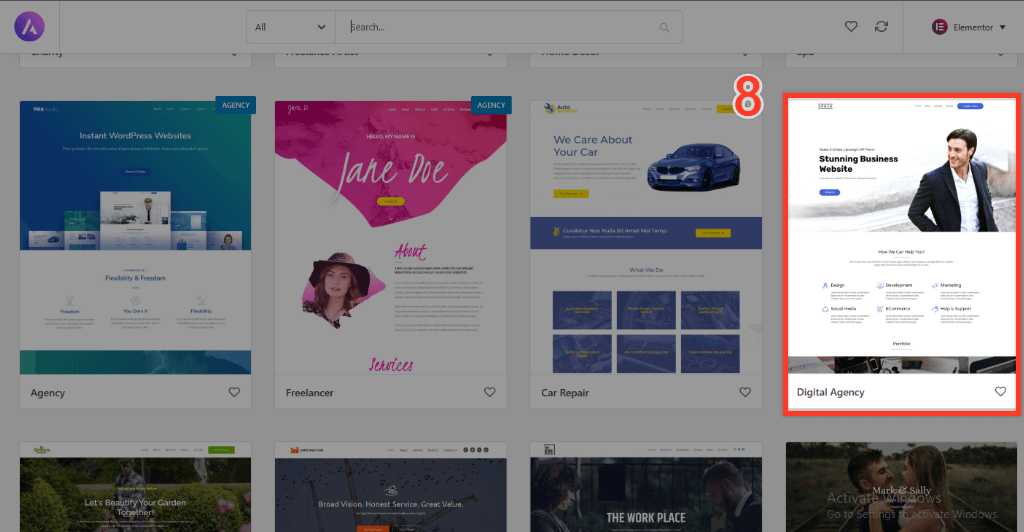
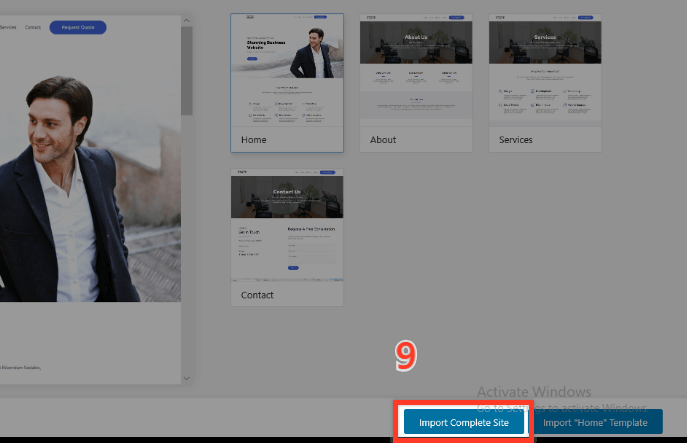
When you click on your chosen design, you will be able to see a preview of how your site will look. To apply this design to your site,
Click on ‘Import Complete Site.’
Click Import to start the import.
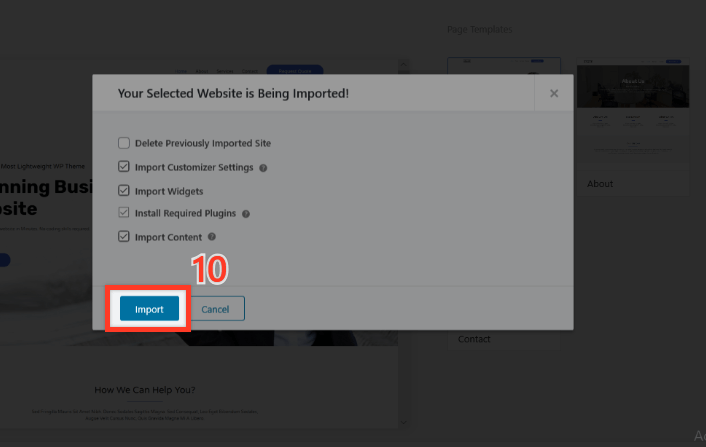
Do not close the window until the import is complete. Once the import is complete, click on View Site to see your website’s design.
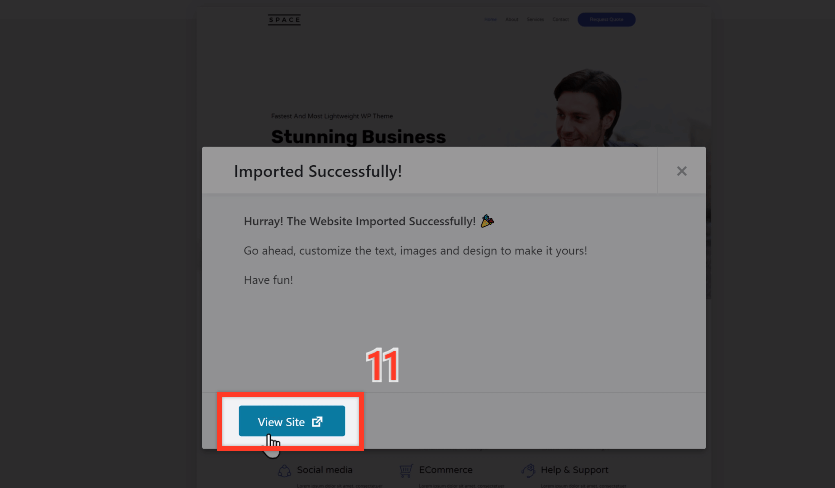
The complete website’s design that we chose will be imported to our website. This design has some sample content in it.

Now how do you change the content of these pages?
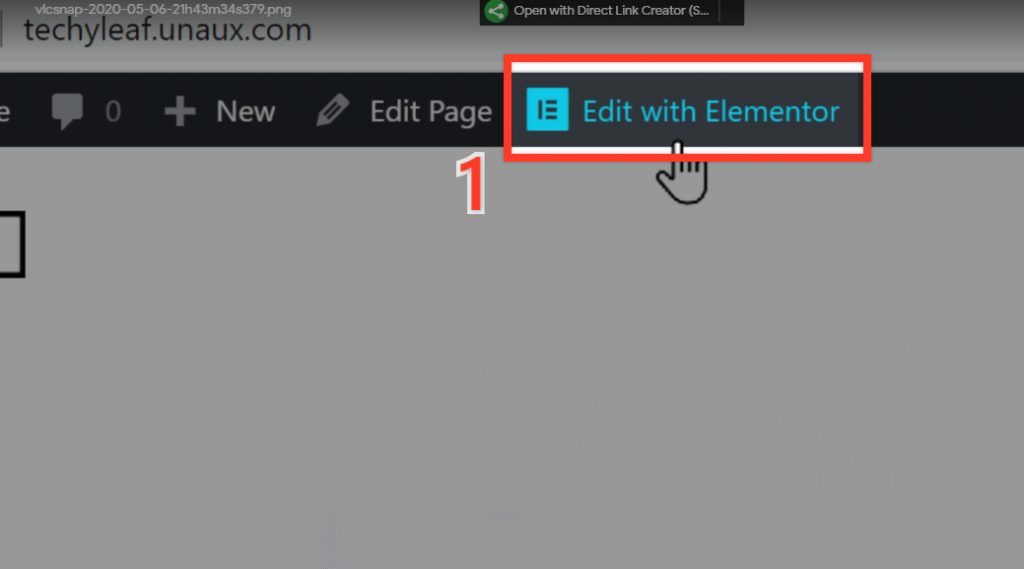
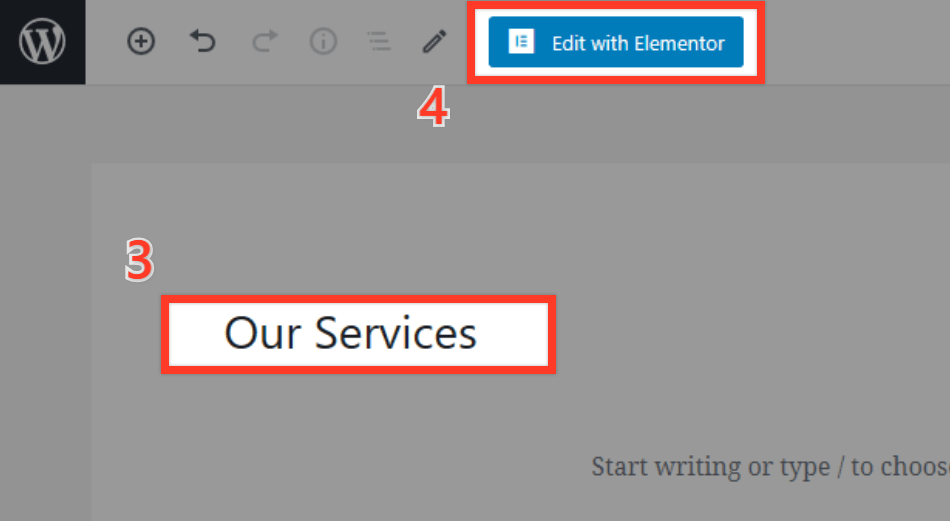
Now to edit the content of your website, all you need to do is enter the page in editing mode and work on it. As we are using Elementor Page builder, here we will choose to edit with Elementor.
So here we are going to edit the home page, so just click ‘Edit with Elementor’.
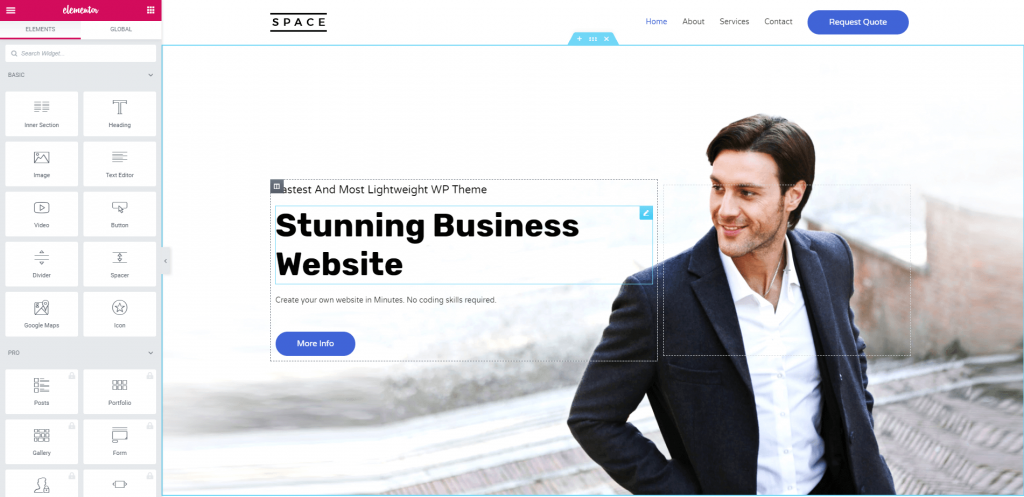
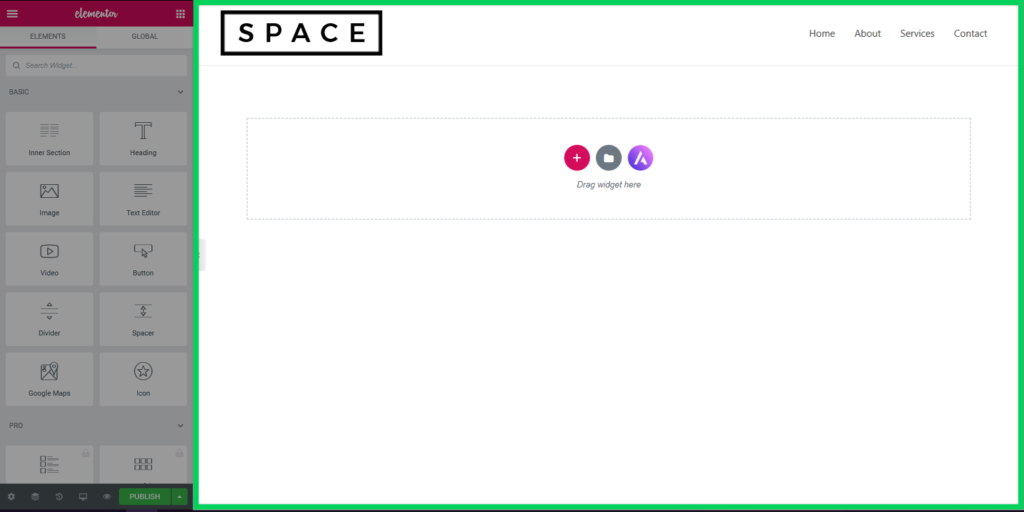
You will be taken to the editing section as shown below.
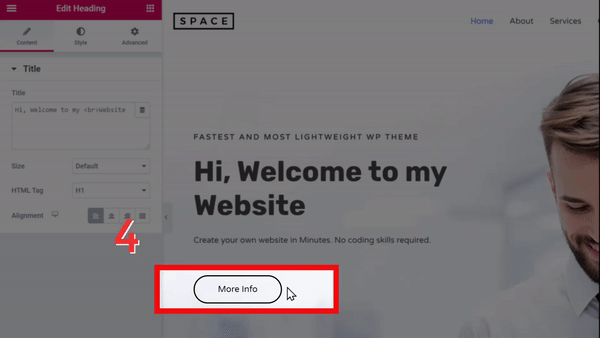
You can edit any element on the page. For example, if you wanted to edit the main heading.
Select the heading text, and you can simply rewrite the text as you wish.
Next, if you want to change the text on the More Info button,
Again, just select and edit it.
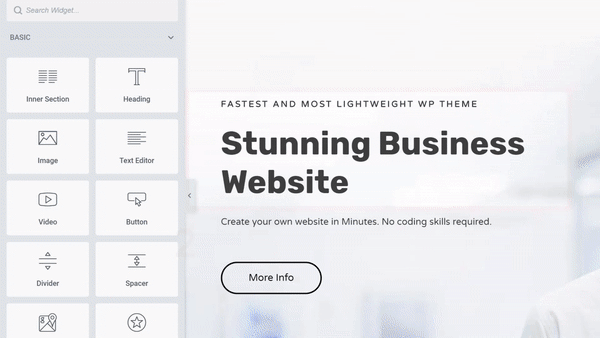
You can edit any text you want in the same way by selecting the text and then start typing. This method works throughout the site.
Let’s try and change an image. Again, all you have to do is click on the picture, and then click on the image on the left side over here.
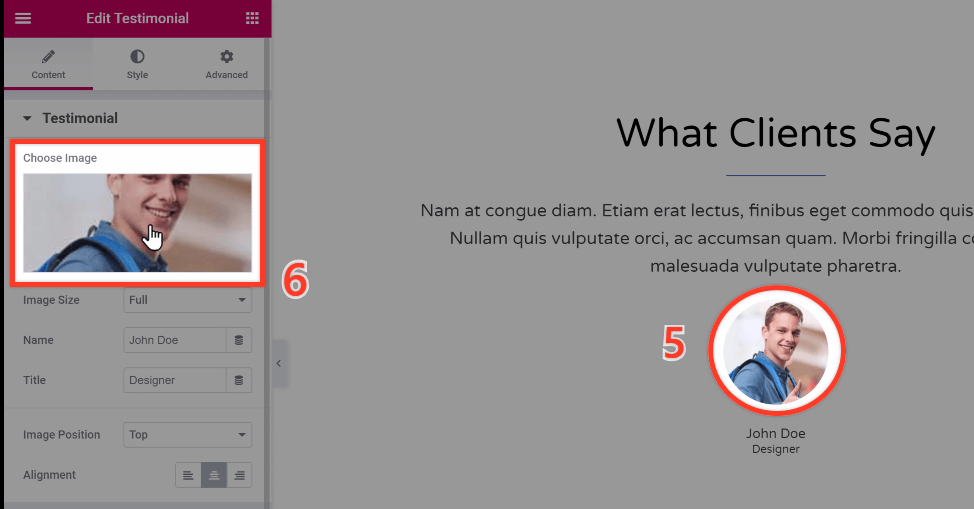
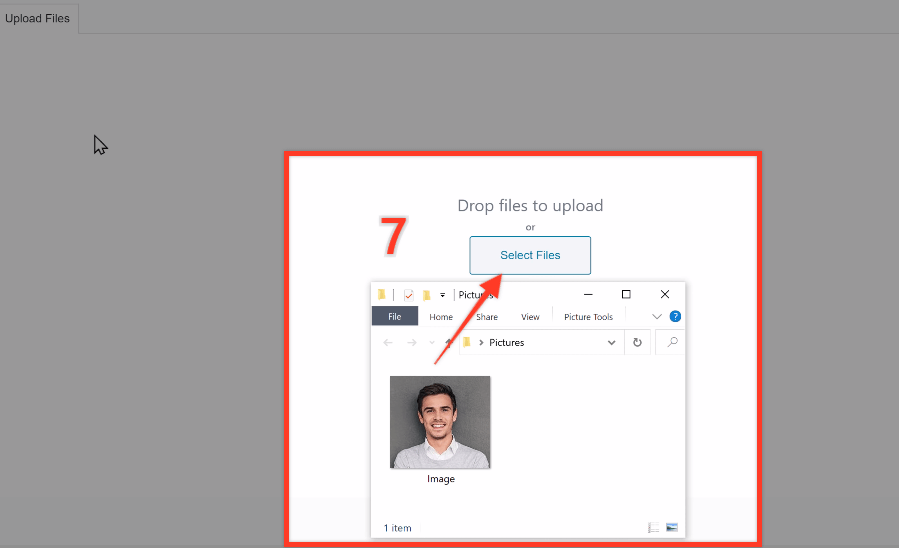
On the next screen simply drag and drop a suitable image from your computer.
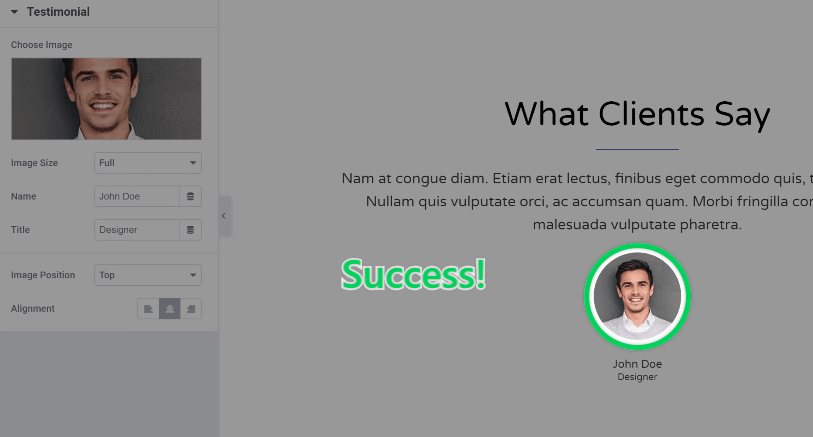
As you can see the image has been changed.
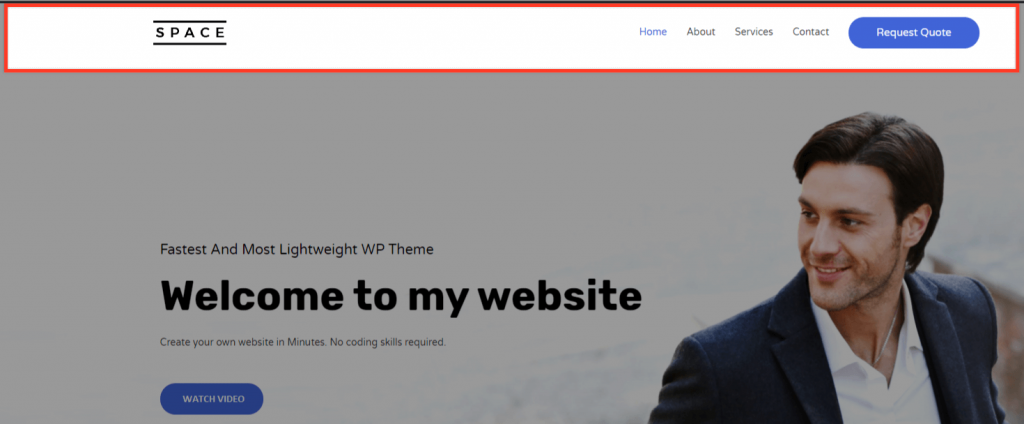
Now once you’re done with all the changes, just click Update.
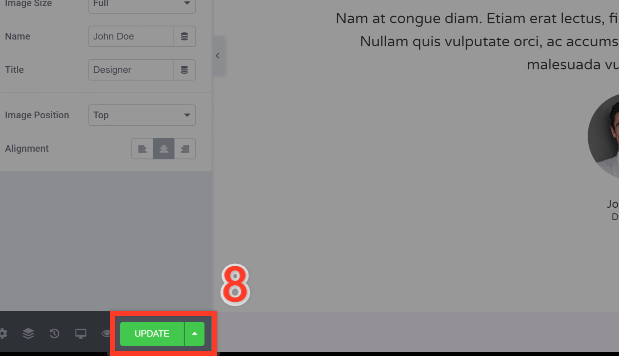
Now if we go to our site and click refresh, you can see, all the changes are here.
So now you know how to edit any page on your website.
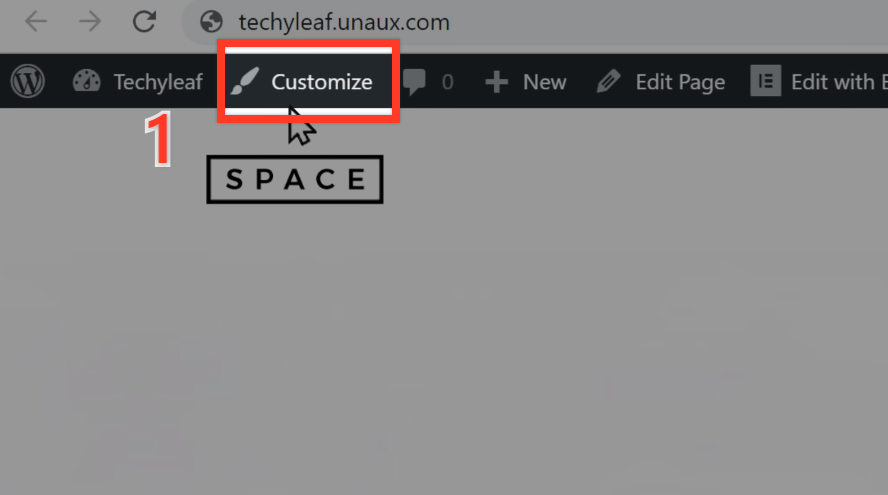
Next, we are going to see how you can change the header area of your website.
To change this area, you need to select Customize.
Once the customizer is open, you will see various blue icons next to the sections. If you want to change any section, just click the blue icon next to it.
For example, if you want to change the logo, click the little blue icon next to it. This will open the logo customizer and you can change your logo from here.
Once you are done with the changes, click Publish.
And if you go back to your site and click refresh, your changes will be made on your website.
Now that you know how to edit a page and change the header of your website,
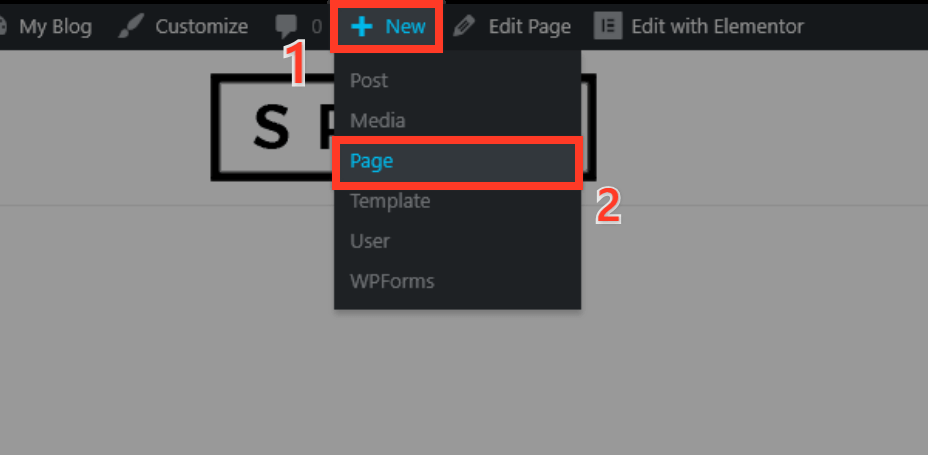
What if you want to add a new page to your website?
Well, that’s easy too!
To add a new page to your website, just go to New and click Page.
Let’s say you want to create a service page for your website.
First, Enter a title. And then, click Edit with Elementor to add design and content to your new page.
You will be taken to a blank page in Elementor.
You have two options to create your page.
Option 1: Create your own page
Option 2: Using Ready-made Template
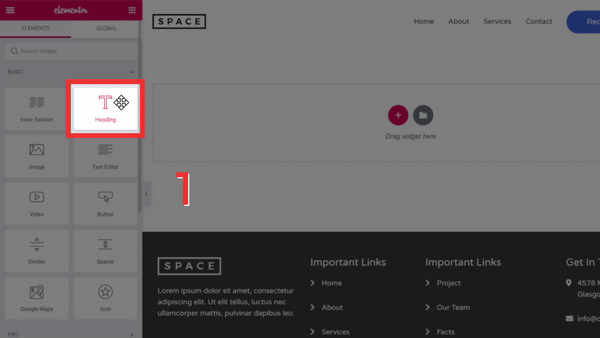
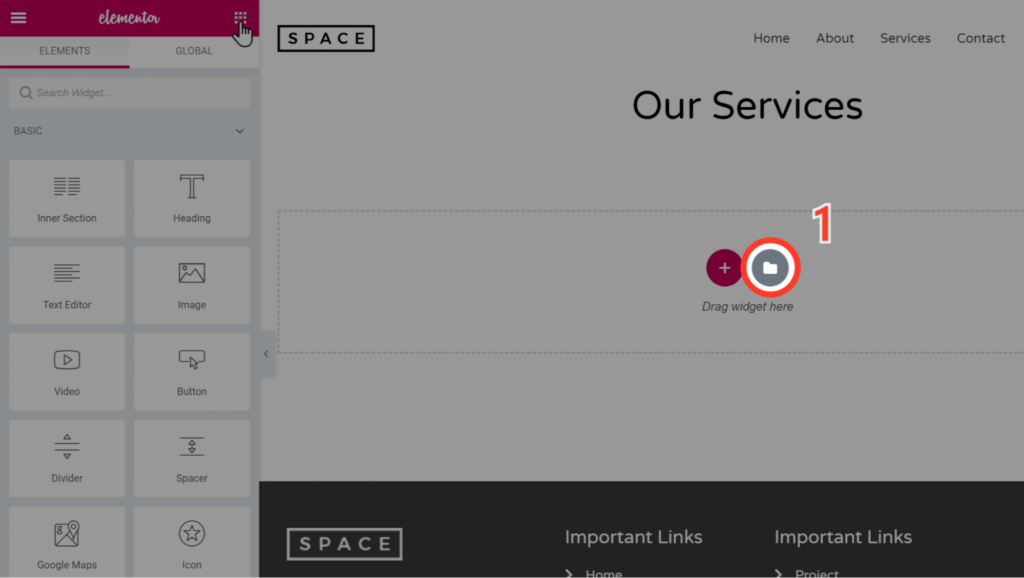
To create a page from scratch, You can choose from the elements on the left of the screen and then drag and drop them into the blank area.
So, let’s say, if you want to add a heading, you can drag and drop this element into the page.
And then, you can enter your own text.
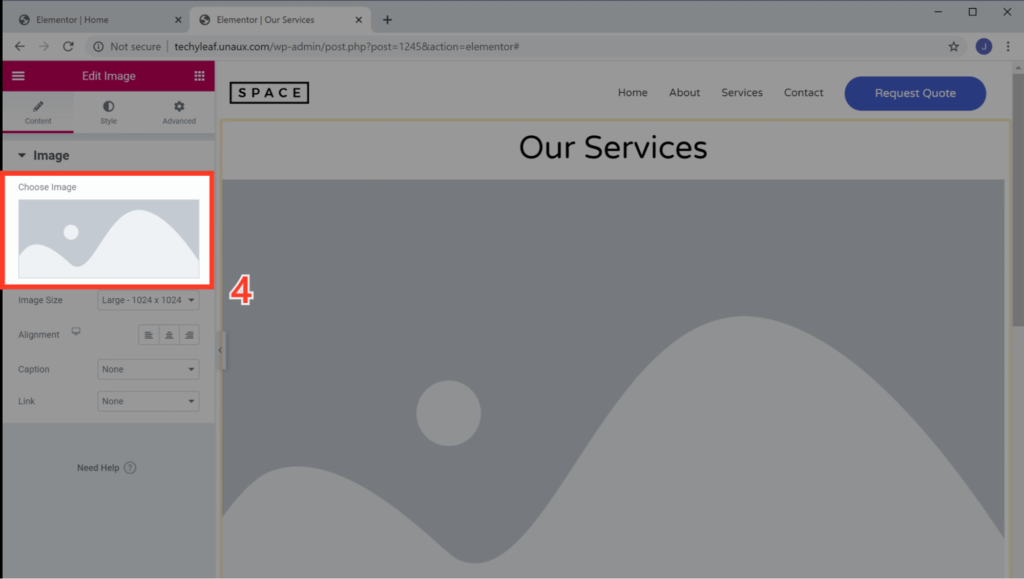
If you want to add an image to the page, drag and drop the image element from the left to the page’s working area as shown below.
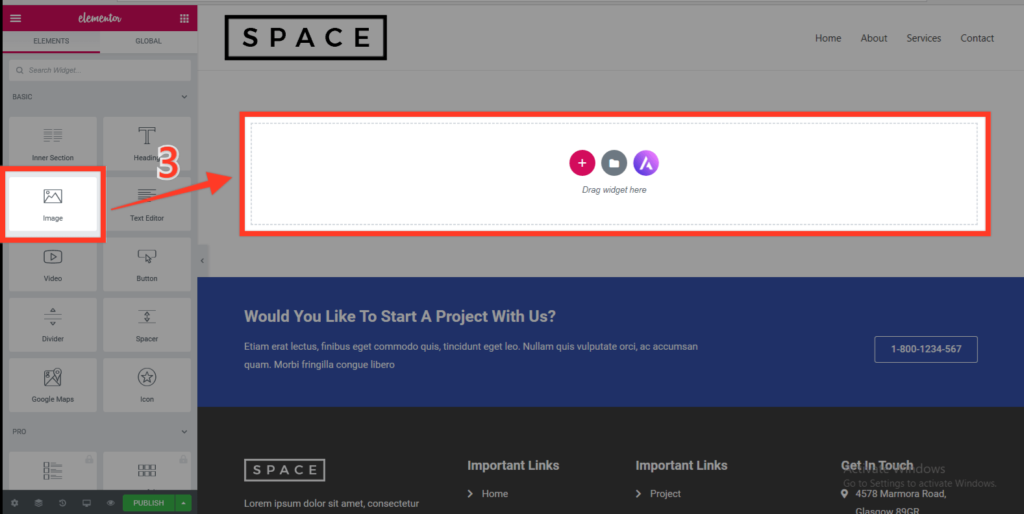
Once an image element has been added you can then choose the image that you would like to add by clicking on the Choose Image button.
In the above step, we saw how you could create a new page and add content to it.
There is an alternate way of creating pages, which is by using templates. Templates are ready-made pages that you can import into your website.
To create a page using a template, click on the add template button.
You will find several templates, as shown in the image below. If you like a design that you would like to import, simply click on the template.

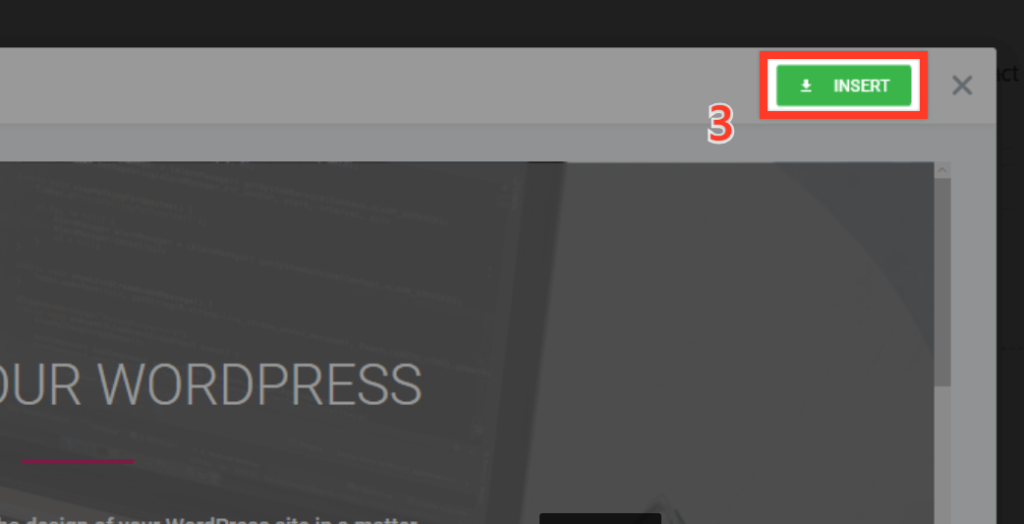
Once you click on the template, you will get to see the preview of the page.
Now to import the page to your website, click on Insert.
The template will then be imported into your website as shown below.
You can easily customize anything on the page by simply selecting it and changing either the text or images.
Once you are done with the changes, click on Publish.
You can then view the page by clicking on Have a Look.
Now as you can see we have our new service page here.
So this is how you can add a new page to your website.
Now that we have successfully created a free website, anyone can access your site by going to the website address.
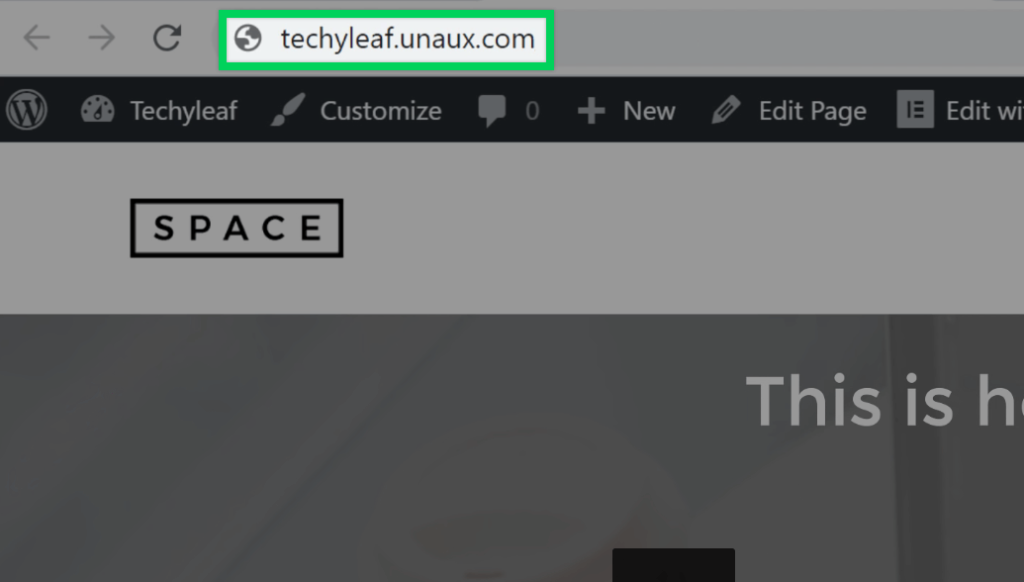
One of the major disadvantages of using a free domain name is that it is not easy to remember. For example in this tutorial our domain name is www.techyleaf.unaux.com
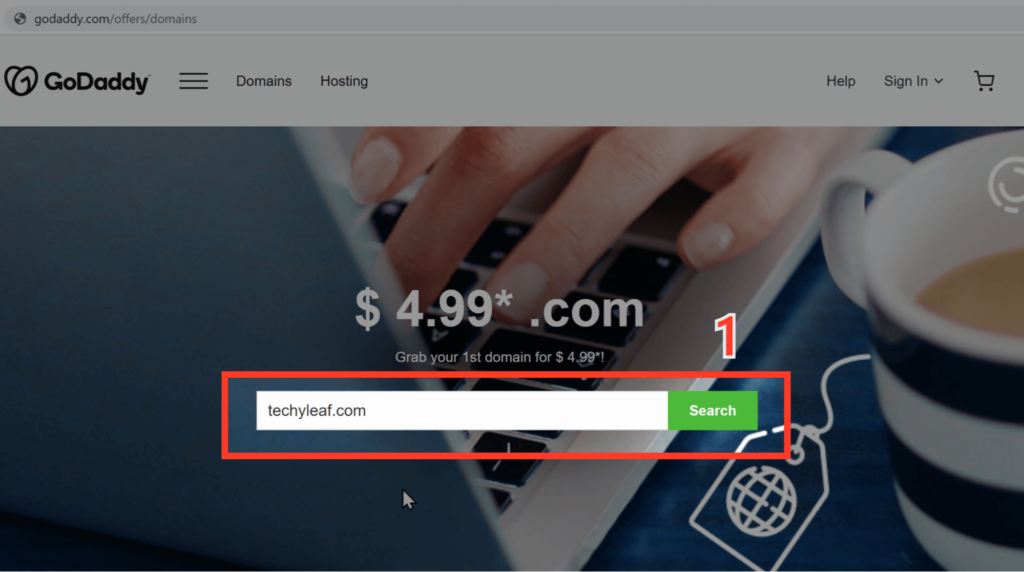
If you would prefer to have a unique website address let say www.techyleaf.com, you will need to purchase a.com domain.
Let’s see how you can buy a .com domain name. All you have to do is click this link which will take you to GoDaddy.
GoDaddy is one of the best hosting providers available in the market that we have chosen after carefully considering several hosting factors.
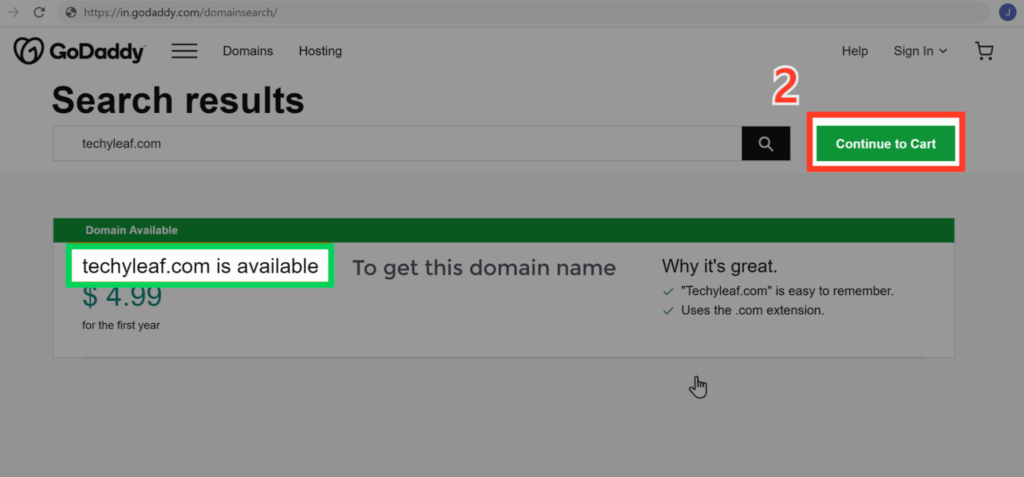
To get started, search for your domain name and click on search.
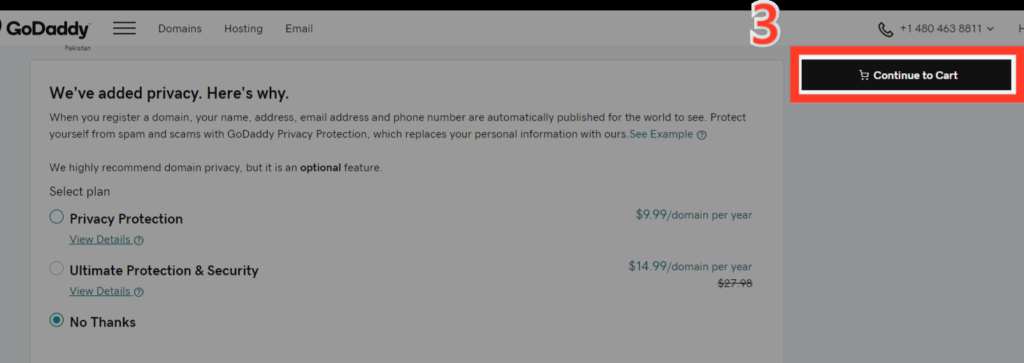
If the domain name is available, click on Continue to Cart.
Now you can choose whether or not to include GoDaddy’s Privacy protection, and lick Continue.
Now in order to get this domain name, GoDaddy will ask you to create an account.
Enter your details like Email address, username, and click Create Account.
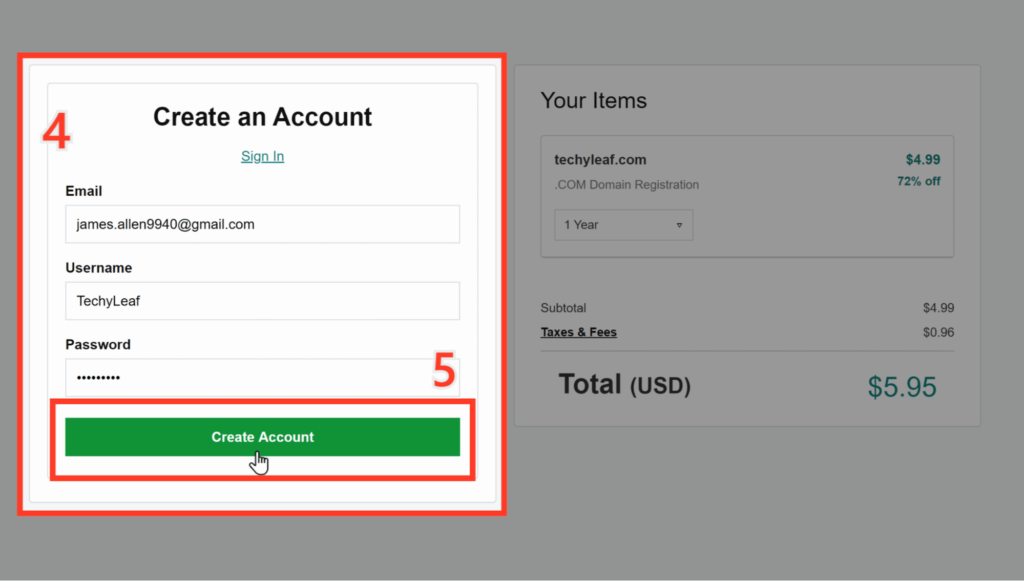
Now as you can see, we’re getting this domain for 1 year, which means once you make the payment, you will be able to use this domain for 1 year
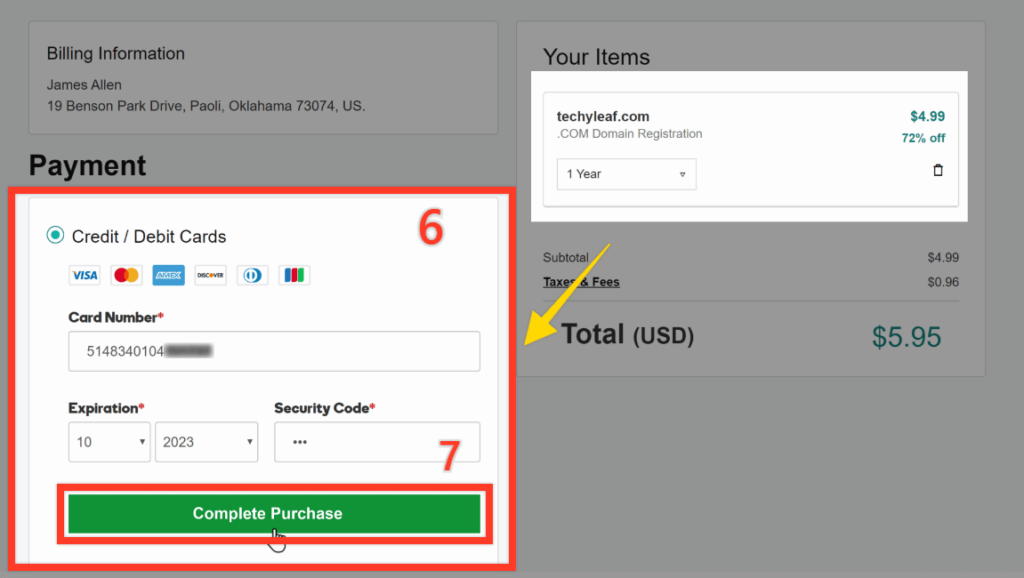
Now to get the domain, let’s enter our card details to complete the payment.
And click Complete Purchase.
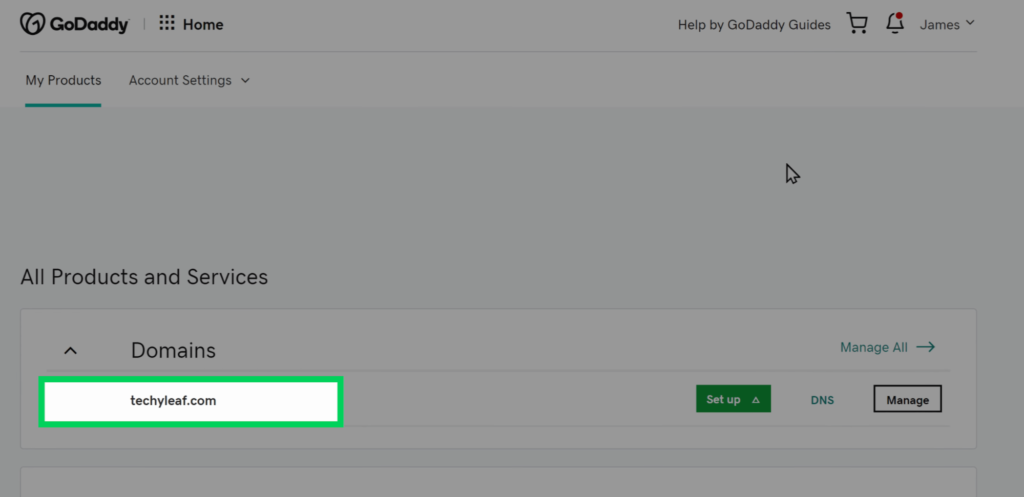
Once the domain name has been purchased, on the next screen, click on your name.
Here, click on My Products.
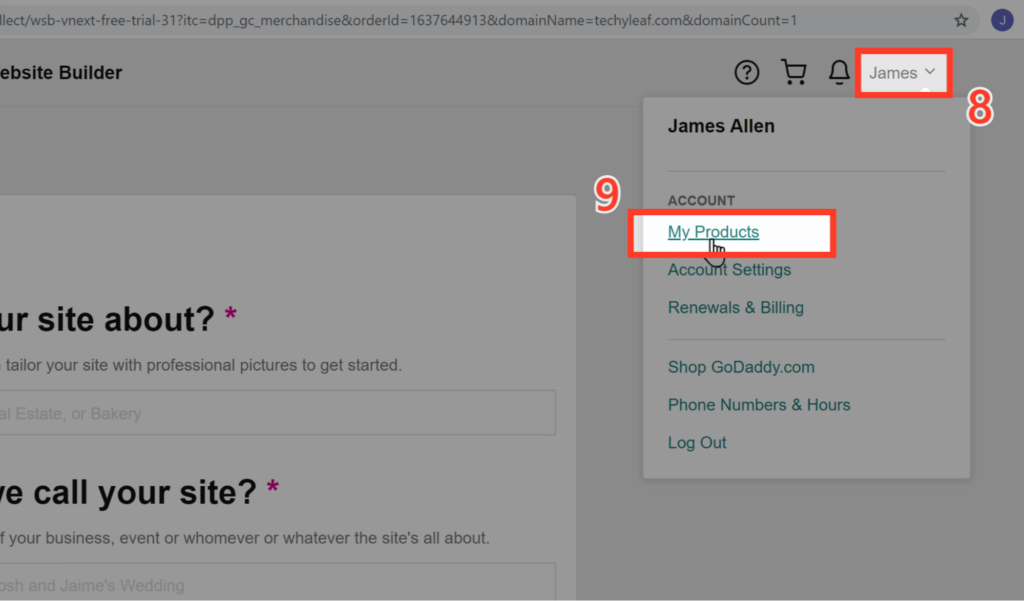
You will see that the domain is now listed under your account.
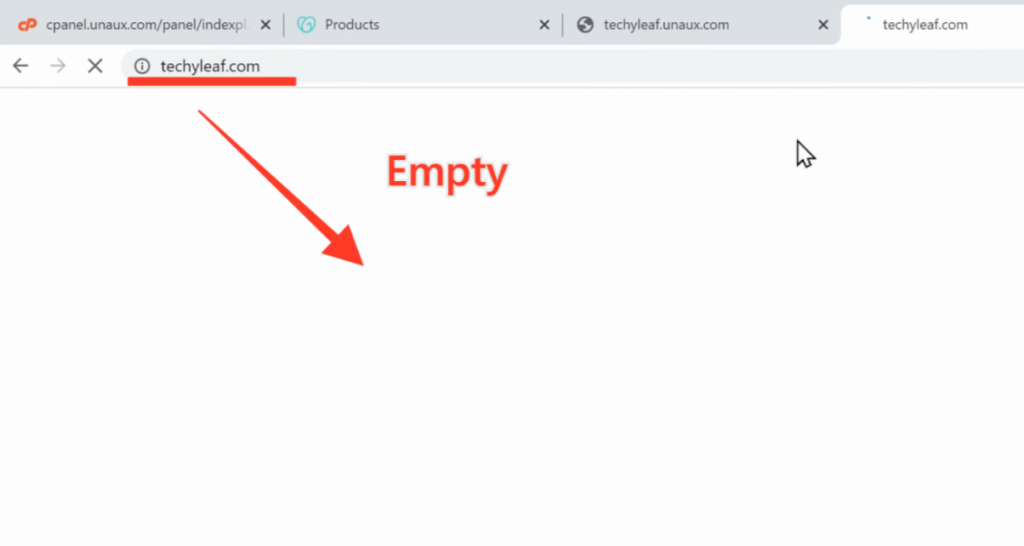
Now if you go to techyleaf.com on Google, you can see that it is empty.
Moving your website to a .com domain is pretty easy and can be done in 2 simple steps,
To add your domain to profreehost.com, open your Profreehost cPanel.
Under domains, click on Aliases.
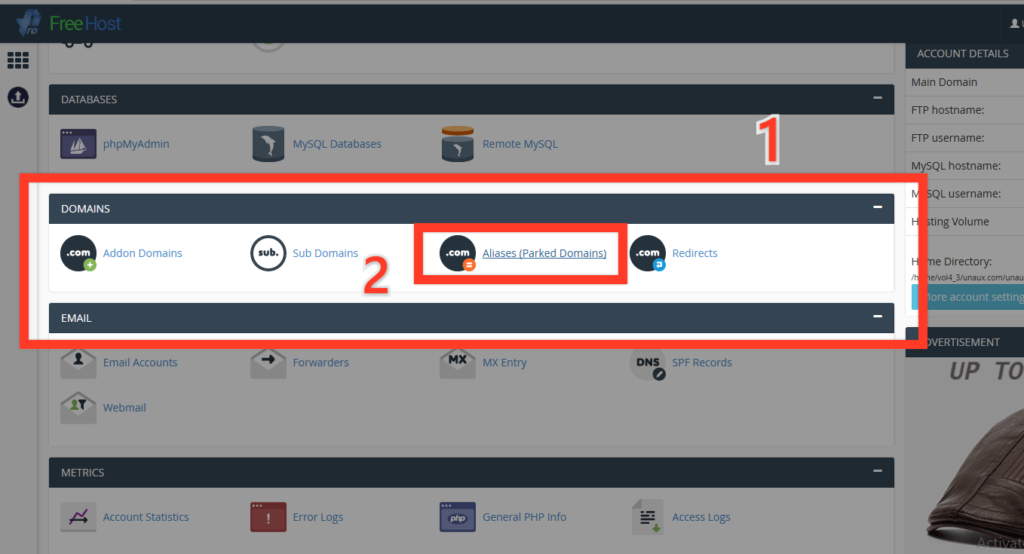
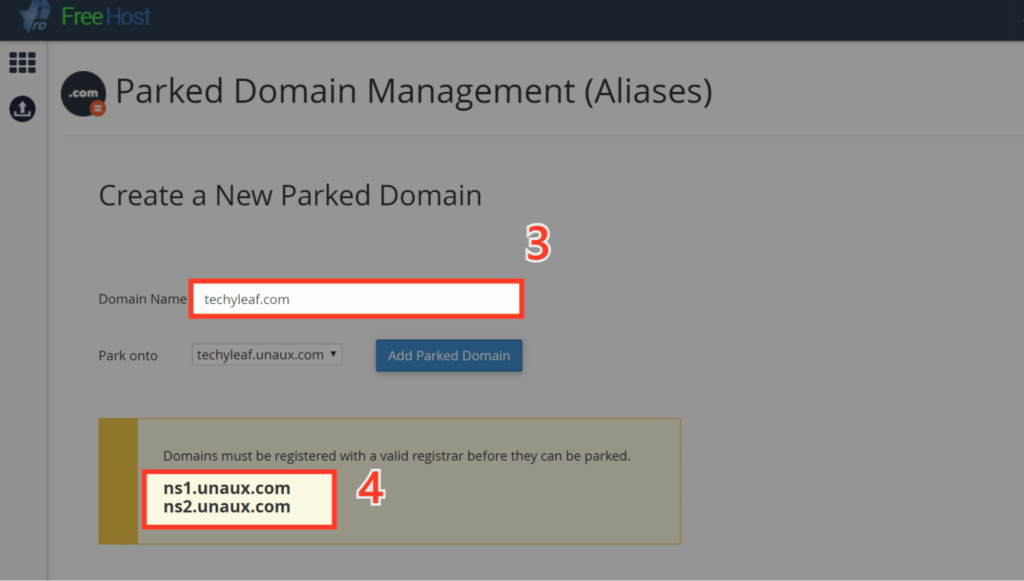
Now enter the domain name that was registered with Godaddy.
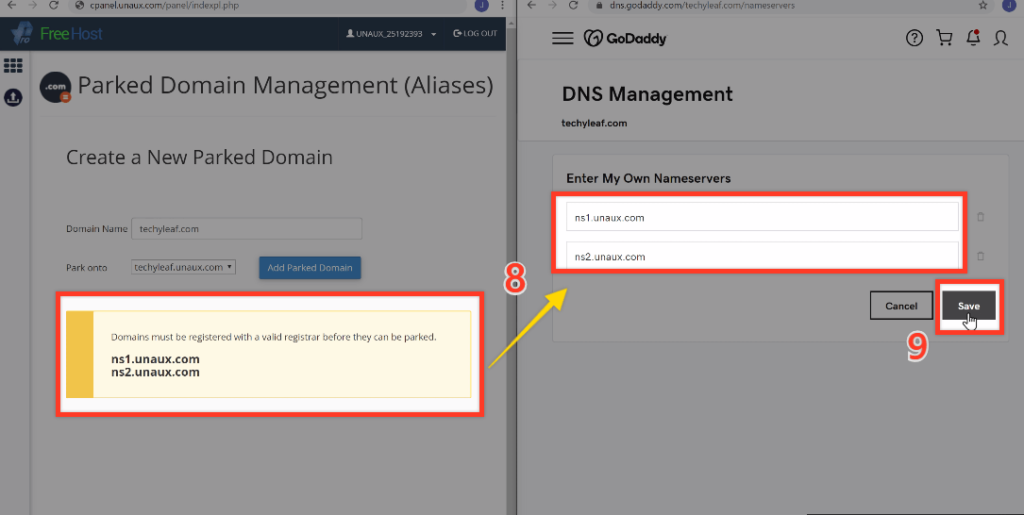
Now to move your website to the new domain you need to add these DNS addresses displayed in GoDaddy.
So, let’s copy the DNS servers.
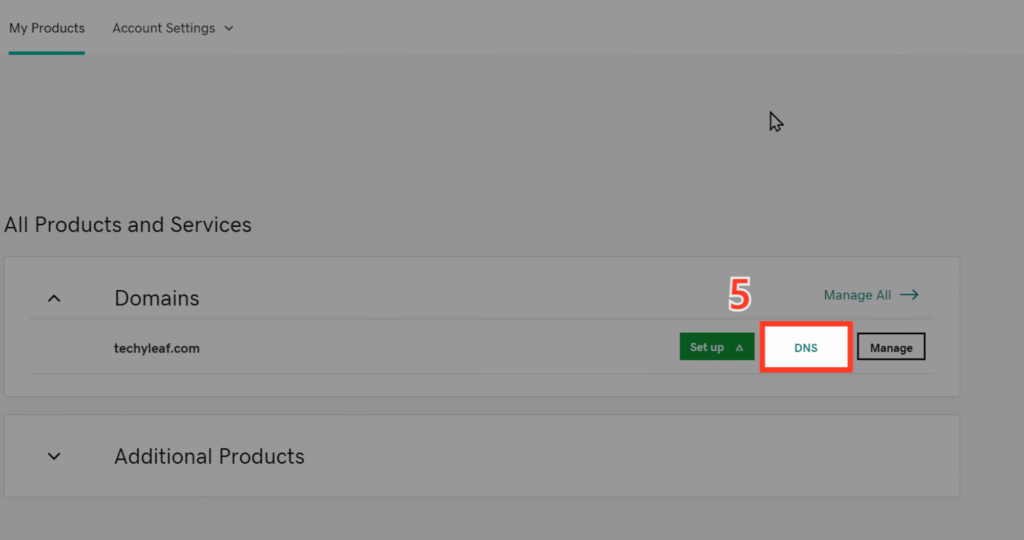
And then go to GoDaddy,
Click on DNS.
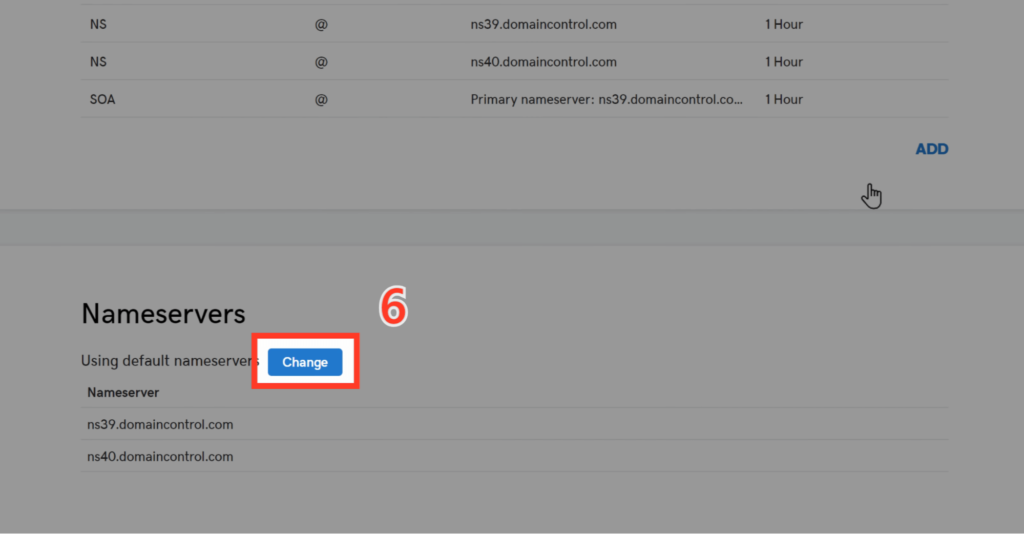
Then scroll down and go to nameservers and click Change.
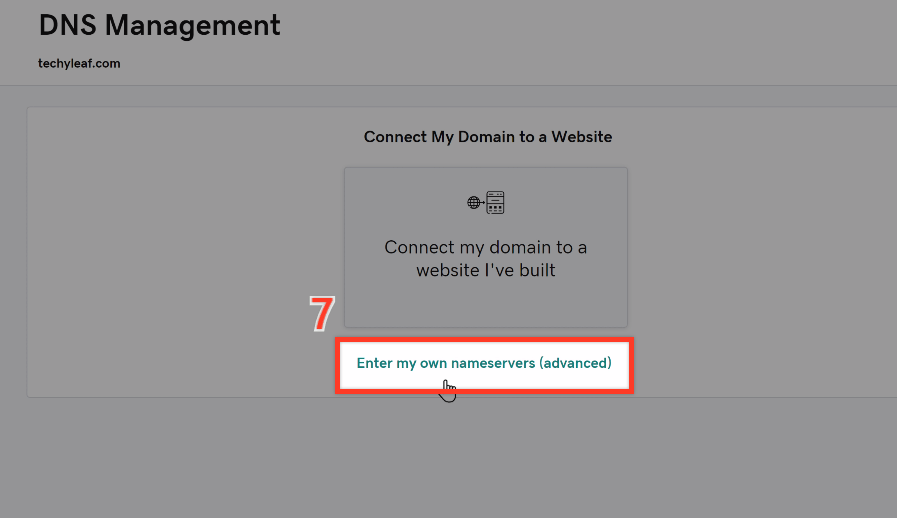
Click Enter my own nameservers (advanced).
Here, paste the copied nameserver details into these two blocks and click Save.
You have now successfully added the nameserver details. Once you’ve added, these details go back to your control panel.
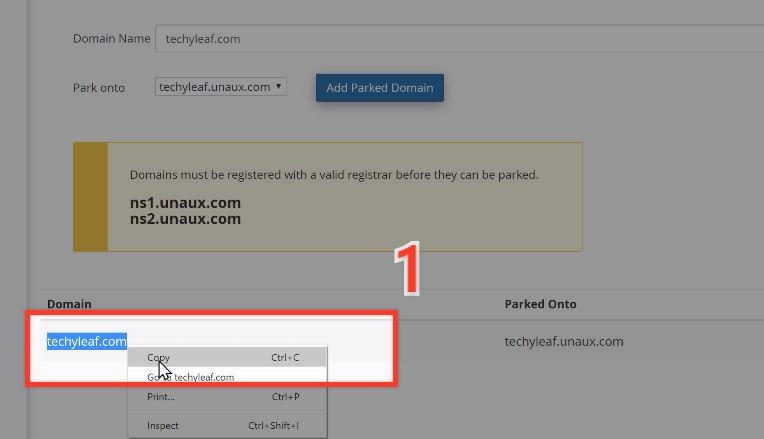
Now, click Add Parked Domain.
As soon as you click this button, your new domain will be added to ProFreeHost.

To move your website to your new domain, you need to add your domain to WordPress.
To do this, simply copy your domain name.
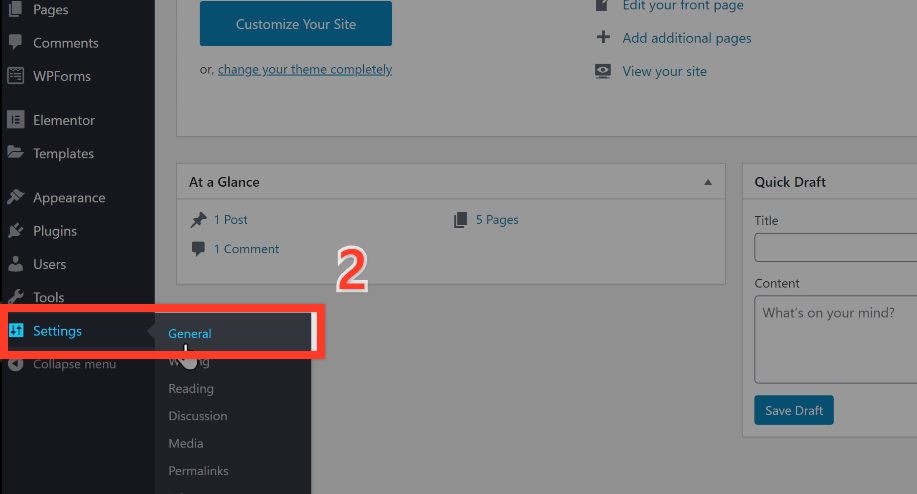
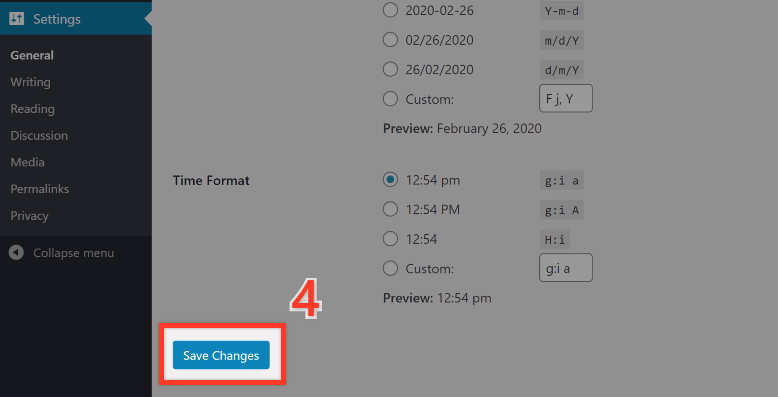
Now go to your WordPress dashboard, select Settings and click on General.
Here you can see the free domain which you selected in the beginning. This needs to be replaced with the new domain name from GoDaddy.
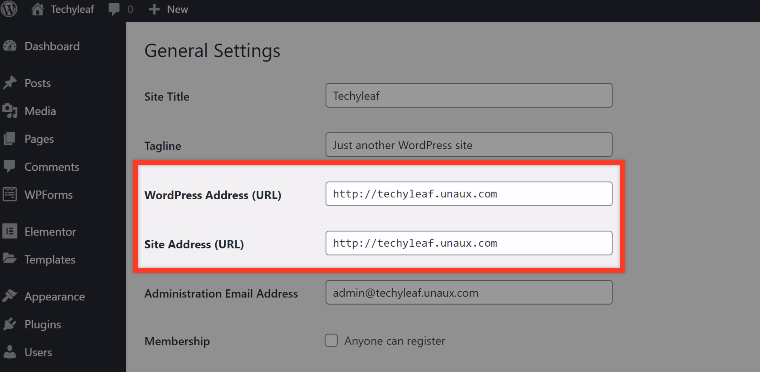
Simply paste your new domain which you have copied earlier, into both the WordPress Address and Site Address boxes.
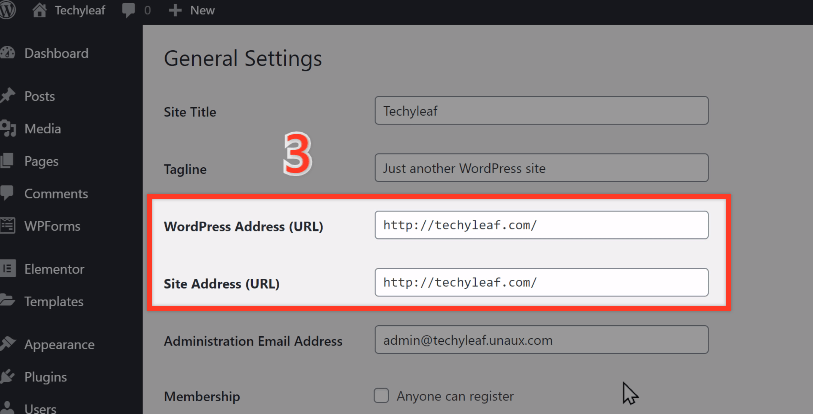
Scroll down and click Save Changes.
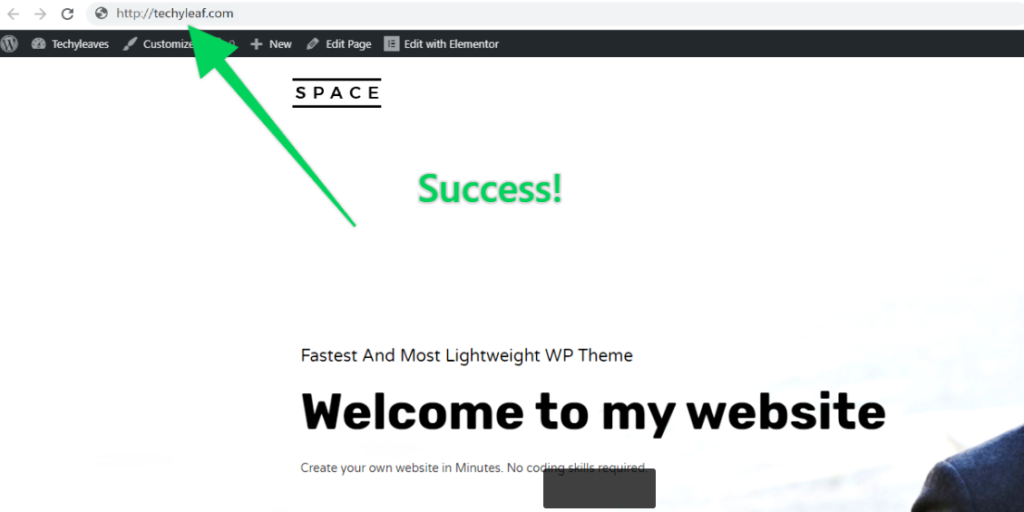
As soon as you click save changes, your website will be moved to your new domain, and your website will be ready to receive visitors.
Now, let’s take a look.
Go to the tab where your new domain was showing a blank site and click Refresh.
That’s it, guys!
As you can see, we’ve created a fully functional free website on WordPress. Here is a video tutorial on the same for you to follow along,
Though a free website is great, to begin with, it is not advisable in the long run. So, you can upgrade to a .com domain using one of the hosting providers like GoDaddy.
Now that you have created a WordPress website on your own, check the 7 important steps that you must do after launching a WordPress site.
And if you are still sceptical about WordPress, here are 7 Reasons why you should use WordPress. If you are confused between WordPress.com and WordPress.org, check our blog on Wordpress.com vs Wordpress.org to know the differences.
For regular updates on more such WordPress tutorials, subscribe to our YouTube channel.
You can create your own free website by following this simple step-by-step workflow,
1. Create an account in ‘profreehost’
2. Get Your Free Domain
3. Install WordPress on your free domain
4. Log in to your website
5. Choose a design for your website.
6. Edit the content of your website
7. Add a new page to your site
Yes, you can use free web hosting when you’re new to WordPress and want to learn within a budget. But if you’re making a website for business or for professional purposes always go for a paid hosting provider.
As a beginner, you may be confused to choose the best hosting provider, as there are a lot of companies that provide reliable and better security. That is why we came up with the Best web hosting providers for 2022.
Instead of importing a complete website design, try to import the pages of the website’s design that you chose one by one to get the entire site imported without any issues.
Do you want to learn WordPress to build any kind of website you want? Then this is the only course you need to take.
View CourseSEO isn't as difficult as you might think. Learn how to start growing organic traffic to your website with our easy to follow video .
Watch VideoSign up for our WordPress Course today!
12 Comments
Leave a CommentSatyam Patel
Awesome,
I want to create a website like https://sarkarinaukarisearch.com/
on wordpress, How can I create website like this on wordpress?
Swarnarajan
Hi Satyam Patel, Check out https://www.youtube.com/watch?v=PQaB0HDdTTg&t=6s to learn how to create your own website with a unique domain.
Also, we can help by creating a website for you. Feel free to drop an email with your requirements to [email protected]
August Gongalez
you are really a good webmaster. The site loading speed is amazing. It seems that you’re doing any unique trick. Furthermore, The contents are masterpiece. you’ve done a great job on this topic!
Haley
It’s terrific too see a helpful article of some true value to me, as a reader.
It is actually going on my list of criteria I need to emulate being a new blogger.
Some good thoughts; you have most certainly made it on my list of people to watch!
Continue the excellent work!
Well done,
news now
Thank you for this post, it has been very helpful to me! Way better written than anything else out there.
Karthik Tatikonda
We are glad that this blog helped you, Vanderbeek. 😁
Alton
Everything iis very open with a very clear explanation off the challenges.
It was truly informative. Yourr website is useful. Thank you
for sharing!
Karthik Tatikonda
We are glad that this blog helped you, Alton. 😁
Pramila
Very useful article for person who wants to build his or her own web site for free
Karthik Tatikonda
We are glad that this blog helped you, Pramila. 😁
School Log
Thankyou so much Menaka for briefing us so well about how to create a website step by step in so much detail. It helped me a lot. Thankyou so much for writing this. Keep writing….best of luck !!
[email protected]
We are glad that this blog helped you. 😁